


 Reply With Quote
Even without its clothes, that SAAB still looks pretty.


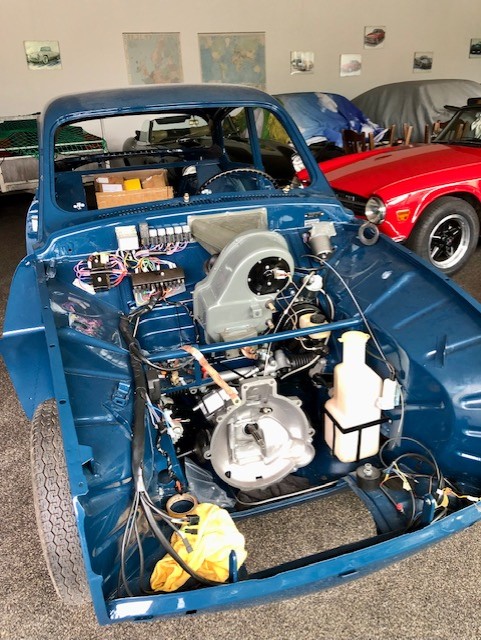
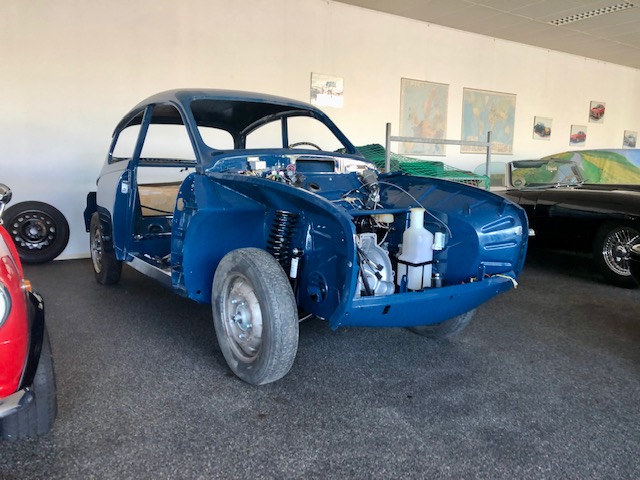
A lot has happened since I last posted pics of the Saab. The wheel bearings are installed, so the car is on its wheels now. Lots of progress on the bespoke wiring loom. The gearbox from a well-respected 'box builder was leaking like a sieve when the oil was poured in... A leaky seal was the culprit. Thankfully, the clutch and engine are still on the work stand, so pulling out the 'box and repairing it was relatively easy. (And then the discussion with the supplier starts... grrr).
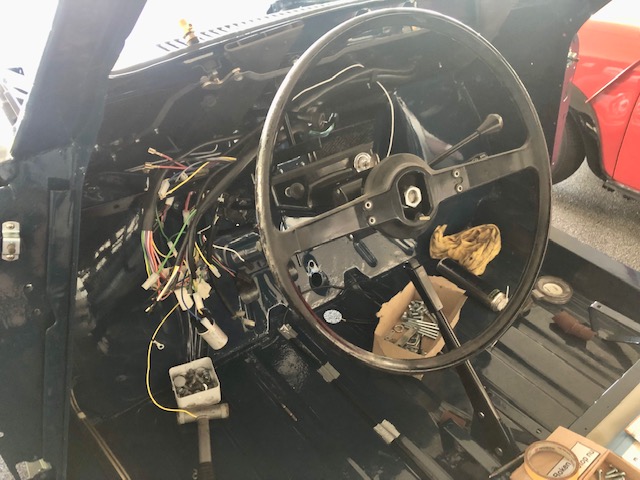
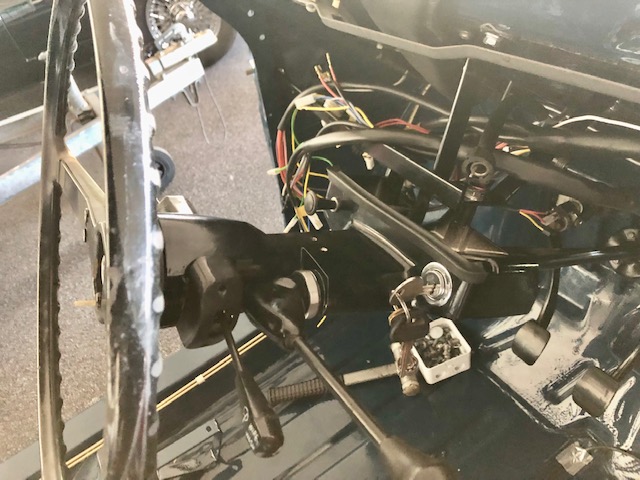
One of the mechnanics dismantled the complete steering column. That is pretty intricate in a Saab 96; gear shifter, steering and ignition lock work together. 'Work' as in: when it's brand-new... Removing the lock cylinder was a lot harder than the Haynes' manual tells you. Even when you've fabricated the correct tool! After a lot of fiddling and some interesting name calling(...) the lock came off the steering column.
The column was sent to the powder coater for a brand-new look. But not without two tapped holes! (You see them on top of the column, right behind the wheel). Many Saab 96 owners have a separate rev counter mounted on top of the steering column and all are mounted pretty fiddly. Basically, there's nothing to attach it to! Now, with the bolt holes, it's easy to install a rev counter and a base.
Then the Fiat. A 600. Brilliantly painted and in very, very fine condition. It's in for a simple service. The owner has installed an odd-looking steering wheel. I think that the logo on the wheel is from a clone that was built behind the Iron Curtain.

Last edited by thieuster; 18th February 2023 at 21:14.


Even without its clothes, that SAAB still looks pretty.
It is! And the engine that's going to be installed is an interesting one. Normally a modest Ford Cologne V4, 1500cc, 65 DIN hp with a simple FoMoCo carb. In this one, an 1850cc V4, 90 DIN hp with an double Solex carb. Adding nearly 50% to the hp will make a difference!Originally Posted by Filterlab

Saab once used to publish 'How to' manuals with drawings, parts / parts# you needed to prepare your car for serious rallying like the Swedes and Fins used to do. Those manuals resurface from time to time and the engine builder has copied one of those engines. A 'stage 1'; other stages needed a different camshaft and some 'stages' even needed at least a different inlet manifold for big @ss Webers and different pistons! Those engines' hp output was 100% more than the original...
And yes you need a stronger g/box as well. The original g/box was in use since the days of the two stroke engine. It was never upgraded when the V4 arrived. Needless to say that they broke down when transferring the power to the wheels. The original g/box is fragile. Every box I know has a whining noise in 2nd gear. All my 96 had it and now my 95 has it as well. I once asked the dealer: "What can I do?" His answer was clear: "Turn up the volume of the radio!" The rally 'boxes have stronger synchromesh rings. (And more).
Those pre mentioned FoMoCo's were a crappy product. And the auto choke made it worse. Post '76 (or '77) cars had a double barrel Solex with different manifold. I produced 5 whopping hps more! Easy to recognise with the V4'Super' badge... 99% of the FoMoCo'ed Saabs now have a hand-chocked Weber 34 ICH. It's a fit-and-forget product. Together with electronic ignition, the best upgrade you can imagine in any Saab V4.
About the Fiat: we re-parked the car this afternoon and the Cyrillic-like word on the steering wheel turned out to read 'fiat' in a neon-letter-style font...
Last edited by thieuster; 17th September 2022 at 18:18.
Cracking engine, and given the weight it should nip along nicely. What gearbox do you have for it?
Saab's gearboxes for these cars was always the 'Achilles heel'. Basically, it was the same box during all years, including the years with the simple, not so powerful two stroke engines... Later on, there were upgrades and stronger internals. This box is sold to the owner of the car as an uprated, stronger box. We'll see!
One of the mechanics is busy putting the Saab 96 together. My car is a 'how to' for some parts. Mine is 99% original and therefore a great example. To give you an idea: originally, Saab put some sort of 'painter's tape' around the air hose between the heater and the bulkhead. All cars had it, including mine. We discussed the (re)use of that tape in the 96. Stuff that you won't see when all's mounted again.
And we had a lengthy discussion about the color if the heater housing... it's a greyish color. There was a local car painter who runs a spot repair business. He comes with his van to your address and removes small dents, repaints scratches etc. He has a nifty device that he puts on a color and it 'tells' you what the color is. The guy was at the workshop the other day and he tested the heater housing of my car and Alan took the old heater housing to the powder coater with the correct RAL color. It's now back with the correct coating.
Next up is a new fuel tank for the 96. The current tank is filled with rust particles. When you shake the empty tank, it's like shaking something with sand in it... My 95 has a differently shaped tank.You can buy new alloy tanks for them. The 96's tank is higher but less 'boxy'. Somehow, they're not available off the shelf. A local company that builds agricultural machines is willing to weld a new one from an alloy sheet. I guess that it's about 500 euros all in. But then you never have to worry about contamination inside the tank.
Interestingly, it's time to adopt something we read about on the TR forum! Years ago, someone mentioned the trick of painting the back of the dashboard in a light (white or grey) color. That way, working behind the dash is easier when you shine a torch while working. I once told the mechanics that trick and all cars that they've done since then, have a white dashboard back!
Here you go! The odometer is not turned back to 0.0, because it's a one-owner-since-new car and the owner "... picks it up again where he left off many years ago!"Please post pics and updates as the Saab progresses, memories of my dads when I was a kid. He loved that car as did I.
The airbox above the dash has nothing to do with the Saab.
Last edited by thieuster; 28th September 2022 at 15:02.
On request: a bigger pic close-up of the dash gauges.
The odometer is in kms. Back then, most of the V4 engines in those Saabs needed a rebuild around 100k kms. This car will receive another, tuned engine. The original engine hasn't been opened (yet).
I know of one, mid 70s Saab 96 that has done close to 800,000 kms (!!!) Mind you, it has been restored 3x by now. The owner is a big, big Saab fan. It was his first Saab back in 1981. And he has kept the car all those years. Over the years, he has become one of Holland's leading Saab specialists with tons and tons of parts for these cars. Restoring is for him an 'off the shelf' job.

Last edited by thieuster; 29th September 2022 at 10:45.
I hope that I do not annoy people with (ir)regular updates on the Saab. So here a few pics of the engine.
The owner of the car managed to source a tuned 1700cc engine. Back in 1974 and 1975, Saab launched a special edition of the Saab 96, the so-called 1700s. The US version of the 96 already had a de-tuned (lower compression) 1700cc engine from the early 70s. Other markets had the 'standard'. Cologne Ford 1500cc.
Saab built 150 cars with those specs, but there's a rumor that 58 cars were built for the UK market. All cars were bright orange with black trim and striping (striping makes every car go faster!) and so-called 'soccer rims'. Finnish blogger Tommi Järvinen writes about these cars:
http://saabisti.fi/saab-96-v4-1700s-1974/#.Yz3cHC-QlZI
The tuned 1700 engine was the blueprint for a lot of 'cottage engineering': take a 1700 engine and tune it to 90hp is not the most difficult job. (Saab managed to get 150hp from the engine). And the engine that's going to be in the blue Saab is another example of a home-built 90hp engine. Saab applauded that: they even had a tuning catalog! Customers could get their hands on all parts, the same parts that were used by the factory for the cars of Stig Blomquist and Per Eklund (to name two famous drivers)
.
The whole job of rebuilding the car is making great progress. Lots of parts arrived: interior trim, s/steel bumpers from Vietnam (recommended), the final parts for the dash.
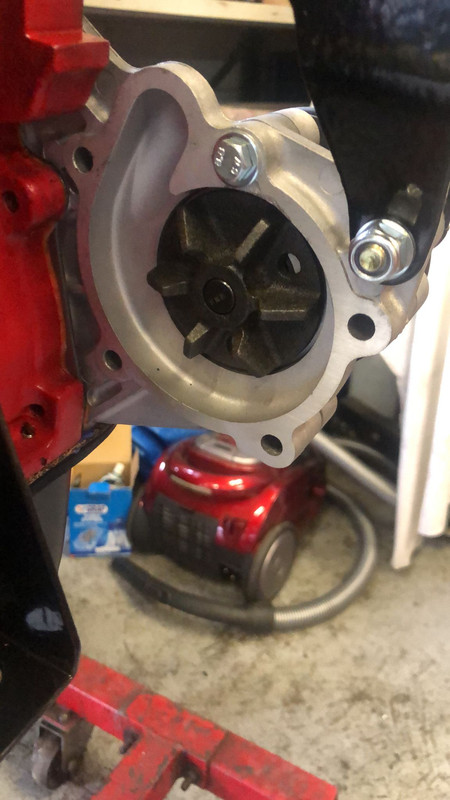
But first the engine. One of the mechanics opened up the engine, removed the heads and bottom end bearings and checked it all carefully. In good shape. He decided to replace the oil pump and the water pump. According to the tuning catalog, one does not need uprated versions of both. Just to be sure, the rear oil seal was replaced as well. Now is the time for that, without the flywheel in place. Timing gear is always a discussion point among Saab 96 owners... the originals were made of 'plastic' and tend to loose their teeth... The replacement / alternative is steel! But a lot more noisy than the original gear wheels. Since this is not going to be a quiet car, steel timing gear is a 'must' and it was already installed. The front of the engine is different from my car's: the 'trumpet' with the bearing for the fan is machined off and whoever built the engine has plugged the hole in the engine cover plate.
The outside of the engine should be black, but the owner insisted on red. All engines from the workshop are painted in a non-gloss finish. Or perhaps semi-matt. The reason? Leaks are shiny and easily spotted on the non-shiny paint!
Finally, the 'pipes' for the cooling. I know from experience(...) that the metal connections between the hoses (e.g. 90 degree joints at the back of the engine) tend to leak. So, these were carefully checked as well. And hey presto! The piping behind the water pump was brittle and after a short blast in the blasting cabinet, a 4mm round hole appeared! A new one is on its way.
So, the engine will be 'in' next week or so.
[/url]
[/url]
[/url]
Last edited by thieuster; 5th October 2022 at 21:03.

Never annoying, I look forward to these updates. Carry on.
Sent from my iPhone using Tapatalk
Keep it coming 👍

I really enjoy the updates too, thank you for taking the time to post them.
Fascinating
Sent from my iPhone using Tapatalk
Busy week, not only Saab-related.
Last week a few Jaguars (what else) came in with various problems. Repairing is not the problem, waiting for parts is. So the space where the cars are before they're repaired was totally crowded with cars. That's how the shop's inventory ended up behind my barn... car trailer, normal trailer and a frame for car restoration are now stacked and waiting to be returned. Storing customers' cars at my place is certainly not wise. It has to do with insurance and (well, first of all...) customers are not happy when they see that their car is not where they parked it in the first place!
I have considered putting my Saab 95 on the trailer and bring it home. But the fact that my car is next to the car that's being restored, saves the mechanic who works on the car tons of time. It's back and forth so to speak.
My car proved to be very useful for the installation of the interior. Saab built these cars with a sort of cardboard behind the pedals. Back then, the cardboard was insulated and is attached to the firewall with a sort of big plastic dots that crumbled when they were removed during dismantling. Guess what: the new cardboard is easily bought but far too large and it comes without the insulation!!! So it was a real DIY job: making the cardboard fit and adding fireproof insulation. Only then, it was clear that the 'dots' that came with the new cardboard would never fit with the insulation attached. In the end, one of the mechanics used a lathe and made new dots from alloy and spray-painted them black... That cardboard needs to go in first before the dash can be fitted.
After that, it was time to start working on the interior. And that's a difficult job and basically a big puzzle because my stationwagon 95 and the saloon 96 are really different there! My 95 is far more utilitarian: no soft padding on the B pillar, a totally different headlining.
Luckily, it was clear that the set-up of the interior near the A pillar is the same. That gave away the answer of that puzzle. So first, the padding and covering of the A pillars was glued in, only then the dashboard could be installed, with all wiring loom connectors connected. The small metal can you see under the dash is for the indicator lights. Saab used different types over the years. And this is not the right one... Luckily, removing and installing is easy. That relay has its own bracket behind the dash!
Now, one of the mechanics is busy glueing-in all sorts of soft padding before the official beige of the B and C pilllar lining is installed. The headlining has a lot of ribs that need to be addressed (position, equal distance...). A very tiresome job!!! The glue he's using is no ordinary glue! It's heat-resisting glue. The car roof can get hot and you want the glue to hold the roof and interior together!

Last edited by thieuster; 18th October 2022 at 16:20.
Friday afternoon update. Very happy mechanic, very happy owner. The headlining is installed! It took the best part of 1.5 days to get it in, including the foam layer I showed earlier this week.
The new headlining was made (using the old one as a template) by a local upholstery. They were willing to install it in their shop, but the price for that was immense and the car needed to be hauled to their address - and you don't want a partly built car outside on a trailer etc. So the decision was made: an 'inside' job for the workshop.
As said, 1.5 days... The mechanic did it for 99% singlehandedly. Only a few times, he needed an extra set of hands. And look at the results! I think it looks better than what I've ever seen before in a Saab 96! The edges as glues around the window frames and will be covered by the window rubbers, adding extra strength to keep all in place. There's now a gap where the A pillar goes into the roof lining, but the two rubbers (door and window) will press it down so that the flexible lining will follow the shape/profile of the inside of the A pillar. The B and C pillar will also hold the seat belt bolts. That will keep the vinyl in place as well: special rings will be on top of the vinyl before the belts are bolted to the pillars.
We're extremely proud of the B pillar. As said earlier, my 95 has a different interior style behind the doors; the B pillar in the 95 is painted (body colour) and the 96 has a vinyl cover, but not padded! I remembered that from my previous Saabs. Later models (post '75) had a profiled plastic cover. Guess what: all those pieces of plastic have become brittle and have crumbled. This vinyl covering is much better.
Time for pictures
I am really admiring the skills here! And I've made that very clear to the guy who did the job.
Last edited by thieuster; 21st October 2022 at 15:04.
Wow ! That looks like a fine job he's done there 👍

That looks very good indeed.
In the Sotadic Zone, apparently.
Very nice. Taking shape beautifully.
That is a lovely piece of craftsmanship
A few pics to show the progress.
The headlining is in and the door rubbers and side window rubbers are installed. That's an extra 'security' to keep all in place. And that's when we found out that something went wrong. Well, not really. My car is the example-car and somehow, in my car the sun visors are the wrong way round. And now they're wrong in the blue 96 as well. One side is black and the other side has the colour of the headlining. The 'look' with the sun visors up should be with the black side facing the headlining. As you can see on previous pics, the black side is facing the driver when the visor is up. It's a matter of unscrewing the bolts and swapping the visors from left to right and turning them around. Oh well...
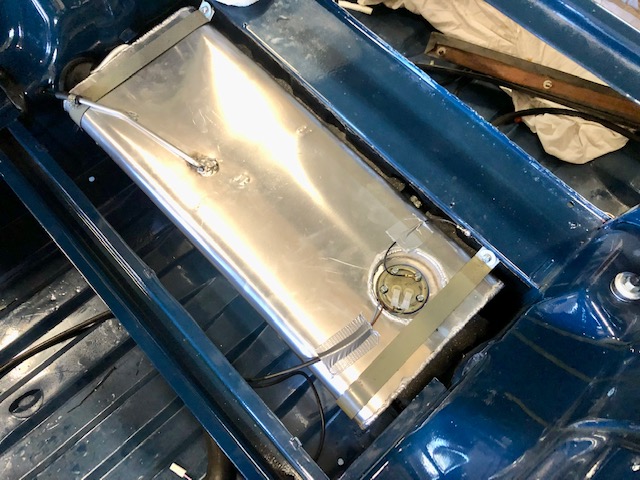
Apart from the interior details, something big is installed as well: a bespoke, handmade allow fuel tank. I hate those old tanks and the lengths one has to go to make sure that no debris from the inside clogs up the fuel line. One can put a sealer inside, but somehow, in the past, I was not too happy with the results.
When I restored my TR, I found a guy who was willing to weld me an alloy tank. Sadly that person has passed away. Finding another welder who was willing to make a new tank using the old one as a template was not easy. But in the end, a guy was willing to make a new tank. Honestly, it's not as cleanly welded as my TR's is. I find this one rather 'rough' around the edges; the welds are not really smooth. But, it is what it is. And luckily, the tank will be stashed under the floor.
Then the engine. I mentioned before that it was carefully checked and that there were some small changes in the original set-up. But now it's time to install it: replacing the rear oil seal (just to be sure) and installing the flywheel. New flywheel bolts are on their way.
The clutch is a matter of discussion. Saab had several clutches for their cars, in relation to the power output. My car has a run-of-the-mill V4 engine, not tuned and delivering a whopping 65hp. It comes with the standard clutch. The engine that's about to be installed in the blue car, is tuned to about 95hp. Not much by modern standards, but still nearly 50% more powerful!!! A few Saab 'druids' are in mediation retreat(...) to come up with a suggestion for the best possible clutch + engine combination.
Then the engine cover plate on the other side (front) of the engine. The Ford V4 was originally designed for the German-made Ford Taunus. And came with 2 front end plates: the Saab version with a 'cone' for the cooling fan bearing and the 'slim' (Taunus) version without the casted cone. The one here used to have the cone. Here, the cone is cut off, the bearing is removed and the hole has been plugged. Simply to allow space for a modern electric fan.

I really enjoy reading this thread,its going to make a lovely usable classic when finished.
The engine is in! That was easier said than done. Installing the engine is not more than a 20min job when you have everything lined-up, but what happened after the engine was installed was a puzzle! Last week, I mentioned the 'clutch gurus'. So the engine was installed with the -for this car- correct clutch. Not with springs like the original one, but with a diaphragm. After installing the engine, the clutch didn't work ! The trust bearing, the diaphragm... all worked fine but the clutch wouldn't operate.
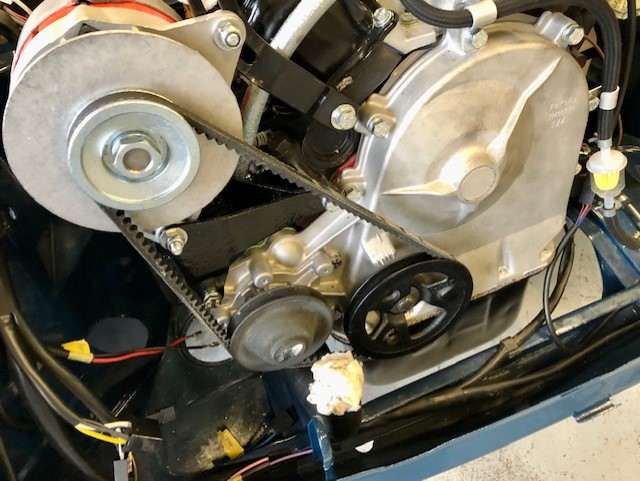
It took some time to figure out the problem: it was the flywheel! I posted a pic of the flywheel last week. A 'stepped' flywheel, like Porsche used as well. The only reason for using this sort of flywheel is the compact construction of the g/box, bell housing and engine together. With a 'recessed' flywheel, you gain about 10 - 15mm.
Long story short: the higher part of the flywheel was too high. The clutch plate and the recessed part of the flywheel were never 'in contact'. The solution: skimming the flywheel as little as possible with a lathe.
Famous last words...
It turned out that the flywheel (new!!!) was not flat! Its surface was wobbly, unbalanced. Causing what so many Saabs have: judder when pulling away! So in the end it was more than a light skim to make the flywheel completely flat again. (My TR used to have the same problem. When I had the engine restored, I had it balanced as well. The mechanic then said: "It was so wobbly that when I turned the lathe with the flywheel attached on, the flywheel wanted to jump off the table and walk out the door!")
Anyway, the engine is finally in. Turning a 20min job in a two-day job (including the work on the lathe).
With all sorts of plumbing connected, things start to look nice! Not the special pipe on the carb's automatic choke device: a bi-metal spring inside the house operates the choke. The bi-metal is heated by coolant water. But of course, this needed a special connector to fit. A bespoke copper fitting with a brazed-on copper pipe will do the trick!!!
Honestly, when you seen the spaghetti-like plumbing and wiring, I would think that the engine designers missed the 'Scandinavian Design' class when they were young. Even a Jag's V12 looks 'composed' when compared with the Ford/Saab V4.
[/url

Last edited by thieuster; 2nd November 2022 at 12:53.
Looks fab. Coincidentally just watching Wheeler Dealers and they have done this Saab
Sent from my iPhone using Tapatalk
My Saab's colour! 'Brilliant Gul'.
I would give an arm and a leg for the grill and headlights of the WD Saab! Hen's teeth nowadays. The US-style grill is extremely sought-after because most Saab owners think that it's the best looking combination on the 96. And, it was always on the Saab rally cars. Those cars had highly tuned engines with 2 double Webers, special cams etc. 150bhp was no exception. For cooling they needed the wider Saab 99 radiator and expansion bottle, hence the wider grill!
Saturday morning

Really enjoying this thread, thank you!
Sent from my iPhone using TZ-UK mobile app
Im loving this thread. My friends Dad had a 96 back in the 70s and I remember clearly being super excited to be a passenger and seeing the needle rise ever so slightly above 70 !! Back then as a kid it seemed that we were reaching near supersonic speeds !!!
Like last Wednesday, an update today.
Visually, no spectacular changes. However, there's enough going on to fill the days! 99% of the work is 'under the bonnet'. The freshly painted bonnet (+ doors, boot lid and glass) are in a corner of the garage, safely stashed behind some cars that are 'stationary'. But 'the bonnet' was a major subject for the last few days.
The under-bonnet space between the top of the air filter and the underside of the Saab's bonnet is very, very limited. You can't put on a K&N filter without the risk that the filter and the bonnet will collide. And the special way of closing a Saab bonnet will certainly cause a bump from the inside out(...) when there's not enough distance! Luckily, my Saab 95V4 is close at hand for a solution. We measured the distance between a fixed point of the body, upwards to the top of the air filter of my car. Knowing that my car's configuration fits. As long as the set-up (height) on top of the blue Saab's engine is the same or less than my car's, then all's good.
The blue Saab has a tuned engine and lot of the extra power is found in a different intake manifold and non-standard carb. You can see the problem coming, I suppose. A K&N filter does not fit (too high) and the base plate of the K&Ns do not fit the Saab's carb. There were two of these on the shelf of the workshop and finally the decision was made to build one from scratch! First, a fitting 'ring' round the carb's intake and then a baseplate welded to that ring. Not on top of that ring, but as low as possible. Lowering the total height of the K&N. The pics tell the story.
Personally I would have opted for a round K&N filter. Note that the carb's intake is not in line with the engine. An oblong or rectangular filter will always be installed under an angle compared with the engine's N->S configuration. I think that looks odd. But most tuned Saabs have a filter that sits like that.
Then the electrics. Monday was alternator-day. The original alternator returned after an overhaul at a local workshop. Saab had 2 versions: a 35A and a 55A version. The latter was installed with the introduction of the heater rear screen. This is a 55A version for all the 'extra goodies' that will be consuming electricity: fog lights, electric fan etc. With the original fan that was mounted to the front of the engine removed, the search for a shorter belt started. The old belt (now too long) was cut and used as a measurement tape. A new, fitting one, was easily sourced.
Finally a pic of the new wiring loom: extra fuses, additional relays. Now with a handwritten 'sticker' to make clear what they're for. The jury is still out when it comes to the final type of lettering, material etc.
Sadly I forgot to take a pic of the shop's 'signature upgrade': welding cable as wiring from the battery to the starter motor. Thick welding wire, like one uses for electric welders is capable of transporting a lot of current and it's very flexible. Plus a bonus: the rubber insulation material around the copper core is better than the normal automotive stuff. A big upgrade that's been used in all cars that leave the workshop after a restoration. (Including all my cars).
Saturday morning update.
Remember how I commented Saab's design & position of the carb: you always end up with an aftermarket airfilter that not aligned with the rest of the car and engine compartment? Well, not in this car. At first, I was thinking along the line of a round filter to overcome that visually ugly problem. But there is another way.
I posted pics of the new-to-be-made baseplate of the K&N filter. Some careful measurements shows that it was possible to cut the new hole 'not square' in the bottom of the filter with the result that the filter itself would sit square on top of the engine. And by putting the filter a little to the front, it was also possible to stay clear of the carb parts that need to be free! The result is a nice looking set-up!!
I never had a K%N filter on my Saabs. I've always used the original set-up. Saab had the old system of 'summer' and 'winter' position of the induction pipe that led the air to the filter. I've always used that without any problem. Saabs always work in cold conditions (No surprise here). I'm curious to know how this engine responds when it sucks in cold air through the filter. On the other hand: my English sports cars all had K&Ns and that was never a problem. We'll see how it works.
As you can imagine, figuring out, measuring, trial-fitting and welding this to a properly fitting filter lay-out took nearly a complete working day. The other hours were spent on routing the fuel line. And determining where a solid state electric fuel pump will be installed (under the removable rear seat; Saab routed the fuel and brake lines inside the engine compartiment).

Last edited by thieuster; 12th November 2022 at 12:44.
I felt great this morning after last week's stent surgery, so I dared to drive the 10 mis to the workshop.
They hadn't been sitting on their hands when I was in the hospital; the electric fuel pump is installed, coolant system is in place, the exhaust is installed, rear mudguards are on and the engine is ready to be started! And, not visible; lots of electric connections are in place and tested.
An exhaust for a tuned Saab is -like the clutch- food for thought. Simply a wider bore pipe doesn't cut it. You need to 'dremel out' the exhaust ports and they you decide what diameter pipework you use and how it's rooted. Saab had a tuning manual available in the 70s for the home enthousiast who would like to copy the works rally Saabs of that era. Like Porsche, there's a lot of data available. With that in hand, every single piece was considered.
The exhaust ports were already bigger than the originals. After that, there's only 'one-to-go-brand' for an exhaust: Simons Exhausts. Readily available, off the shelf. But... (as always, there's a but...) The Simons isn't perfect. I have experience running Saabs with these exhausts and and this was the moment to make it a Simons 2.0. The original Simons has two downpipes from both cylinder banks and these are not equal in length. So one of the mechanics cut up the original first part of the exhaust and built a bespoke one with two pipes of equal length. Saab's tuning manual mentions a Y-shaped pipe like this blue car has now! This is very much in line with Saab's suggestions!
The second downside of the Simons exhaust is the resonance. The Saab's floor is flat and the exhaust sound sets the floor in motion/resonance, making 100 km/hr a nasty speed to drive without ear protection. I suggested a flexible joint to make the chances of resonance a lot smaller. We'll see how that turns out. I have another trick up my sleeve when there's still too much resonance; that has to do with the way the exhaust is hanging down from the floor.
The mechanics ran out of time this morning for a first start! The engine is going to be started with 98 RON petrol. Here, from BP. My car runs on EcoMaxx, a fuel for classics like Aspen for gardening machines. But it's better to tune the car running on normal petrol. EcoMaxx is fantastic stuff when you store the car over the winter. It does not disintegrate over time! I'm sure that I can turn the ignition in March and then the ar will start 'on the button'.
(Oh, and next up, next week: the introduction of a very rare car on British roads: a 60s German Ford Taunus! Incidentally with the same V4 engine as the Saab has!)
Pics
Note all hoses connected. The cooling system is filled with Evans Coolant. A 'first time' for the workshop. https://www.evanscoolant.com
Note the cut-offs and reworded patches of the exhaust system
The equal length Y-shape pipe, the 2-in-1 collector and the flexible joint.
Simply because it looks soooo good.
The rear is getting shaped. Note the installation of the rear lights and back-up lights. The tip of the exhaust is sticking out. That has to do with the 'on size fits all' Simons: late Saabs had thick rubber bumpers and the exhaust's length is in line with those bigger, bulkier bumpers. The blue car gets its own chrome (well, newly-made s/steel) bumpers. When the exhaust tip is sticking out too far and looks ugly, well then I'm sure that it will be cut back a few inch and rewelded.

Last edited by thieuster; 25th November 2022 at 14:17.
Menno, the proximity of that 2nd exhaust pic.....the washer bottle looks perilously close to getting sizzled.
Some kind of heat stopper going in there is there ?
Very sharp eye!
This is one of Saab's inimitable design ideas. And it's plainly a lousy design. Up to MY 1973 (my own car's model year) the water bottle was situated more in front of the exhaust. The exhaust heat acted as defroster. That was a nifty detail. But with the introduction of the headlight washers/wipers for various markets came the need for a bigger water tank! The tank was replaced and doubled in size. But it was now closer to the exhaust downpipe. Nowadays, there's not a single original water tank that's still without a melted hole. My first 96, a MY 1976 car, also had a hole in the tank so that I was unable to fill the tank higher than the halfway point. Later, I put an asbestos plate between the tank and the exhaust. To prevent the melting.
The jury is still out on this one: installing a heat resistant plate, or a new bespoke alloy tank. We'll see what comes up.
I know it's gonna have a cost implication but the fab'd ali one would be getting my vote 👍
The guy who owns the car is the original owner since new and he has set his goal on driving the world's best Saab 96. He owns more classics and knows what's involved when you start working on them. I'm sure he will go along with the best solution.
Last edited by thieuster; 25th November 2022 at 20:34.

Great to see an update as always, but even better to see you are in shape to write it after recent adventures...
Thanks! Yes I feel as good as one can be one week after returning with a new stent. And I feel better every day. Mind you, the trailer for hauling classics was in my own workshop at home. A guy came to collect it, he's bringing a Ford Taunus to the shop. Normally, I would have hitched the trailer behind the car myself to pick up the Ford. Now, he did everything on his own. Monday is a good moment to unload the Ford at the shop.
Just wonderful, taking real shape and looking absolutely smashing. I love it!
Great work by your mechanic chaps.
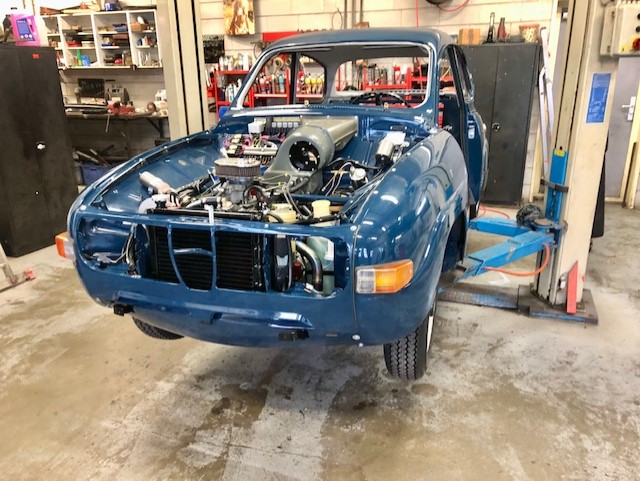
About 'shape': the car is getting its distinct silhouette back!

Very classy build
Pics are sometimes deceiving (as we, WIS know...). That also goes for the Saab. Today's pics are nice and shiny, but basically tell the story of a mistake. A mistake we made a long time ago. Luckily, we can correct it without too much hassle.
It started when the car came in the shop. The front panel (Triumph TR aficionados call it the 'apron') in which the grill sits, was rotted. Welding and repairing would be too costly compared with a 'new' apron. You can buy second hand aprons for € 40. I had an apron in my own stock, totally straight and without rust. So we used that one. The headlight frames still looked good, so they were re-galvanized.
Fast forward to this week: time to put in (on?) the apron and close up the front of the car. And then things went wrong.
Saab started the V4 in 1968 with an apron that had square holes and round headlights. Between '68 and '70, the apron was also the grill. In 1970, they changed the design: an apron was introduced and it stayed the same between 1970 and 1980. Frome then on, the grill was a separate item that you can screw in with self tapping screws.
But... the US version of the car had round headlights and the European had rectangular headlights. So, Saab came up with a 'frame' to hold various headlights shapes in the same apron and the grill matched the shape of the frames/headlights. To make things complicated: the 1973 car had a metal grill and the 1974 version a plastic grill. So the headlight frames of the blue (74 car) are different than the ones on my 73 car with the metal grill. The owner wants a metal (pre '74) grill like my car has and we thought that it was only a matter of installing the other grill. But...
We had the wrong frames galvanized. We never realized back then that the frames have match the grill.
That's what we found out this week! Luckily, I had a MY-correct frame set on on the shelf, so a quick change was easy. They're now at the galvanizing company for a shiny coat!

Last edited by thieuster; 8th December 2022 at 16:19.
Ain't car parts great?
Last week, all windows were installed, the 'ears' between the rear window and the rear side windows were installed (before the glass was put in), a proper rev counter was sourced (I have my doubts about the colour of the needle; I think it needs to be orange to match the 'hands' of the original gauges. But the owner doesn't care).
And the first part of the upholstery is now installed. The 1974 Saabs had a new safety belt set up (more about that in a few weeks with pics to explain). The automatic reel of the belt was mounted behind the panel under the side windows. Nowadays a normal spot to hide the reals, but then a novelty!
Nice story about the upholstery: Saabs for the European market were all sold with a combination of fabric and vinyl upholstery. US market Saabs were always sold with a 100% vinyl upholstery. Finding the original fabric is a problem. E.g. my own car (fabric & vinyl) has the upholstery material from... Mercedes (Pullman) nowadays.
The owner of the Saab found a source for the new upholstery in the US. And that guy even offered him a all-leather upholstery. No Saabs of that era were sold with a leather interior, btw. So the owner ordered a complete set for two front seats and the bench in the rear. No door panels. A local upholsterer named Bertil (I really, really like his work; he has done so much for us over the years!) found a matching colour vinyl and made the door and side panels from scratch!!! And he installed the leather on the seats of the car + the internals of the seats like springs, foam etc. And for once, the price was more than reasonable.
At first, I had my doubts about the leather; mainly because I'm not used to look at a Saab 96's interior with a vinyl/leather interior: I'm used to fabric! But now, once installed, I love it!!!
And this week marked the return of the headlight rims; the correct ones that fit the apron of the car.
Next up: the time-consuming job of installing chrome beads in the front and rear windows' rubber. Yes, there's a tool for that, but Saab's tool is a little different (of course...). There's one on its way in the mail; borrowed. For this one-time installation, it's useless to buy one. As soon as it's in, the beads will be installed. Monday is 'carpet day'. Saab's carpet were very 'el cheapo': a thin layer of carpet with press studs on hardboard. 99% of the cars had the hardboard soaked at one time. I suggested to use masonite board; a sort of hardboard but water resistant (up to a certain point...). Nowadays not easy to obtain, but I know an old-school DIY shop that still has enough in stock for the car's floor.
And: I've bought a complete set of stickers (decals?) that should be on and in the car. A guy in Sweden makes them and sells them worldwide. He has a YT channel with his adventures... https://www.youtube.com/@Jensen96 And he has a wonderful and very, very rare Saab 1700S. Finnish Saab blogger Tommi Järvinen writes about it: http://saabisti.fi/saab-96-v4-1700s-1974/#.Y57roi-iFZI
This week is also intended to give attention to my own cars: my 1991 Peugeot 205 (yes!) needs a new MoT. And my Jimny needs a new steering box; the old one leaks + the 4WD system is troublesome. It's a intricate system of vacuum hoses, electrics and an actuator pump. If I'm unable to find the problem quickly, like leaking plastic hoses, I'll turn it into a hand-operated front wheel lock system like the old Suzuki Samurai had. A fit-and-forget system.
Last edited by thieuster; 18th December 2022 at 11:32.
Midweek update. Not really spectacular but steady going.
The bumpers are s/steel items. A factory in Vietnam makes them. My TR has 'm as well. Back then, I was an 'early adapter'. Lots of people had their doubts, but nowadays, most classic car owners want them on their cars. Simply because re-chroming is even more expensive and due to EU regulations about chemicals, re-chrome'd bumpers don't have the quality of the old days. I mentioned doing the carpets this week. Guess what, they're still in the mail... what's new. On the bright side, there's enough to do with the parts that are on the shelf.
The owner wants a set of aux lights on the bumpers. Normally not easy to bolt them on, but with these s/steel ones, it's not a problem. From 1975 on, Saab built these cars with thick, rubber bumpers. Those bumpers have holes with threads in the back. You can bolt brackets for aux lights straight on! Saab considered that most owners wanted to mount an extra pair of lights. Even today, aux lights are a big thing in Scandinavia.
The car is in the box because next door in the workshop a friend wa busy prepping a car for spot repair/paint. The car he works on is another interesting feature. An original VW Transporter Joker Camper from the 80s (I think). The Saab has been moved to be sure that there's no chance of dust or even spray landing on the car.

Last edited by thieuster; 22nd December 2022 at 09:23.
Today's episode: 'Beading by Dr. A.'
Last week one of the mechanics (let's call him Dr. A.) has installed the beading that goes into the rubbers' profile of the front and rear screen. That was more than a morning's job. Some nasty words and a lot of dedication later, all was in. The beading is a universal item, suited for more types/brands of cars. It was the profile of the rubber that made it difficult.
The rear window has odd curves at the bottom and that was the most difficult part. Too tight and the rubber would come off/lift off from the body of the car (and become a potential spot for leakage), not tight enough and the beading may come off in years to come...
Slowly but surely things come to and end. The multiplex floor of the boot is being cut to size; the first part is in. Monday the second part that can be lifted to reach the spare wheel. After that, the multiplex for the floors in the car. Sort of Ikea style interior building! The sticky, greasy fingerprints will come off when we (me, today!) sand the multiplex. After that, a grey flooring mat will be installed with a sort of pushbuttons.
Inside, the aux electrical loom is connected: separate switches and control lights for the aux lamps at the front and the extra reverse lamp at the rear. And there's a spot for a Tripmaster + lights where the passenger sits. All separately fused.
And a pic of Swedish beauties.

Last edited by thieuster; 7th January 2023 at 12:11.
Nice P1800 ES there. I had the natural successor to it - a 480 Turbo in red. Went around corners well, but the headlights were candles and it fell to bits quite quickly.
Not mine, but identical...

Last edited by Filterlab; 7th January 2023 at 17:10.
That car turned heads when it came on the market. Designed and built by the Dutch crew of -former- DAF personnel. Volvo had 4 teams competing for the design: Volvo Sweden, Volvo Netherlands and two Italian design companies. We (Dutch) thought that it was a wonderful machine and Dutch automotive journalists were over the moon. The 480 was indeed beautiful. It was the era of the Citroen BX, CX, the Peugeot 205 and a bunch of awful looking Opels/Vauxhalls... Compared with those, the 480 stood out in the crowds.
I cannot remember seeing a single 480 nowadays. One was found in the UK a few years back; a black car with only 23(!!!!!)kms since new. It was bought and stored in a collection somewhere in the UK.
The 21st century C30 was a worthy successor I think. I still think it's a shame that car was -for Volvo's- only so short on the market. I like(d) the design.
The 1800ES has been restored in Poland in the past. I don't want to talk bad about their skills in general, but it was not what the owner had hoped for (and paid for). But, it's only one experience from one car owner.
Last edited by thieuster; 7th January 2023 at 18:18.
Few actually know that the Citröen BX was originally a Volvo concept car - in 1979, and it was called the Tundra.
Weird looking thing, but I think Citröen made the look of it worse when it hit the 'reality design board'...

Stunning work. Do you present a photographic and written record 'book' to the owner of each of the restorations? It would be a beautiful part of the car's history.
That's why I named that car in my previous post
Not as a 'coffee table book'. There are hundreds of pics of the various details etc. All are handed to the owner of a restored car using an 'USB stick' or WeTransfer etc. In some cases, the owners make a selection for a book or calendar (that's what I've done after my TR was finished). There's a stack of photo books in the shop: my TR, a Volvo 1800S, Spitfire, Morgan, Jag XJ Coupe etc. Just to name a few. It's an absolute 'must' when you intend to sell the car. And old paperwork helps as well.Stunning work. Do you present a photographic and written record 'book' to the owner of each of the restorations? It would be a beautiful part of the car's history.
My 1973 Saab 95's restoration was documented as well. The owner gave me two USB sticks with nearly 3k(!) pics. I cannot name a detail that wasn't pictured 'before', 'during' and 'after'. That was one of the reasons I bought the car. It was all so well-documented! And there was a 2 inch thick map with bills etc.
Last edited by thieuster; 7th January 2023 at 21:07.
A few pics taken today. Work has halted a little, due to a emergency operation on a Jag XK8 (see below).
The interior is nearly completely installed. The all-leather seat covers are from a company in the US and my favorite local upholsterer Bertil has installed them over the seat frames. He has also done the panels. More about that in a few days. The leather looks better than I'd expected. On the floor, new carpets. Also locally made, with the old one as the example of 'how to'.
Tomorrow, the last small batch of items returns from the powder-coater. Time to finish the dashboard: rev counter on a bespoke pedestal, panel for the aux switches etc.
Then the Jag...
A nice looking XK8 was brought in. Long story short: the front suspension is rusted/rotted solid! The only damping and comfort was from the air in the tyres. Mind you, this car has been maintained by the official Jag dealer since new!!! Last bill (the owner had it in the car) was dated mid December and was € 3400 for various things. But not the front suspension!
With the car up the ramps' the ones with the 'arms' under the jack points, it was obvious that things were wrong... The wheels didn't hang down. They stayed in the wheel arches! So everything has to come off. But how? On with solid suspension. It took two men a large part of yesterday's afternoon and this morning to get the full suspension on the LH side off. The RH side is even more stubborn. With heat, penetration oil (soaking since yesterday), a mandrel & hammer... nothing helps.
Bad part is, and I may proudly add that my wife suggested it during our evening dinner this evening... that -at this point- it's not certain that the front suspension arms aren't cracked or have hair line fractures. The arms have done the work of the shocks and the springs! New arms are made from unobtanium.
At first glance, everything is still straight. But we need eagle eyes to figure this out. The 'eagle eye' was suggested by my youngest during dinner. There's a small airfield near my house and I hope that I can find someone/a shop capable of checking this sort of things, like you check a car's crankshaft for cracks - with magnetism, a tracer fluid and light.
One plane workshop has tested my TR's camshaft for wear (Rockwell test), so I hope they can check the arms of the XK as well.
Finding new ones for this type of car isn't easy.
Saturday morning update. The car was outside for a few hours; the ramps were in use and another car (Classic VW T3 'Joker' Camper) was picked up today.
Rev. counter is in. Not my favo spot when it comes to installing a rev counter in a 96, but historic pics show that the factory sometimes mounted them like that. I would prefer a spot higher up. But that blocks the view on the original dials. I know.
A row of switches behind the rev counter. the tip of the switches has an led when they're 'on'. The stickers are temp. One small thing: one of the switches is for the heated seats. Saab introduced them in 1974 for the driver only. And it's safe to say that it's scorching hot. I always detached them on my cars. The point is, there's no overrider switch. Saab had some sort of ambient temp measuring device built into the heater. I told the owner my experience and he asked for a switch-able wiring when he ordered the wiring loom. In the summer it was 'off' and when the outside weather temp was low, it was 'on'. An overrider switch is an useful addition.

 Posting Permissions