closing tag is in template navbar
timefactors watches


TZ-UK Fundraiser
Results 1 to 46 of 46

Thread: Printing a 3D Tourbillion clock... JohnnyE's 3D Printing Fiasco Thread

Hybrid View

  1. #1
    Sorry for the slow progress with this one.... a bit of an educational update before we melt plastic!

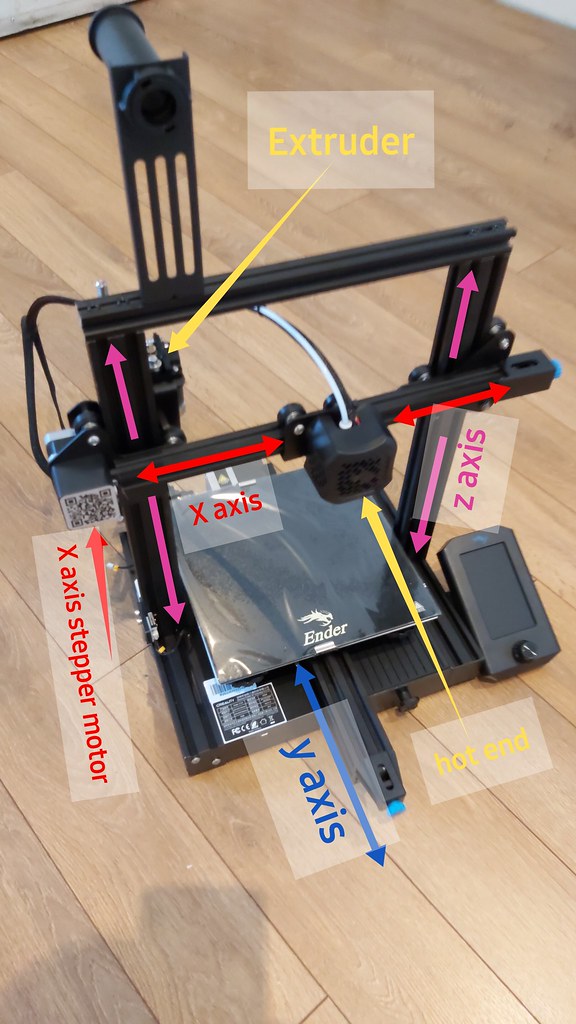
    Introduction to the main parts and the 3 axis

    These are 3D, and the 3 axis are referred to as the X, Y & Z as shown below:


    In this printer,


    • The "X" axis is powered by a stepper motor pulling/pushing a toothed rubber belt which moves the "hot end" (the bit that prints) across that axis.
    • The "Y" axis in my case is achieved by the glass bed sliding on its axis, again powered by a toothed belt and stepper motor.
    • Finally, the "Z" axis is the up and down. Achieved on this printer by the rotation of a threaded bar that lifts and drops the horizontal gantry.


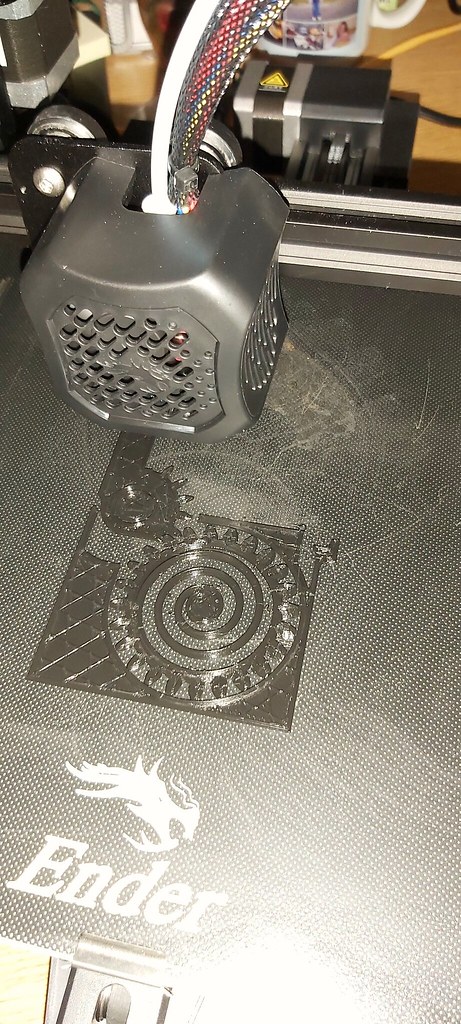
    The filament pops onto that big handle up top (loosely) and you feed the end through the extruder. This is the device that pushes the filament (and pulls or retracts it) down the white tube and into the "hot end".


    • Typical print temperatures are 200-220 degrees celcius
    • Typical glass bed temperatures are 40-60 degrees celcius


    I had it in my head that these print like a dot matrix ink-jet, only in 3 dimensions. Wrong. The extruder pushes out constantly and lays down small lines of plastic.

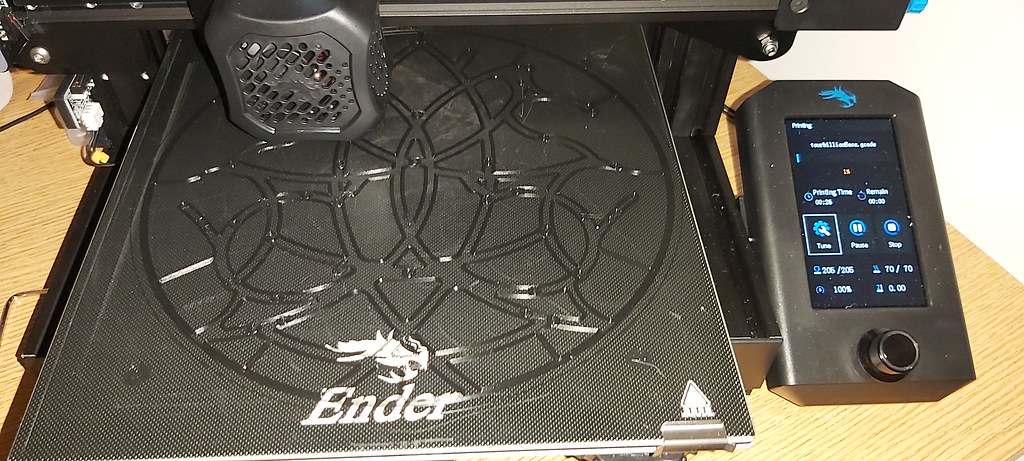
    Here's the printer in action - its quite therapeutic to watch as it glides away!


    So, how do you actually find stuff to print and how do you actually print it?

    If like me you are a complete newbie to this, you'll have no hope (yet!) of designing your own stuff. I personally have ZERO experience of 3D CAD applications. Thankfully, there are many download sites where you can download your 3D print projects, already designed and ready to use.

    Two main sites I've used are:


    1. https://www.thingiverse.com/
    2. https://www.myminifactory.com/


    You can get lost in those 2 sites very easily! A world of stuff to download and print. If you are curious and on a Windows 10 PC, go ahead now and download some files. Windows has a 3D file viewer and you can open the shapes, zoom and look a little closer.

    What file formats are these and do I need to buy software?

    The 3D files are .STL files. These are 3D shapes/renders. You can open them in Windows 10 "3D Viewer" and your 3D printer will come with software to open it too. You can also download free slicing software here https://ultimaker.com/software/ultimaker-cura

    You however can't get print these STL files. Your printer needs that 3D shape translated into actual instructions - layer by layer. This process is called "slicing" and you need software to open that STL 3D model and "slice it" into a .gcode file.

    Don't freak out if you aren't overly technical.... let me recap...


    • Download your chosen STL file and save to your PC/laptop
    • Open that file in your slicer software
    • Click "SLICE" and it'll save you a .gcode file
    • Copy the .gcode file to microSD card and pop it in the printer
    • You then print "standalone" as such... no PC involved to actually print.


    That's a lot to take in... I'll take a break at this stage and fire away if there's any questions.

    Next post... we'll start to print stuff!!
    Last edited by JohnnyE; 10th November 2020 at 12:40.

  2. #2
    Master PreacherCain's Avatar
    Join Date
    Aug 2011
    Location
    London, UK
    Posts
    3,958
    Blog Entries
    1
    Bookmarked for future reference - thank you for posting, OP, it's fascinating stuff!

  3. #3
    Journeyman
    Join Date
    Nov 2017
    Location
    Bristol, UK
    Posts
    135
    Very interesting, please keep the posts coming!

  4. #4

    Bed levelling - the 1st yet most important step before printing

    This, can make or break you! A level bed is vital to get your 1st layer down right. You have a few options here...

    1. Level it manually, using a piece of a4 paper to get a 0.1mm or so gap from nozzle to bed in all areas
    2. Install an automated levelling upgrade (BLTouch is popular.. about £50)

    I was so keen get printing, I rushed this. Got lucky and the 1st test piece had a small base and worked ok. Print quality was quite amazing - you can hardly see the layers! Excellent for the price point of this machine.


    My 2nd piece, had a large footprint and just didn't adhere. The bed was off and there were good spots and bad spots on that base shape. It not only created a mess (as the nozzle ploughed through layer 1) but I scratched the glass bed with the brass nozzle. Just looks a bit unsightly... no real damage done thankfully.


    So - time to set this bed level correctly. Again, youtube to the rescue. If you want to see how... have a watch at this:


    There are loads of print files on thingyverse to allow you to test your levelling. I use this one: https://www.thingiverse.com/thing:2789086 It prints 1 layer thick squares in key areas so you can assess the quality rather than kicking off a big job and creating a mess:


    So.... I now have a level bed. I can print stuff!!! Time to up my game a bit. Worth highlighting... these jobs take time... LOTS of it. Its not unusual for a job to run for 10-24 hours which does raise issues for me. I've taken a chance so far... but a 210 degree "hot end" running through the night isnt so smart is it? Also, these basic printers have no "out of filament" detection. You run out... it ploughs on. Best bit there is that you can upgrade them yourself - you have a 3d printer now so you can print your own upgrades! Long term plan for me it to add some kind of monitoring via Raspberry Pi with remote monitoring and control of jobs.

    Well, here's some of my needless printing that has followed.

    Meet "mini Vader"


    Next, I printed off some "self watering plant pots". Two pieces... rather smart actually! Fill up water in the spot, drop your plant section in and you are sorted. Ah. One problem here... PLA is printed like a mesh. Is it waterproof? No!! Water goes everywhere, so I need to work out how to seal the black pots. One for another day...

    Here's the (to be sealed) water container:


    Here's the inner plant pot - print job turned out REALLY nice here:


    ... and the finished articles! I think I need some kind of resin to line them with. We'll see.
    Last edited by JohnnyE; 12th November 2020 at 14:12.

  5. #5
    Now this, blew my mind.

    You can print complex devices, consisting of multiple parts.... in ONE PRINT JOB.

    Here's the print job of a trial piece. I'm trying this for good reason! It has a hairspring in, pivot points and toothed gears! Let's not forget this is a "lets build a tourbillion" thread after all.

    Print job complete - one job, many pieces:


    Here's how it looks when you take it off the bed and click it shut. It's a spring loaded joint:


    The business side:


    Initial thoughts? Its clever... but is this good enough quality to create a working clock? Those gears are a bit rough. Some research later tells me that the tourbillion clock needs finer brass nozzles. I'm on the stock 0.4mm nozzles. We need 0.2mm and tweaked print settings for the clock. That's ok... we'll cross that bridge later then.

    So - to put that "thingy" above in context... lets print a spring loaded box with that sprung gear powering the lid! Remember... THIS IS ONE PRINT JOB. Just one. That fact still impresses me:

    Here's the box printing:


    Its laying on its side as we see the gear mechanism being laid down:


    About 6 hours later... we're done. It only ******* worked!!


    OK. Game on for the clock build now. I've printed enough useless crap.

  6. #6
    Grand Master WORKSIMON's Avatar
    Join Date
    Feb 2008
    Location
    Dreich Scotland
    Posts
    10,946
    Absolutely fantastic thread, I am really enjoying your forays into the 3D printing world, cant wait for the next post !
    Cheers

    Simon


    Ralph Waldo Emerson: We ask for long life, but 'tis deep life, or noble moments that signify. Let the measure of time be spiritual, not mechanical.

  7. #7

    Right.... lets start this tourbillion job!

    Right, enough of printing useless things! I think I've got the hang of the worst of all this, so lets get down to business.

    This tourbillion clock pushes smaller/home 3D printers to the max on 2 fronts:

    1. The base is large - right to the limits of the cheaper printers. My popular Ender 3 will NOT print this base without modification of the printer's firmware. There are "islands" on the allowable print area - to stop your print head hitting the glass retaining clips. I'll have to learn how to edit the firmware and reflash it in to hack my way past this problem.

    2. The quality of printing MUST be good for the moving parts otherwise this thing just won't tick. On reading the build plans, its recommended you use differing brass nozzles for different parts. So... I'll need some 0.2mm nozzles. Standard is 0.4mm. No big deal as these are cheap off eBay, Amazon or specialist suppliers.

    So, after some time on google, I discover how to remove the forbidden areas from my slicing software. On screen, it looks like this WILL fit:


    I set the print temp and bed temp within the slicer software, sliced it, exported to microSD and away we go... not.


    Damn.

    Back to Google. OK.... inside the firmware of the printer, it has physical limits set. I managed to follow a tutorial to show me how to edit and update a custom firmware file. I flashed it into the printer... AND BRICKED IT!!! Yes, black screen of death. Nothing I did made that printer boot up. Oh dear!

    Back to Google!! Familiar huh? Discovered that the supplied microSD has a 2nd, unallocated partition! Wierd. So, into MS Windows disk management, delete all partitions and recreate just ONE simple new partition, taking up 100% of space. Uploaded the firmware ... PERFECT!! It worked. What a quirk!

    Fingers crossed then. I loaded up some black PLA+ (no idea what the + give you but it was on offer on Amazon for £16 a roll). Here we go......


    YES!!!!


    So that's the clock started. It looks like this one will be printing for up to 10 hours, so I'll report back in the morning. Hopefully we wont see a pile of black spaghetti in my next post!

Posting Permissions

  • You may not post new threads
  • You may not post replies
  • You may not post attachments
  • You may not edit your posts
  •  

Do Not Sell My Personal Information