


 Reply With Quote
Nice one Dave - I love an engine rebuild thread!


Evening all,
I have had to pause my Ti watch build (http://forum.tz-uk.com/showthread.ph...-Titanium-case) to sort out my Porsche.
Its a 968 Sport, so not your boring old 911, and actually one of the rarer ones, they made less than 300 of them.
Ive owned it for a few years, and used to get all over the place in it.
Recently (a couple of years actually!) its been off the road as it needs some serious oil leak attention. Im pulling the engine to rebuild it, and I said I'd post a thread about the rebuild so here goes:
This morning I ran the engine for a little while to warm it up, then dropped the oil out.
Seems that last oil change I did was back in 2013 at 158K miles!
The oil that came out didnt look bad, but its certainly due for changing...
Then out with the jack and up on axle stands.
A 968 engine bay is a full place...
But there is a tea cup stand ;)
There then followed a lot of unbolting, which I didn't really take many photos of.
Out with the Rad, which looks like it has a weep on the cores - a new one of those then £££
Then underneath and off with the starter motor, so I can access the 4 bolts that hold the bell housing to the torque tube.
Undo the exhaust to manifold bolts - amazingly they just unbolted :shock:
Took off the Alternator and undid the PAS pump - no point in lifting extra stuff, and it will help the space around the engine for the lift.
There were no problems with the PAS, apart from a leak at the reservoir, so removing from the engine also means I don't have to touch that if I can get away with it.
Fuel rail pipes and clutch pipe disconnected, and the O2 sensor. Still have the earth and possibly some more wires at the back of the engine to disconnect.
Then I decided to take the inlet manifold off. Getting the engine out with it on is a right faff, as my engine crane + mate is not here until tomorrow I had some time.
There are a million wires and pipes connected to it. I took photos, but I'll be amazed if I don't end up with a couple of spares that need some head scratching...
That manifold is HUGE! it really does fill half the engine bay:
Seems the engine has been sucking in some oil - the inside of the manifold:
There is even a dead spider in the inlet:
That pool of oil by ther valve is mostly actually petrol from when I removed the fuel rail, which was of course still full...
Thunderstorm stopped play at this point, but I think the engine will come out tomorrow :)
Dave

Nice one Dave - I love an engine rebuild thread!
When you look long into an abyss, the abyss looks long into you.........


Ace, I will follow this with interest.
I love the 968, would love one.
Lovely Porsche and those wheels. Great thread nice to see someone like me who has to do all their work outside as I don't have a garage, rain often stops play.
There ain't a lot of room in that engine bay....any bruised knuckles yet..
Last edited by Cat7; 8th May 2016 at 08:27.
The garage is full of machine tools... Oops
There is actually a reasonable about of room, more than the mini I used to spanner on.
The day is fine, so onward. Pics later
Dave
Open heart surgery, please keep us updated.
Started around 9 this morning.
First order of service - the top 2 bolts on the torque tube, holding the back of the engine in.
After trying to get some crescent spanners (why do tool shops no longer stock esoteric tools?)it turns out that a double UJ socket is a solution.
Of course this means dropping the exhaust out of the way - which I hoped to avoid, but never mind.
The stock exhaust is chuffing heavy, especially when lying on your back in limited space with the potential to drop it on your head...
Once out of the way the CAT heatshield also had to come off.
Then there was enough space to thread a 3/8" extension through (not enough for a 1/2") with a universal joint on the end and a 17mm socket.
One side has slightly better access than the other. The harder side needs a double back to back UJ to get round the torque tube:
Crappy photo, but its quite hard to see...
Black is 1/2" 17mm impact socket, then 1/2 UJ, 1/2-3/8 adapter, 3/8 UJ, and then 3/8 extension. What a faff.
Didnt take any other photos, got caught up in the doing, but the end result is:
I now have a boot full of the removed parts so far:
and an engine landed in the garage:
It was a tight squeeze between the Milling machine and the bench.
Much stuff to do next, including making a long (and probably expensive list) of new bits and bobs.
Certainly need a pair of engine mounts and a pair of cams, probably a radiator and most of the rad hoses...
Dave
How deep a rebuild are you going for? Full teardown of the block and replacement of all bearings, gaskets, and possibly machining work on the bores and head refurbishment?
Very good and a lot more skill (a courage) than I have.
I will be interested in the price of the Cams, mine (911) cost £600 (each).
As as for the radiator - should have gone aircooled
btw is a Sport or Club sport model?
Whoever does not know how to hit the nail on the head should be asked not to hit it at all.
Friedrich Nietzsche
I'm going to tear it down to replace all the seals, and I'll inspect the rest whilst I'm in there. Hopefully the insides will mostly be in good nick and I won't need that many bits. The engine still ran well, just had a tendency to pour oil out of the bottom.
I suspect new valve guides might be needed, other than that I don't think much else will be required.
The cams have a chain sprocket in the middle for the variable valve timing. Mine are a few teeth short, a known weakness in this engine. Cams are about £1100 a pair.
Its a Sport, which for those who don't know is a UK only Club Sport model with a few of the comforts added back in. It has a CS vin and I believe Porsche list them as Club Sport with lux pack or similar on their build records.
More photos later
Dave
2 Big boxes of seals :
Of course my phone has had a fit and corrupted my SD card - so Ive lost a load of the how it came to pieces pics...
Tonight I got the clutch off.
Dave
Good to see a front engined Porsche getting some tlc. It'll be good to see it back on the road as they are belting cars. I may be biased though, my 944 turbo just passed 255k miles..
Mine's done 237!
Tonight off with the belts.
THE 968 engine is a 3 litre in line 4 - so it has a pair of balance shafts to help keep it from shaking itself to pieces.
The crank pulley for these has been in a vice at some point in the past - naughty naughty.
With the belts off its time to start stripping from the top.
Off with the camshaft cover
This is a known weakness in 968's - the inlet cam drives the exhaust cam via a chain in the middle. This is then altered to give the variable valve timing. The teeth on these camshafts have a tendency to disappear - this one has way less than is healthy.
New cams are on order, but Im glad I stopped driving this before it got very expensive.
Dave
Following this thread with interest.........I'm currently rebuilding the engine on my MGB to fast road spec.
It's far less complex than the Porsche, but it's well over 40 years old and like many old engines it's a 'bits a', with parts from at least 3 engines being used. What should be straightforward is proving anything but.........feeler gauge, dial gauge, micrometer and protractor are proving very useful! If I wasn't rushing to get the car back on the road I would've done a genuine blueprint job and set everything up to be nth degree; that's a time-consuming process but it's worthwhile on these old engines.
Pics to follow.
Paul
That does look a bit grim. Interesting as Porsche don't have it as a maintenance item. Snapped or disengaged chains don't do it much good!
Dave if your feeling adventurous have a look at Catcams:
http://www.catcams.com/engines/engin...anufacturer=19
I don't know of anyone in the UK that has used them though but I have been tempted to buy a pair for my S2 race car.
Ss and S2s suffered in the same way: it wasnt caused by variable valve timing. The tensioner pad wears, then the chain wears and the worn chain then wears the teeth. They become hook shaped and eventually break off.
Before the lost teeth become a real issue it is usual for the chain to snap and wrap around the tensioner, destroying the cylinder head.
Originally, the part wasnt available and the tensioner/pad wasnt on the service schedule.
This is a really interesting thread.Way beyond anything I would ever contemplate but intriguing just the same. Thanks for sharing.
Nice job :)
Doesn't look bad considering it's had bits of camshaft sprocket floating round inside.
Thanks for sharing! Really interesting work.
I'd really like to do a caterham build at some stage....
Sent from my iPhone using Tapatalk
Wow. Fascinating. I wouldn't even know where to start. Hats off to you, sir, and thank you for sharing.
You mostly start by accepting that its going to cost in tools and parts.
Then you just undo stuff.
You haven't seen me put it back together yet
I finally managed to get the Cambelt pulley off tonight. It was chuffing tight.
I modified my Mini Flywheel puller (drilled 3 holes in it)
Then wired it to the bolts that hold the timing key with some welding rods:
Put it under tension and then walloped the puller bolt with a hammer.
Repeat until:
Hurrah! Now the rest of the cams and then the head can come out.
Then we'll see how bad the head gasket is.
Dave
Probably fallen apart according to Baz Hartech unless its been replaced in recent years. I believe it was also the thing that caused a fair few S2s to overheat and bore score as well as they seem to keep pretty decent compression even when the HG is shot.
I don't know about you Dave but when I was helping my brother with the big stuff on my race car build we were taken a back by how big and heavy a lot of the 944/968 components are, the engine in particular is a big heavy beast for something under 250 Bhp and only 4 cylinders.
Haven't been brave enough yet to try rebuilding the engine so will be following this with interest.
Somewhat more humble but no less challenging, here's a couple of pics of my MGB engine which is sitting on the garage floor at the moment..........rebuilding old engines is proving harder than I thought! Like old watches, most of the issues are caused by previous poor work; my engine had been rebuilt by monkeys and I`ve ended up taking it all to pieces again. It's unlikely Dave's Porsche engine has been taken apart in the past so it won`t have suffered at the hands of the unskilled and uncaring. Thankfully I`ve done a few in the past, otherwise I would've really struggled. Anyhow, progress is being made; the engine's back in one piece and the paint is drying. These pucs were taken earlier in the week:
Anyone who's ever installed a non-standard camshaft will relate to the second pic, others won`t have a clue what's going on. Having listened at school during maths lessons is a distinct advantage; basically a protractor is fitted to the crankshaft pulley and this allows the cam timing to be set correctly. Full lift on no 1 inlet valve at 108° after TDC is the figure I was aiming for. Anyone who's played around with offset woodruff keys will know how I modified a 2° offset key to give 1° using a flat metal surface and a hammer.........totally different approach to watch work!
Paul
I can relate to the timing.
I cheated and used a vernier pulley when I build my 1275 GT engine. that was running a Kent 286, made about 100 hp from 1330 cc.
Timing the Porsche engine requires 2 Dial gages and a lot of patience as far as I can tell..
The bits are certainly engineered. I think they you could save a lot of weight if you only used 1/2 the bolts, and it would still function.
Drilling the centres out might also work...
Managed to get some more done on the Porsche Engine tonight.
The Camshafts are out, and the Variocam unit.
The Slipper pads show very little wear
Top:
Bottom is slightly worse, but not much:
The Exhasut cam is only missing 1 tooth:
The inlet however is missing 7! Don't think Ill be using that again...
Strangely there is 1 left in the middle of the group. The other teeth on that cam don't look to good either - piting on them, about where they snap off.
In other parts the flywheel just came off (hurrah)
And the head eventually unbolted. The head nuts are chuffing tight.
They have thick washers, which are a PITA to get out:
Solution:
Magnet on a bit of wire.
Attach to washer:
and tada!
This sneaky nut isnt mentioned in the workshop manual.
Good job I had a check for additional fixings before going caveman on the head...
Head off. The bores are HUGE compared to anything I've worked on before.!
The head gasket came with it, its buggered, as expected.
Slowly working down to the floor.
Should get the block onto the engine stand tomorrow if I can get hold of a block and tackle.
Dave
Loving this thread. Those bores look massive!!
To echo other comments, I'm enjoying this thread - many thanks. A real education on how little I know about what gets me from A to B. Looking forward to future updates.
I’m also enjoying the thread!
How did you get this out? Maybe it’s just the angle of the photo but it looks pretty tricky.
Originally Posted by Dave S

That reg plate Lxx HAN looks very familiar from my car magazine obsession days, was this by any chance a Porsche press car?
Good thread
Methinks the cost of this Porsche engine job is rising.......... Most of these projects do!
I'm a great believer in doing things right and doing them once, even though it can get costly. I've virtually given up trying to estimate costs when working on cars, there's always something you haven't expected .
Paul
The sneaky nut is fortunately just a nut on a stud, so once I undone it just came off.
I'm hoping to complete the build for under 3k. So far I'm about 1700 in new bits, tools etc. Fingers crossed I don't find anything disastrous in the bottom end. I already knew I needed to replace the cams, just not quite how bad they were...
Dave
Yes... this sort of projects can only be attacked when you're not afraid to fork out more than expected. Try to figure out a reasonable sum and multiply it with 3. That leaves you room for excitement when in the end the total sum is lower! Porsche parts are mostly 'off the shelf' but Porsche is never cheap. Never. A friend took his 997 2007 Carrera 4 to the dealer. A normal(...) service relieved him from 4967 euros... So yes try to do it yourself - it will save you tons of money.
Menno
At least my MGB engine hasn`t cost big money to sort out, but the quality of replacement parts is always a worry. That's the beauty of these cars, parts are fairly cheap but sadly the quality of some stuff leaves much to be desired. Engine parts are usually OK, it's rubber /suspension bits that are dodgy.
My Piper 270 fast road cam (brand new) cost me £200, including a set of cam followers........I remember when they were £80!
£3K for a Porsche engine rebuild isn`t bad, and if you do it all yourself you know it's been done carefully.
I`ve managed to get an engine crane on long term loan from a mate who doesn`t need it anymore. Hopefully I`ll get the engine and gearbox back in tomorrow and with a bit of luck the car will be mobile soon.
Paul
The rebuild on my Porsche 964 was £14k but that included a Light weight RS flywheel and clutch.
Do I win
bloody worth every penny BTW.
Whoever does not know how to hit the nail on the head should be asked not to hit it at all.
Friedrich Nietzsche
Nice one Paul
Years ago I was replacing a faulty roof mounted extract fan motor, it had twin pulleys, the pulleys were located with woodruff keys, one of which had sheared, when I told the lad who was with me that a woodruff key was damaged, he just kept saying I'd made the word up.
Yes, most folks won`t know what a woodruff key is thesedays...........or even a pulley!
Dave, was the engine previously running with the cams as per the pictures.
Yes. That's a nice figure... Rebuilding a Jag V12 engine will set you back more or less the same amount when we carry out the work at our workshop @ 55 euros/hr ex VAT.
We discussed earlier this morning the fact that re-threading the bolt holes in a cylinder head for the manifolds takes 4 - 6 hrs... Work that you'll never see as a customer! Even the rebuild of my Porsche 914 engine (VW origin!) set me back between 3500 and 4500 euros. And yes, I pay the hours as well, but I have all tools at hand, can buy parts cheaper, have technical support looking over my shoulder and years of technical feedback every time we take a coffee break (We don't do tea overhere...)
Menno

Very interesting pics and talkthrough, thanks
Reference for this thread, these guys in the states sell off-set keys for this series of engines:
http://www.928motorsports.com/parts/...aft_keyset.php
Been thinking about it on my race car to correct its timing which has the power to high in the rev range (several hundred rpm higher than Porsche spec).
Massive bores indeed - being 3000cc 4-pot - reminds me of my 2500cc citroen CX engine ... i thought those were big bores until I saw these...
is that a crack or a hair left of the '944' near the top?
...let alone a splinge pin.
Thanks for posting! Really like those threads. Interesting to see that the engine still ran. Porsche quality :-)
Bit lax on the updates, but the engine is now on the stand and a bit cleaner.
I'll try and post some pictures in the next couple of days.
Dave
Im not posting pics of how I raised the engine - suffice to say I considered the options, did some back of an envelope sums, and then proceeded. I would not like anyone to emulate what I did...
Anyhow, engine is on stand:
We managed to damage a casting in the trip from car to garage.
I can fix it, but I'll see how much a new part is. (suspect arm and leg...)
Did get a couple of quite expensive boxes from Porsche:
Cams, chain and other odds and sods.
After a bit of a clean down (brake cleaner and brushes are quite effective) on with more stripping
This is the Oil filter housing
This is the water passage in the block that flows around the housing:
And this is some of the years of sludge that were in the actual housing passages:
The sump is a large alloy affair, with internal baffling and a windage tray. It also has quite a lot of oil in it even when empty...
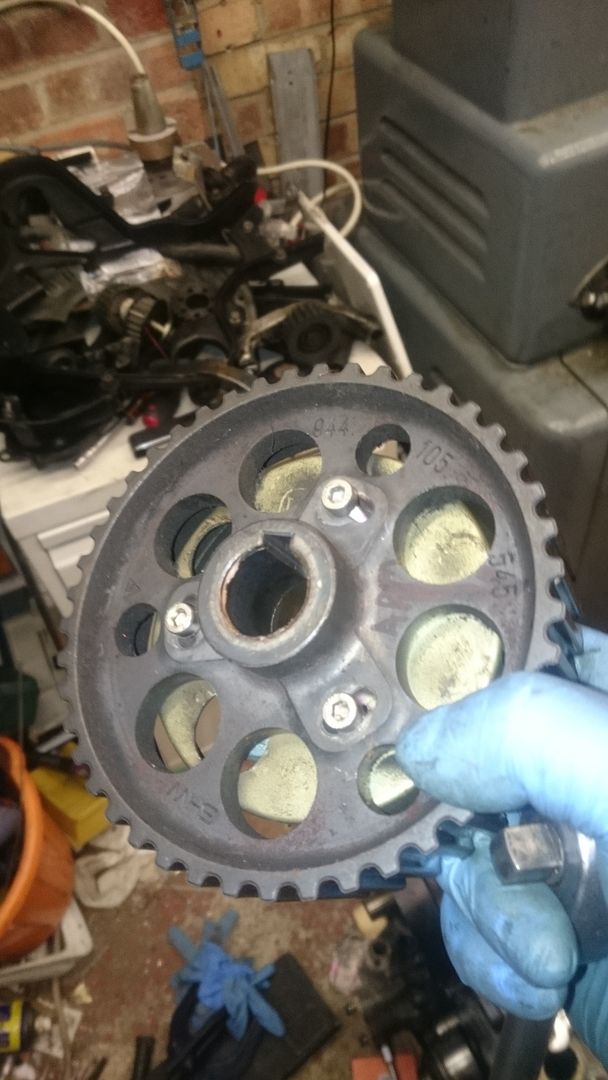
I did also find the missing cam teeth:
Think I can glue them back on?
On removing the sump I also found out why Porsche Engines are so expensive....
They are made of GOLD!
It nice and clean apart from the colour in there.
Stay Tuned...
Dave
How many hours of labour do you reckon you've put into this so far, Dave?
It took best part of a day to pull the engine, mostly due to doing it in the garden.
Since then it's a couple of hours in the evenings when I've been able, usually a Monday and Tuesday. Its under a weeks work so far (40 hours) if you were doing it full time I reckon.
Dave
I enjoy threads like this. It means that some poor sod is going through a load of engine rebuild related grief, and it's not me.
Been there, done that.
Keep up the good work!
Nice over-engineered big block 4 banger with proper head studs.
You can tell it's built for forced induction. I love the old Saab H engines for being similarly beefy.
Will be great when it's back on the road
 Posting Permissions


