Reply With Quote
Cycle wings worth far better fir track use, swept wings do look good though. I guess it depends what you are going to use it for mainly. The older swept wing Westfields do have a certain classic character to them.


My Caterham had swept wings. When the speed reached about 75-80mph the steering would become disturbingly light, as the wings created aerodynamic lift.
Cycle wings are definitely the way to go.
Although no trees were harmed during the creation of this post, a large number of electrons were greatly inconvenienced.

Cycle wings worth far better fir track use, swept wings do look good though. I guess it depends what you are going to use it for mainly. The older swept wing Westfields do have a certain classic character to them.
Had a busy week, despite SWMBOs insistence that theres other things to be done around here... :-(
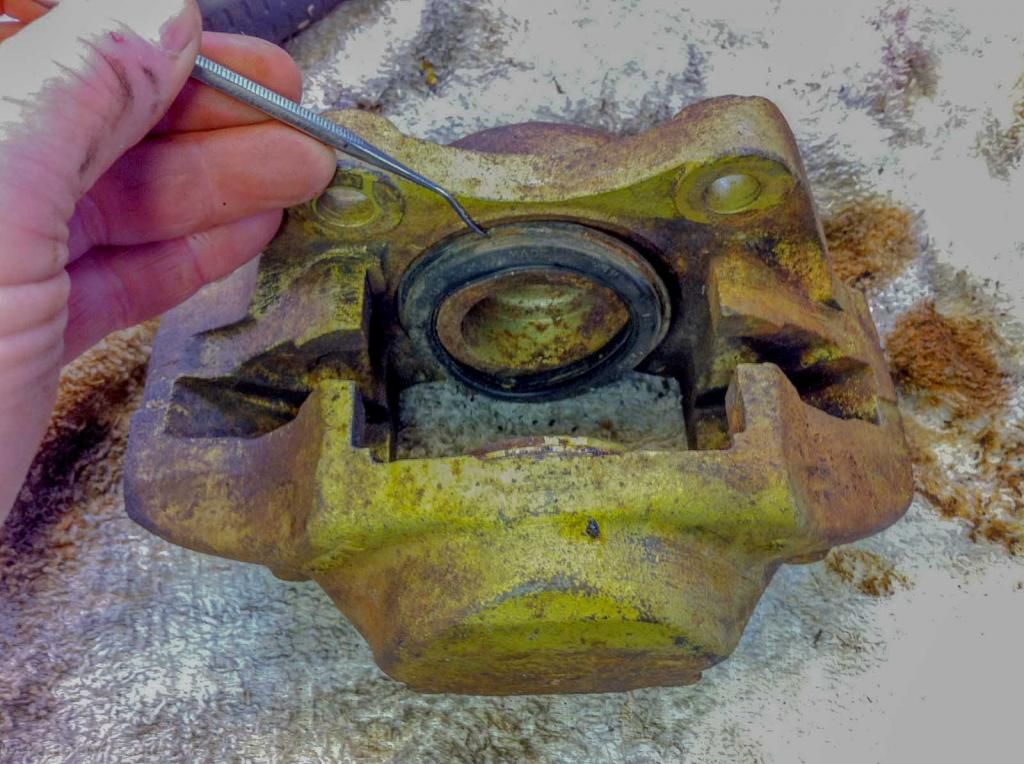
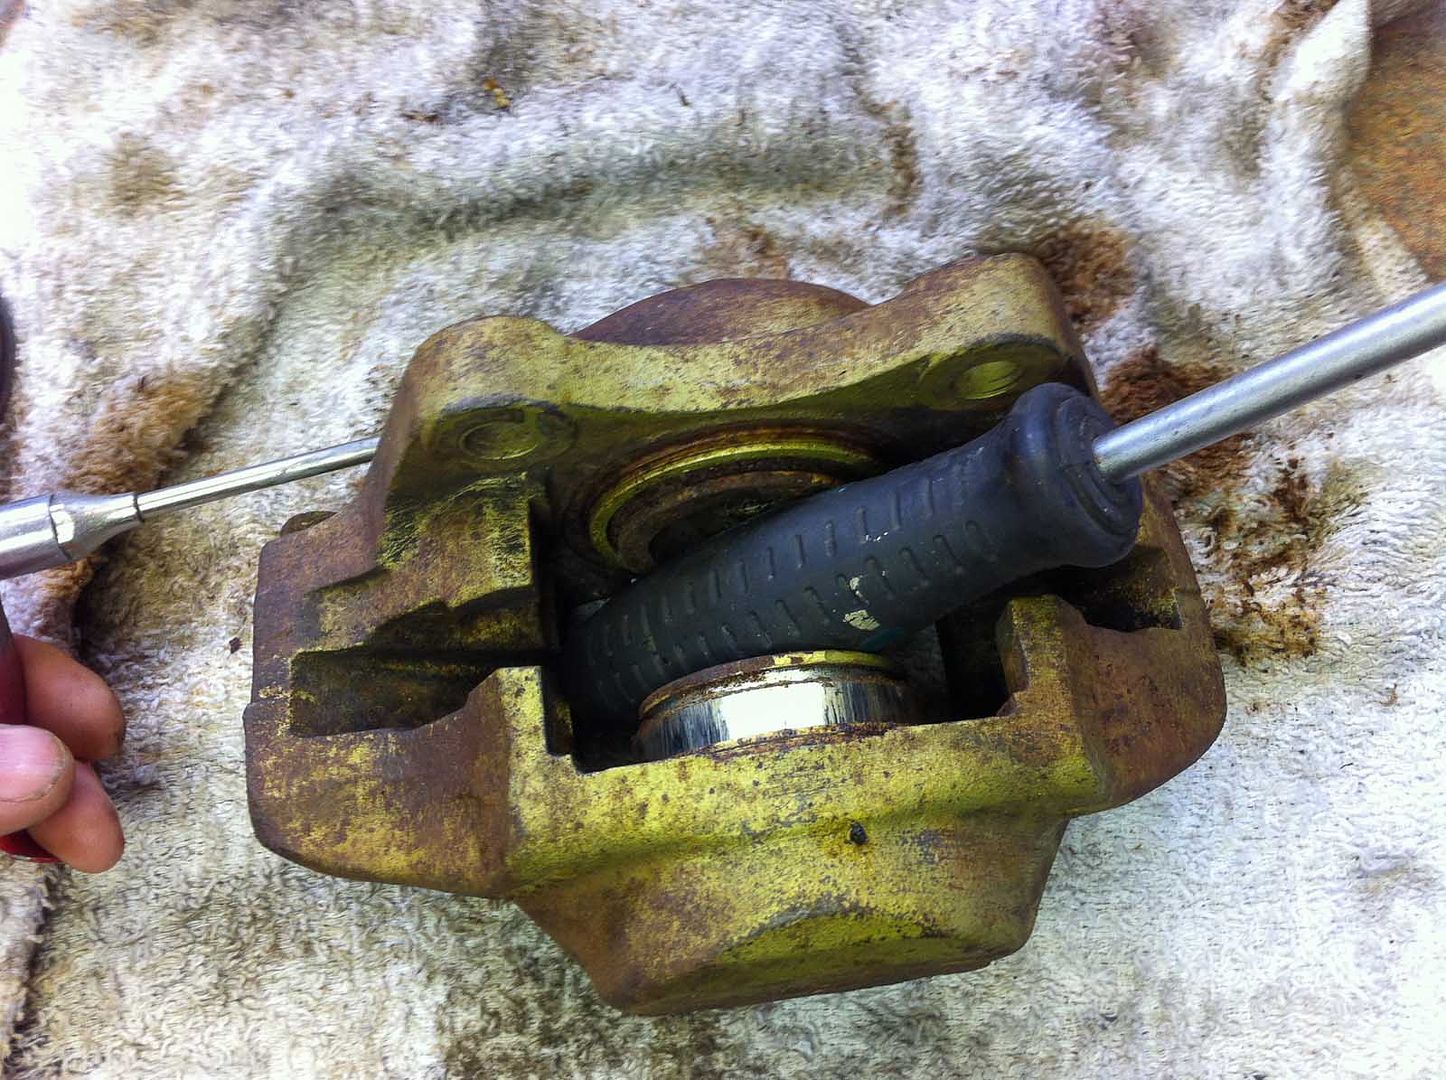
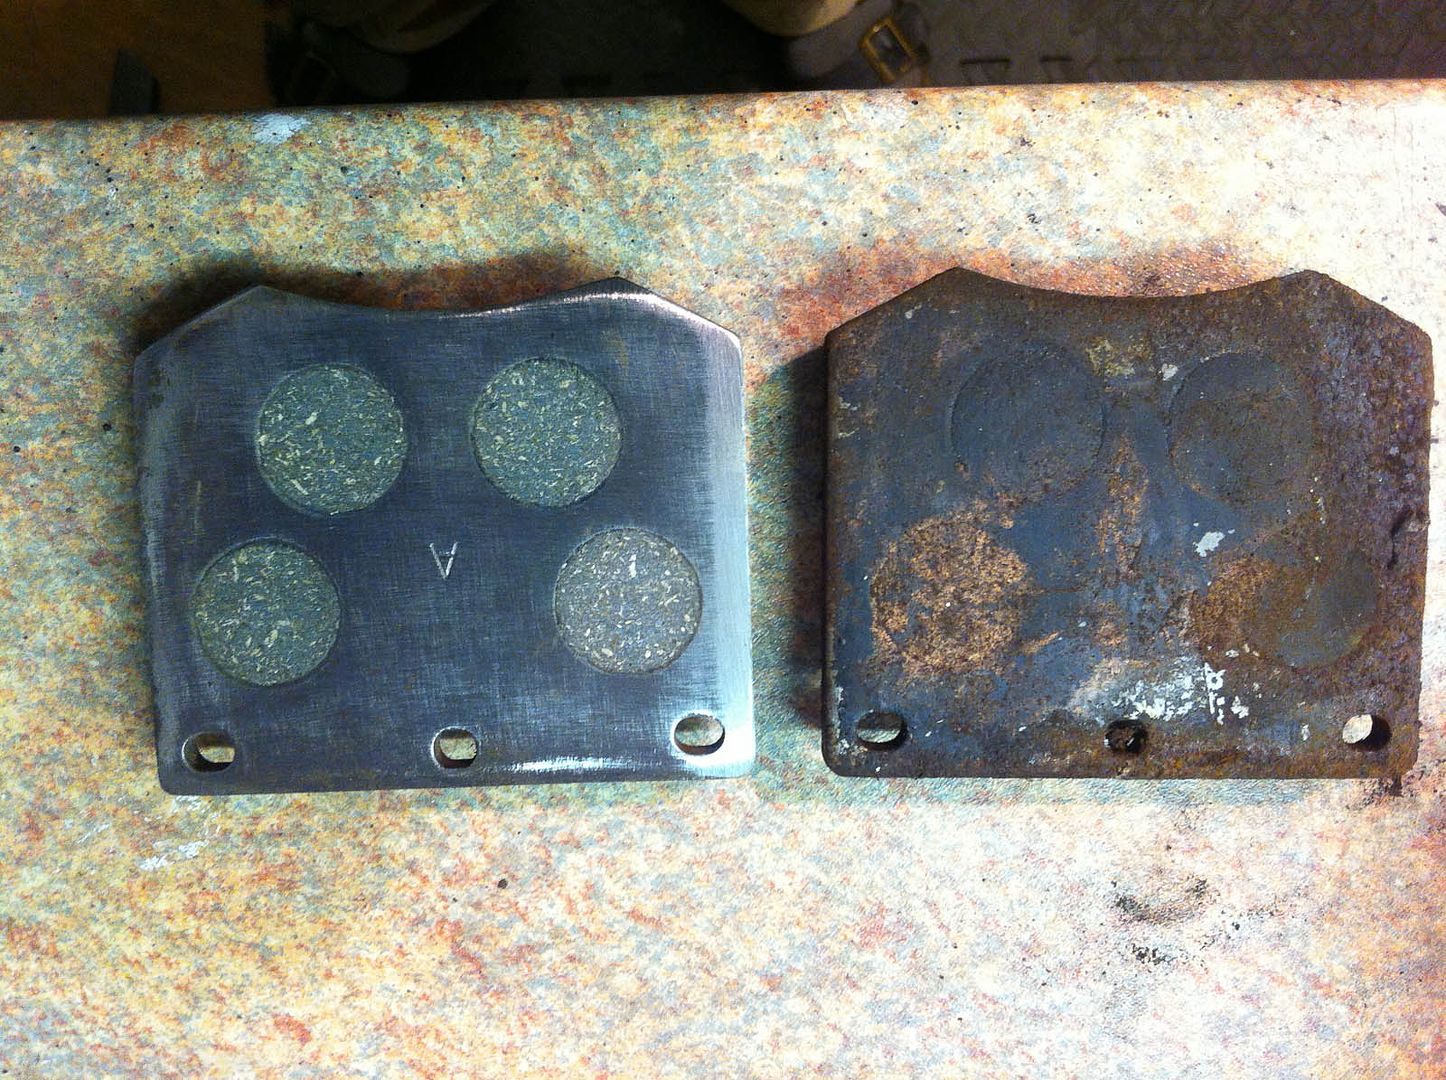
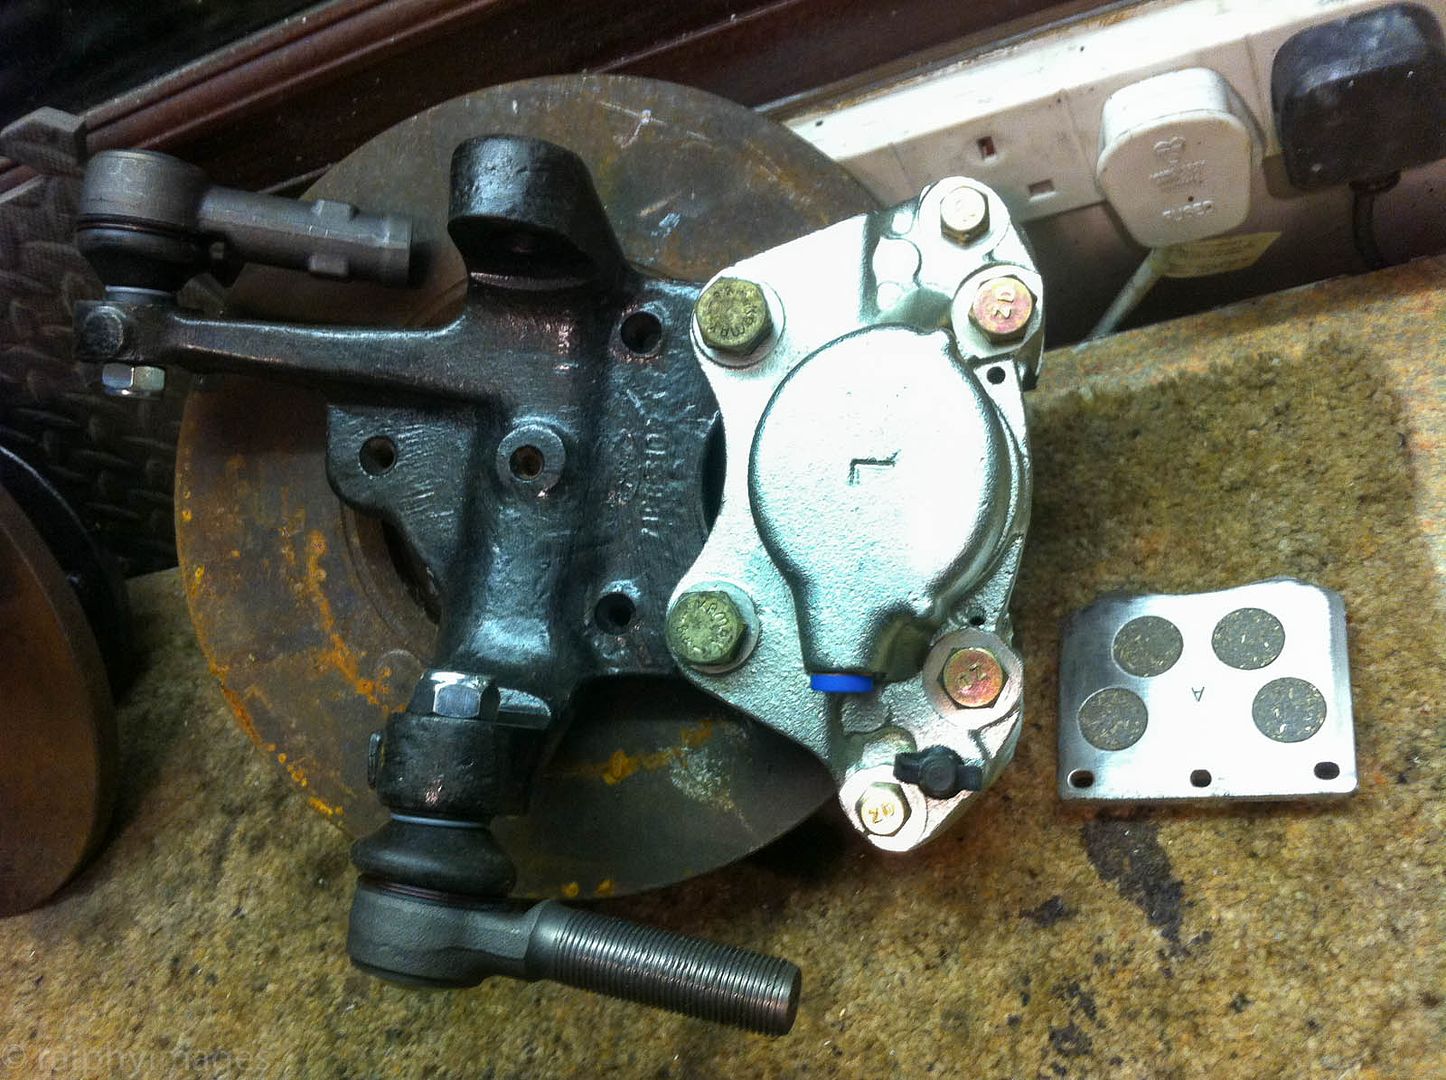
Front caliper brakes. They were in pretty bad condition cosmetically and upon inspection it wasnt just cosmetic. The only thing to do was to strip them down completely and re-build from scratch.
(Sorry about the crap phone pics).
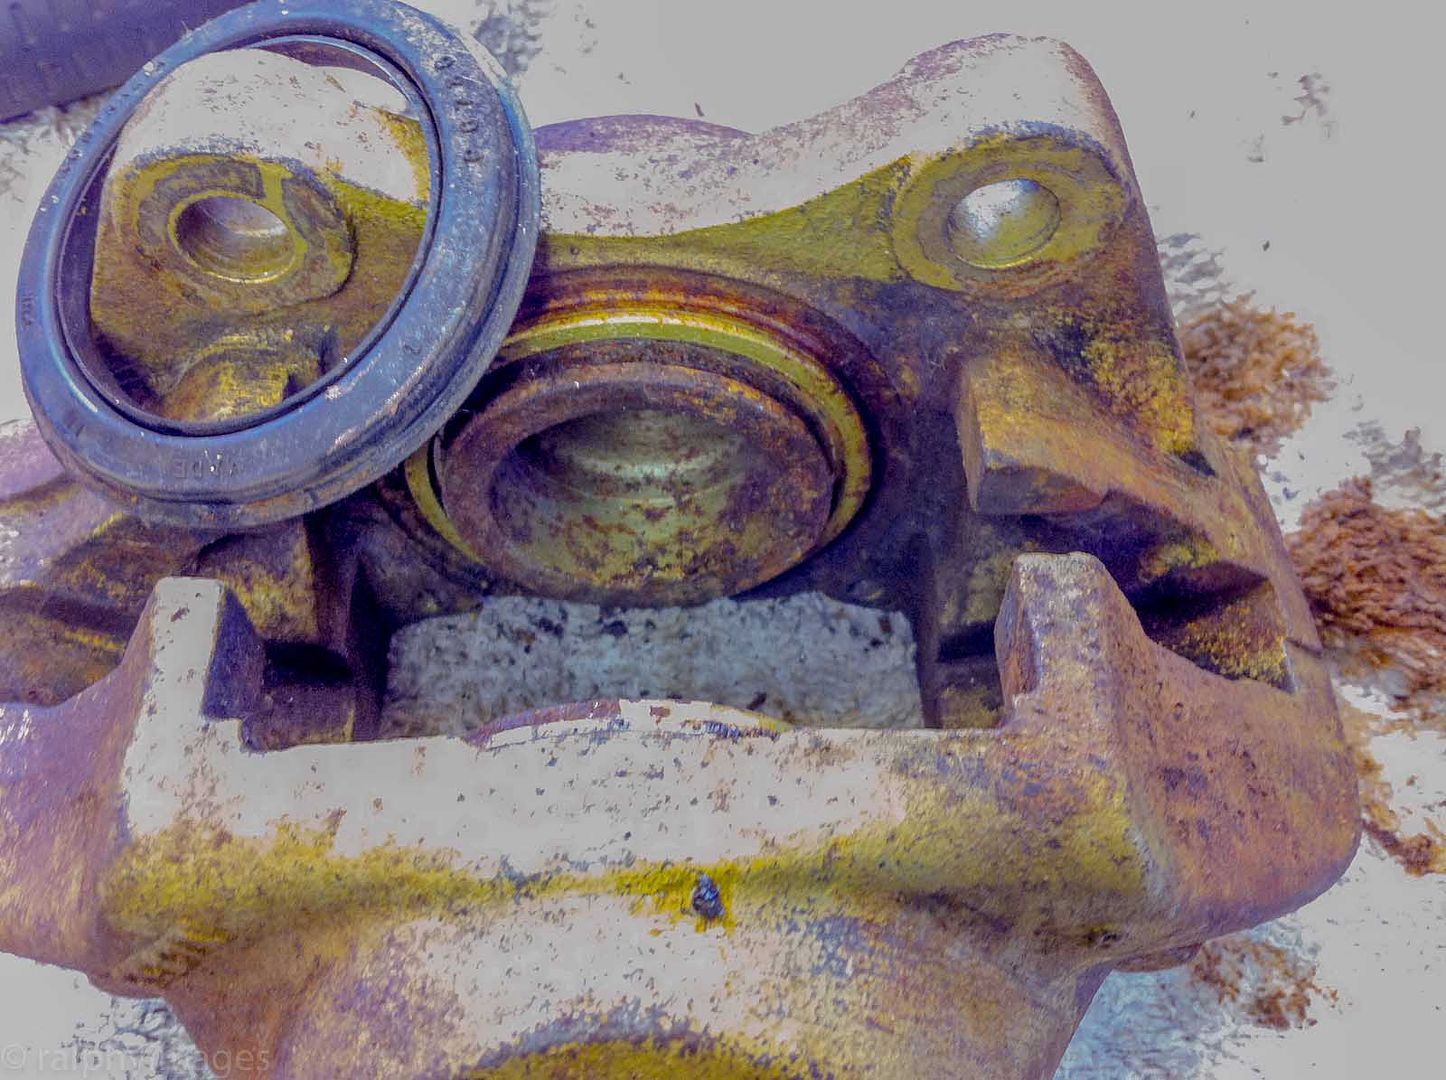
Remove the piston seals:
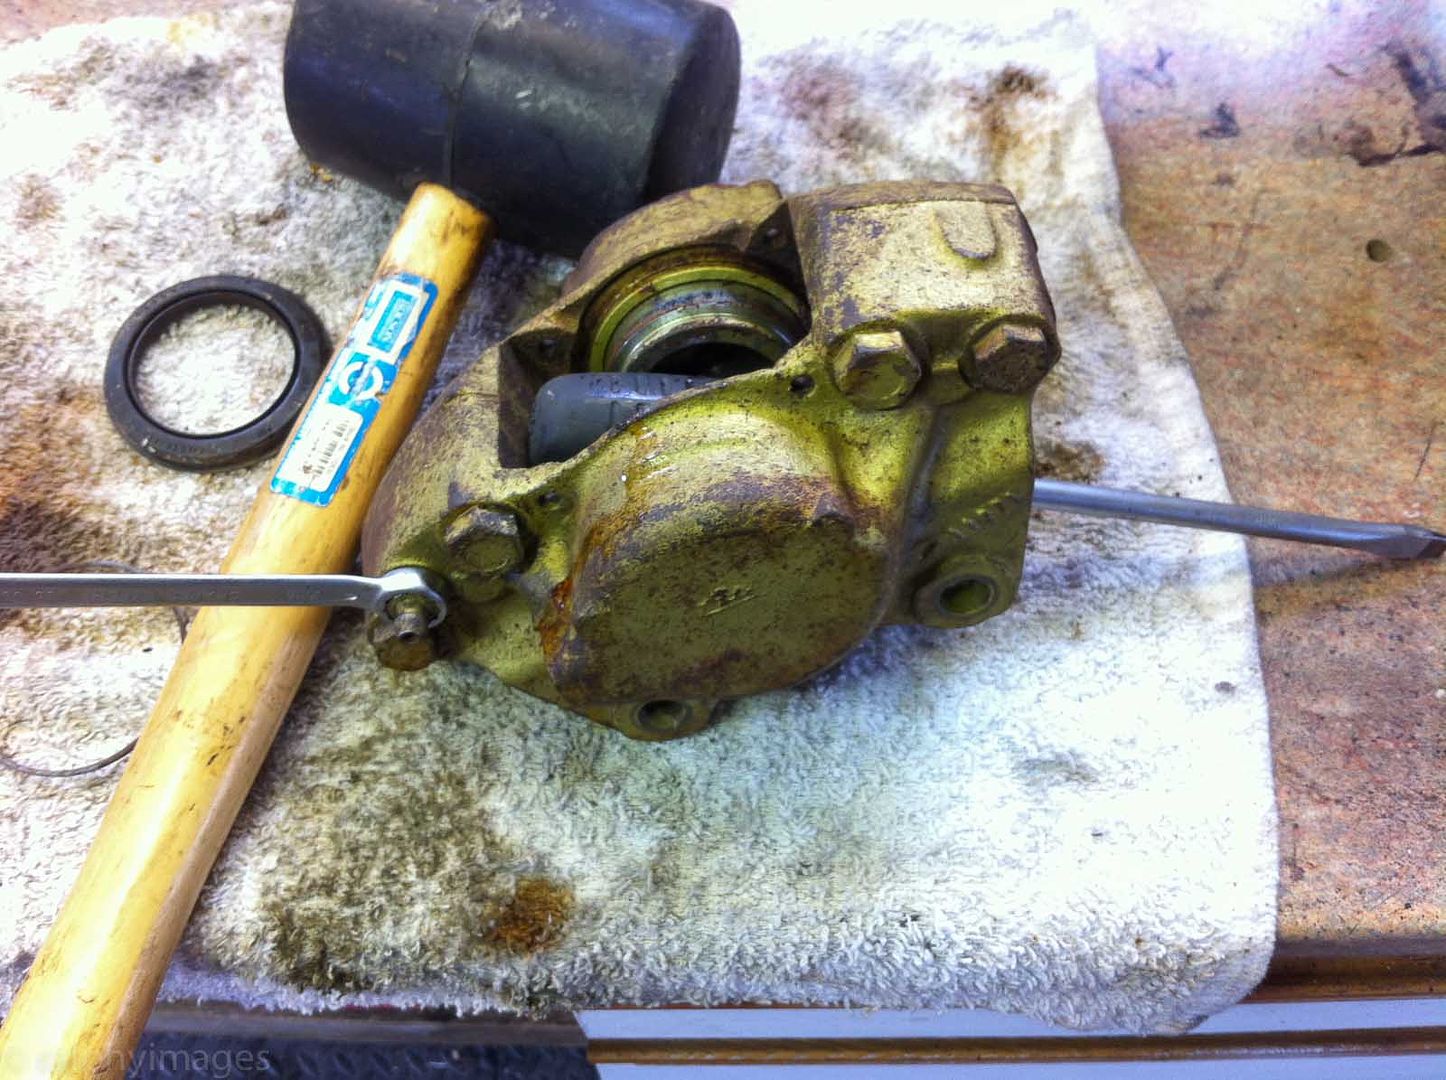
To find that the pistons themselves were seized solid.
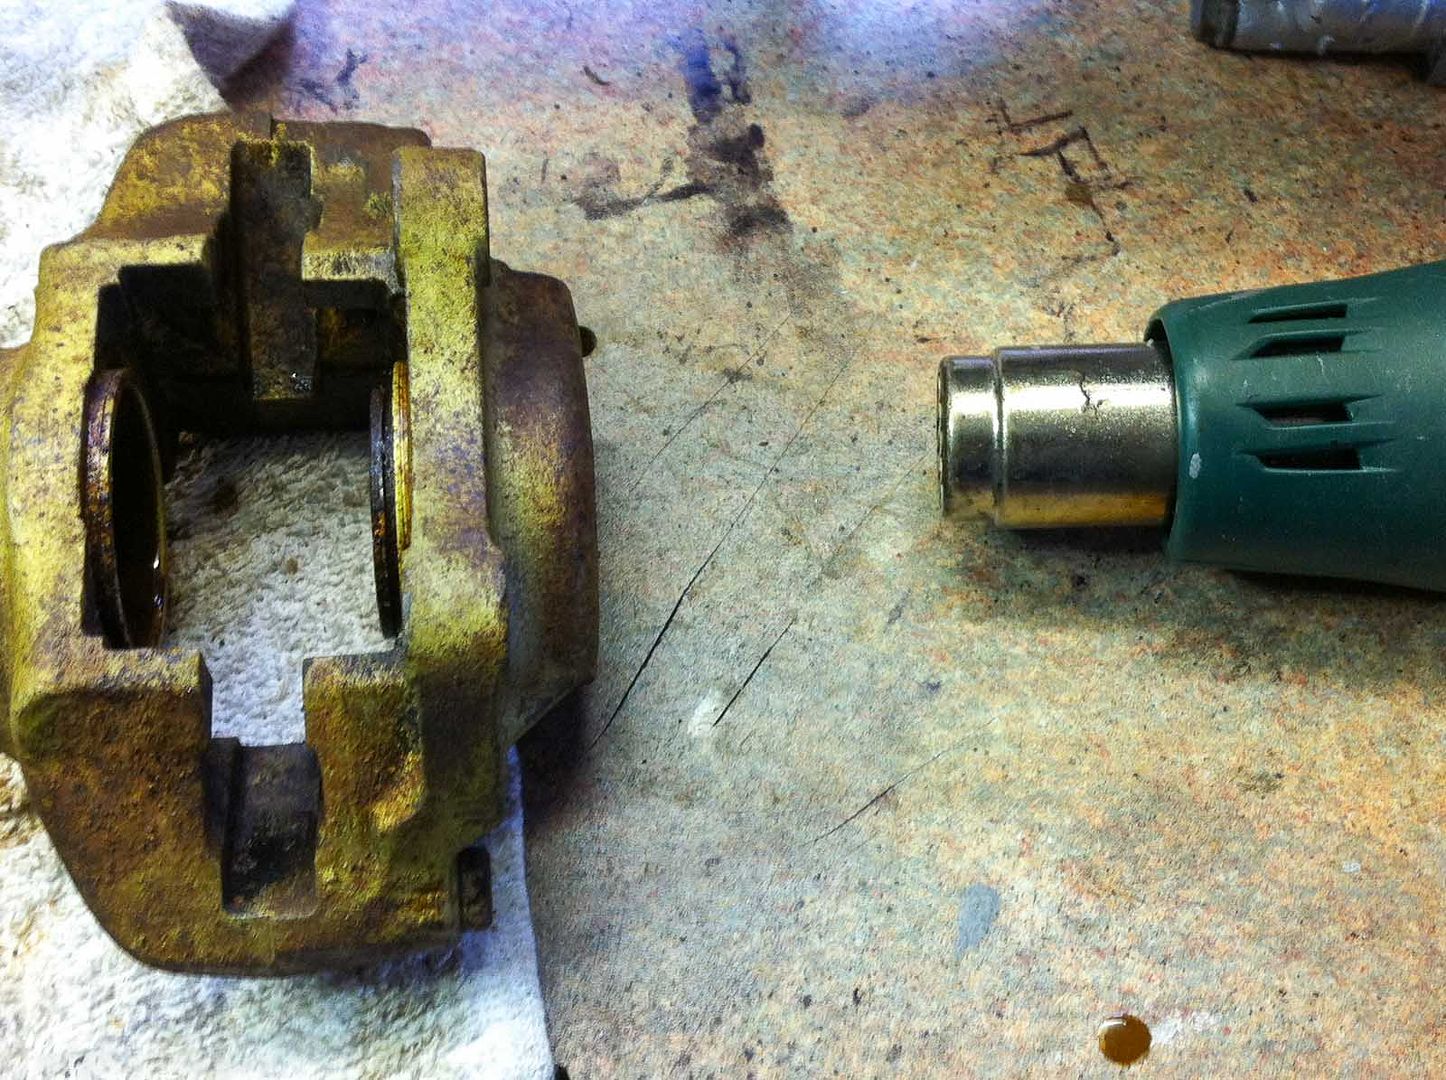
After several days application of Plus-Gas it was down to heating them up:
and then blowing them out by compressed air:
Finally a result:
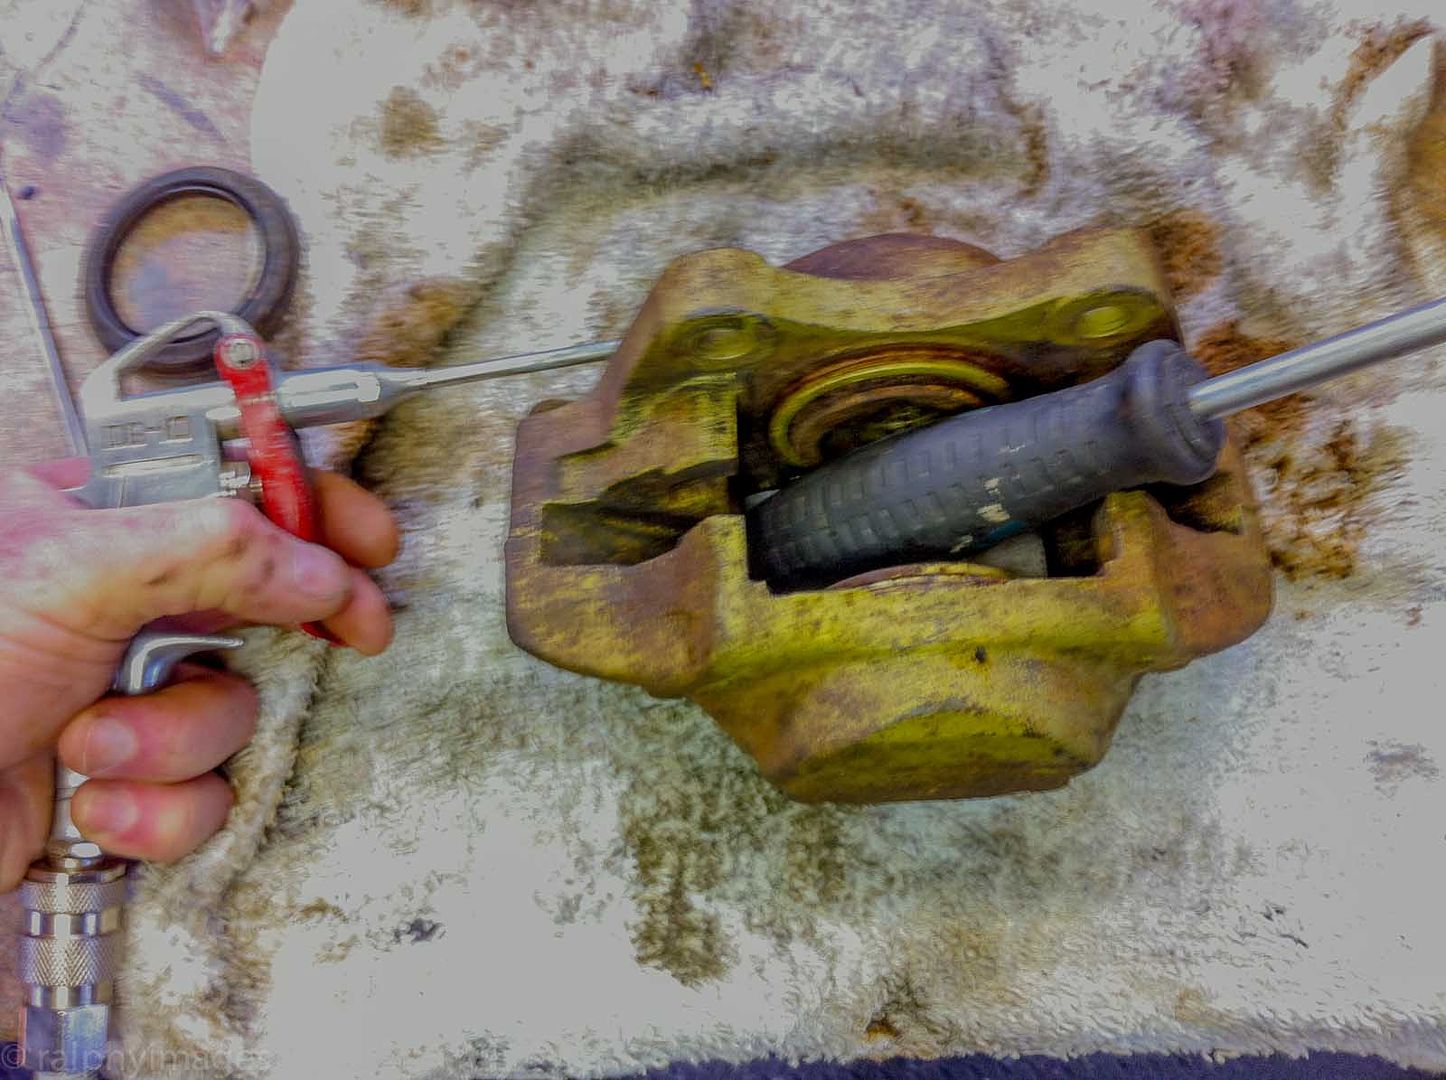
Then remove the corroded bleed valves:
The plan is to have the casings blasted, then coated and followed by a replacement of the pistons and seals.
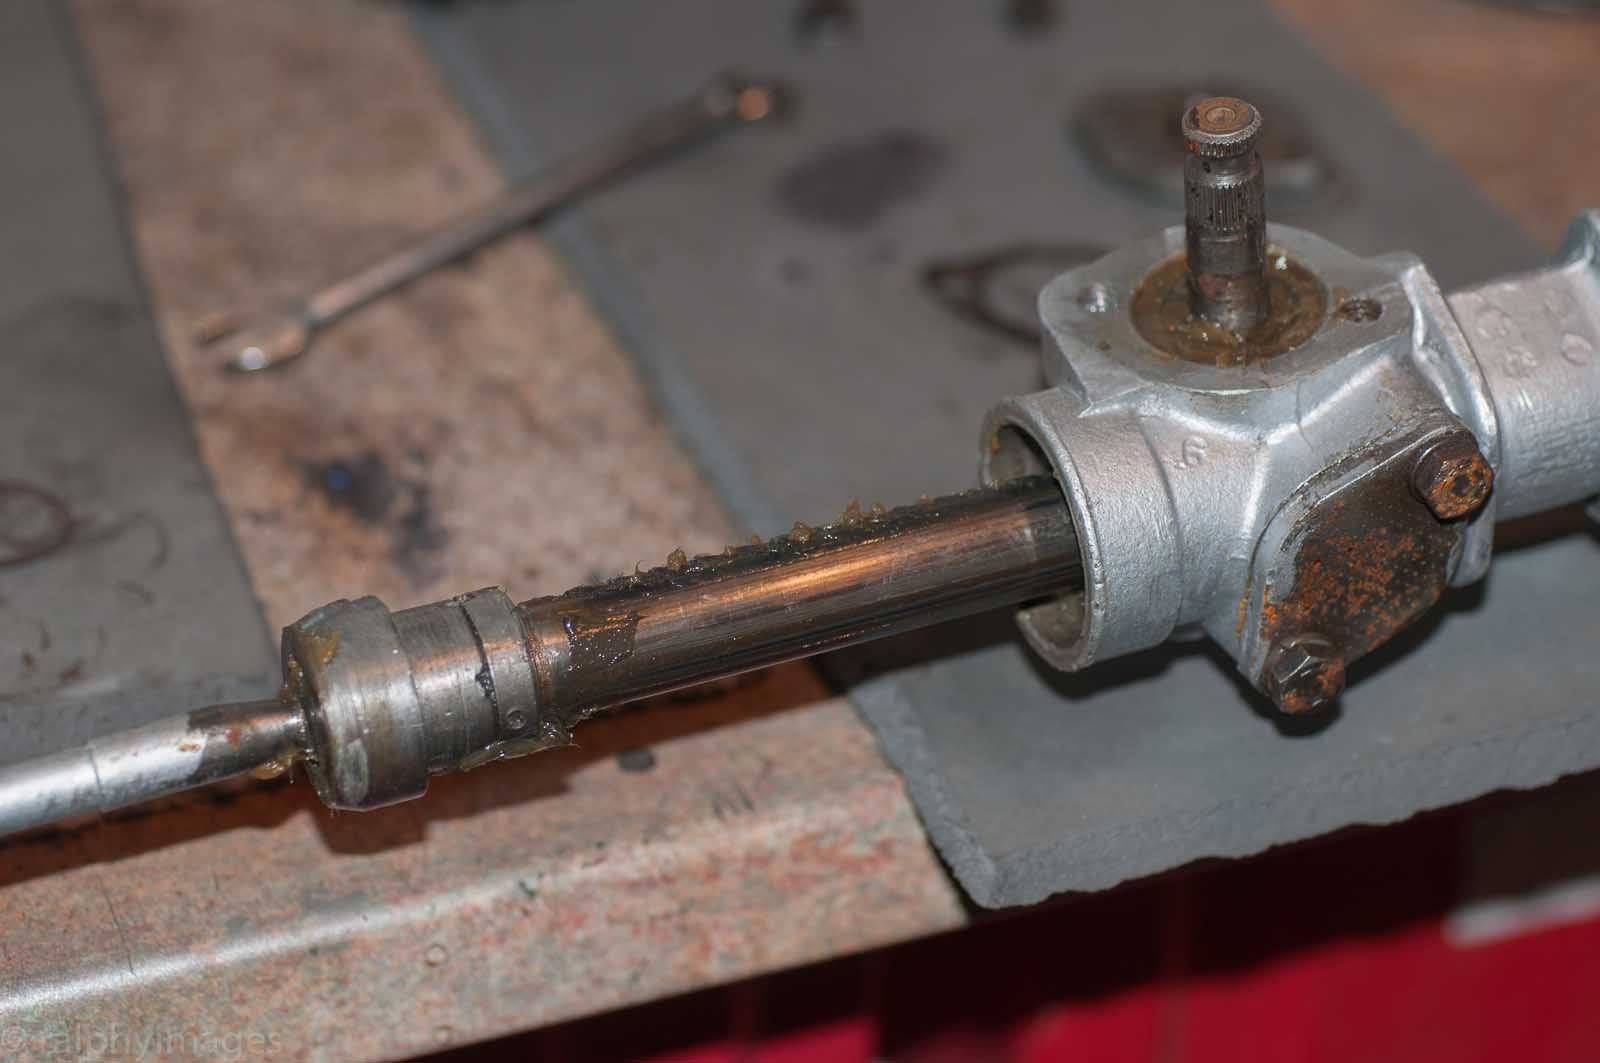
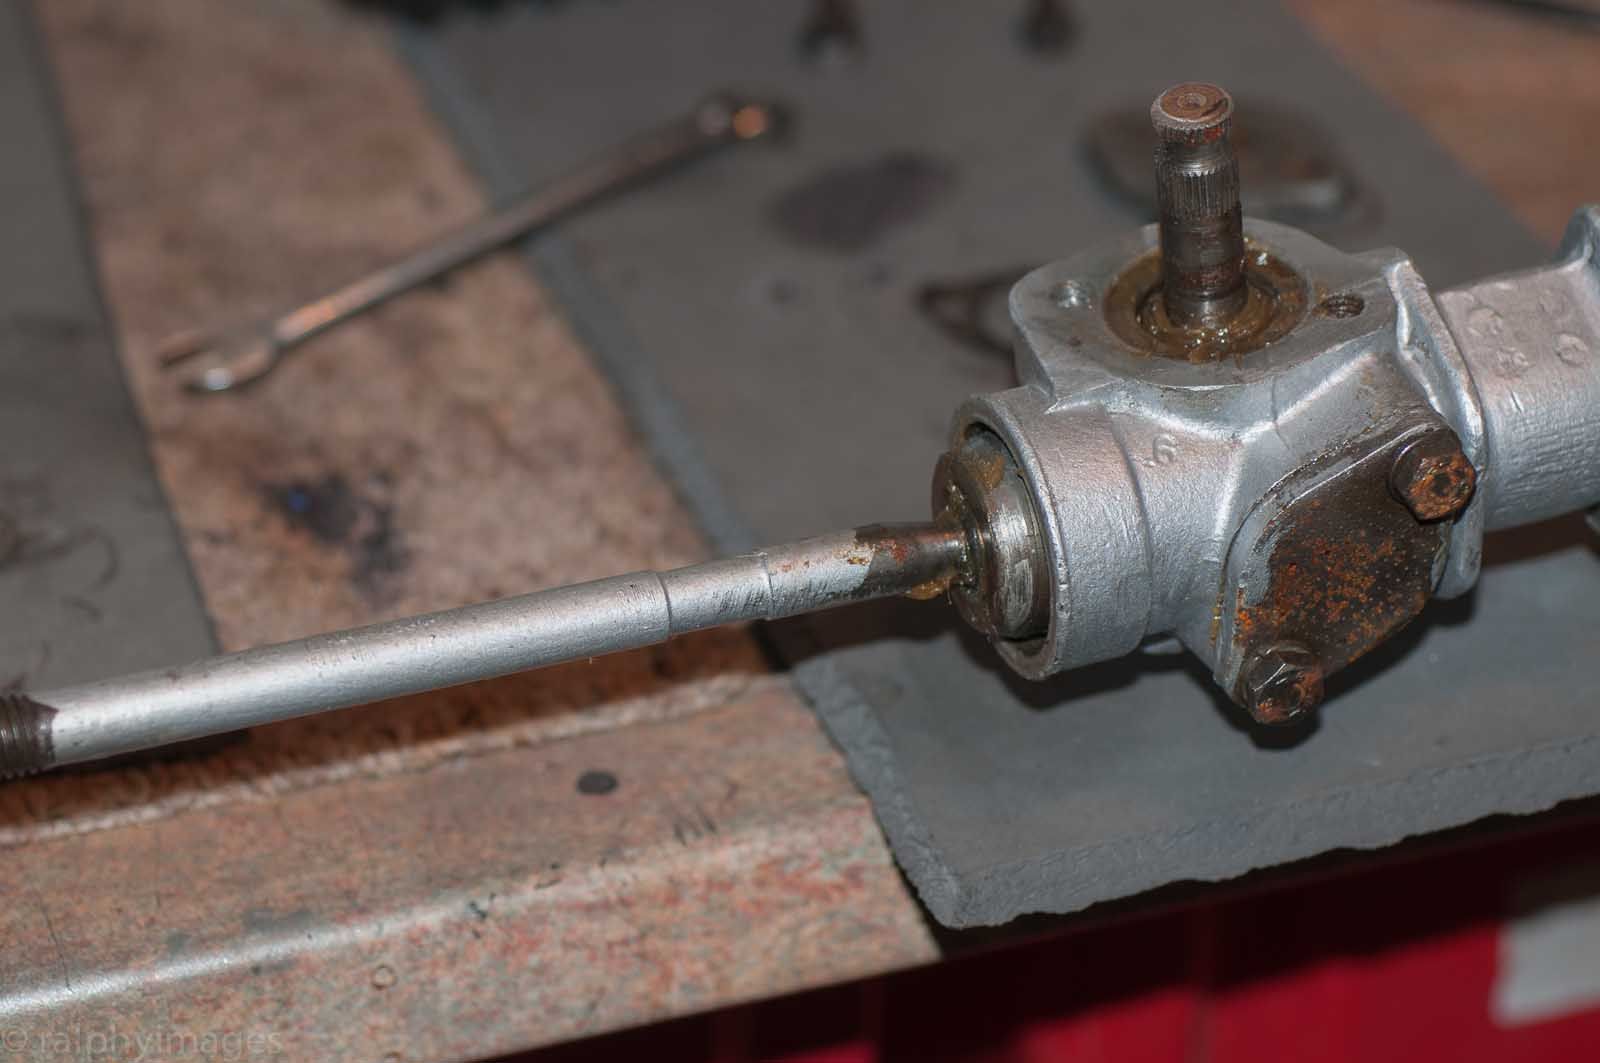
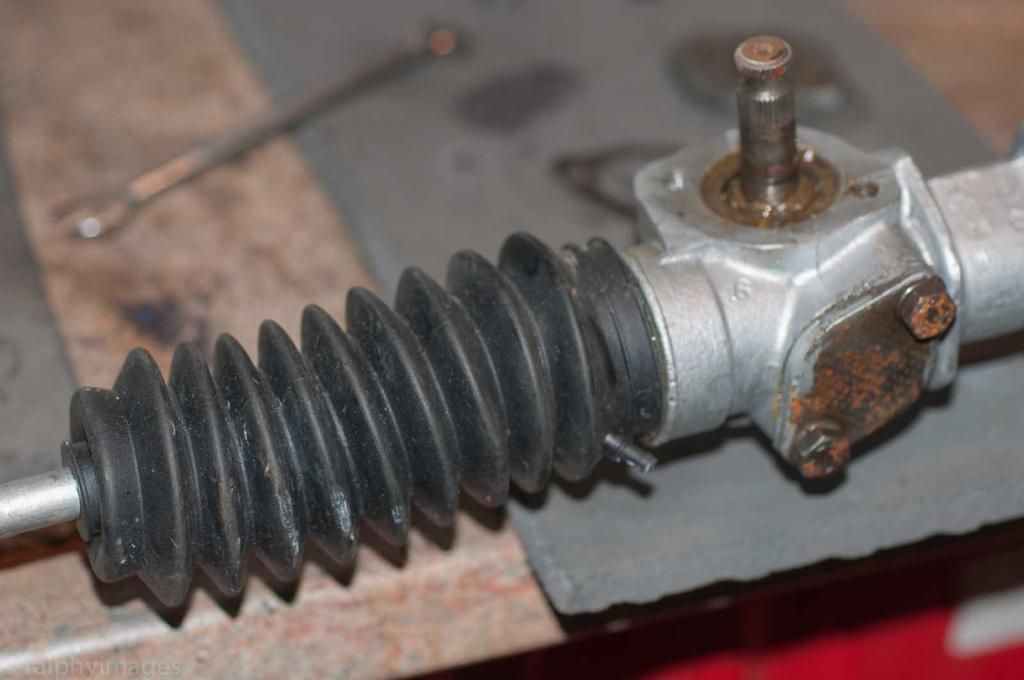
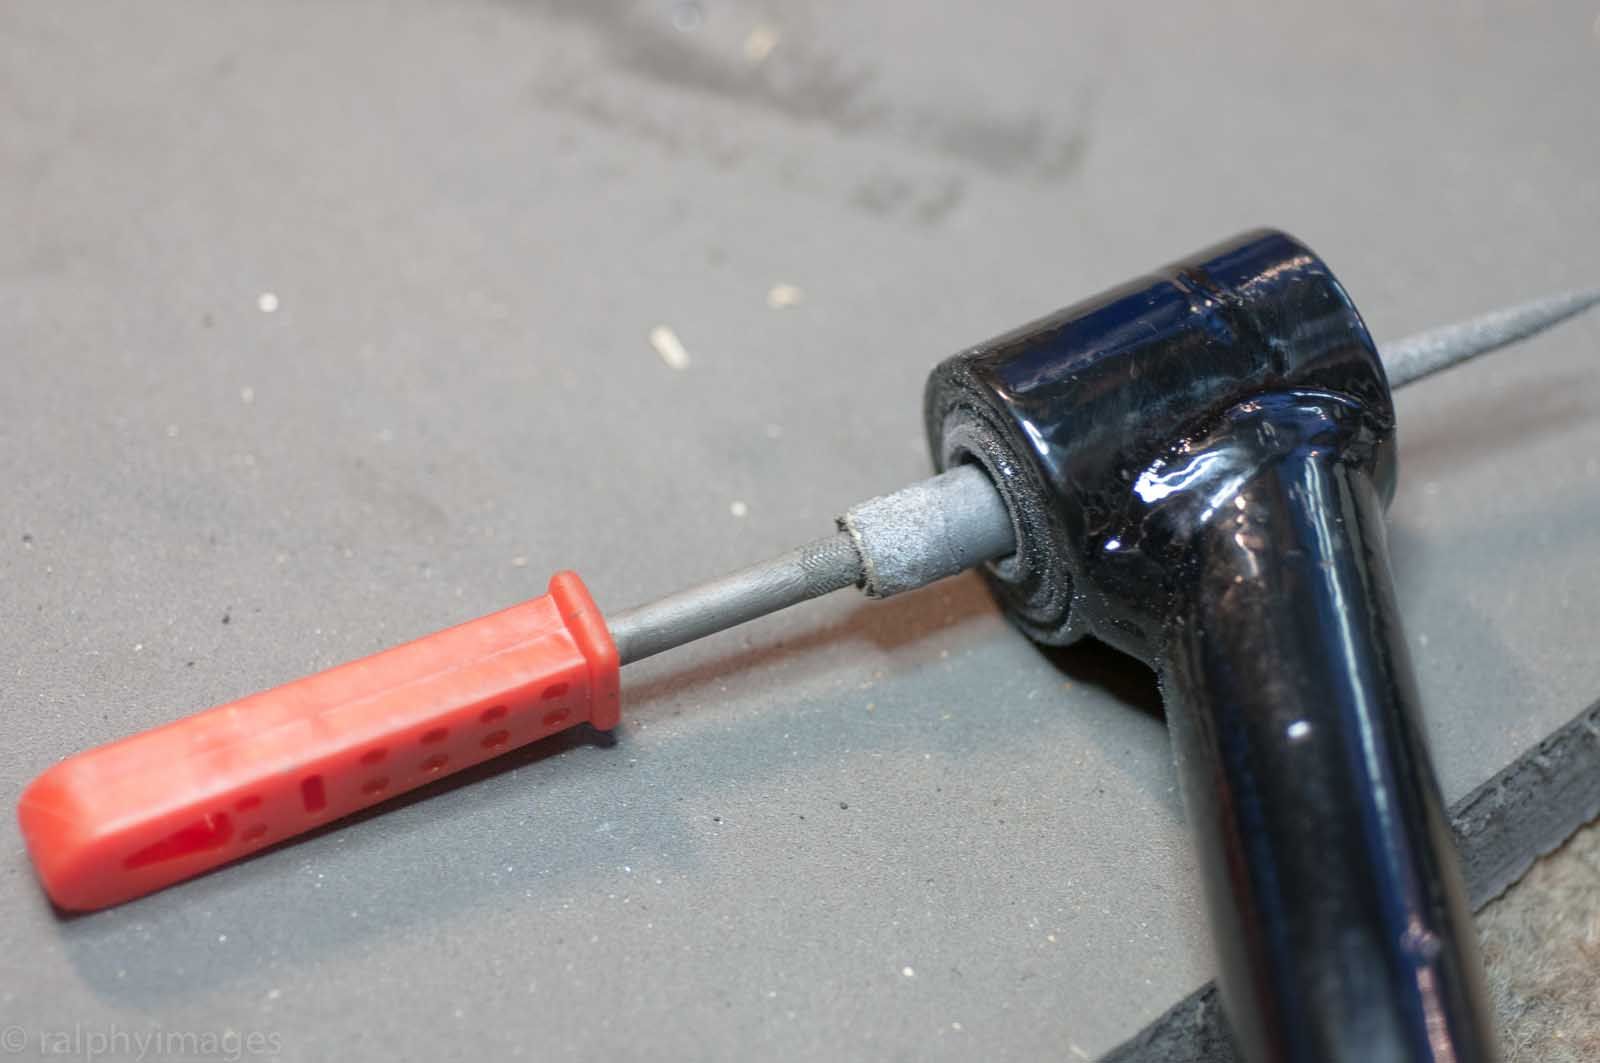
Steering rack. Not in too bad a condition overall, so just a question of strip, re-grease, check tolerances and then rebuild with new gaiters.
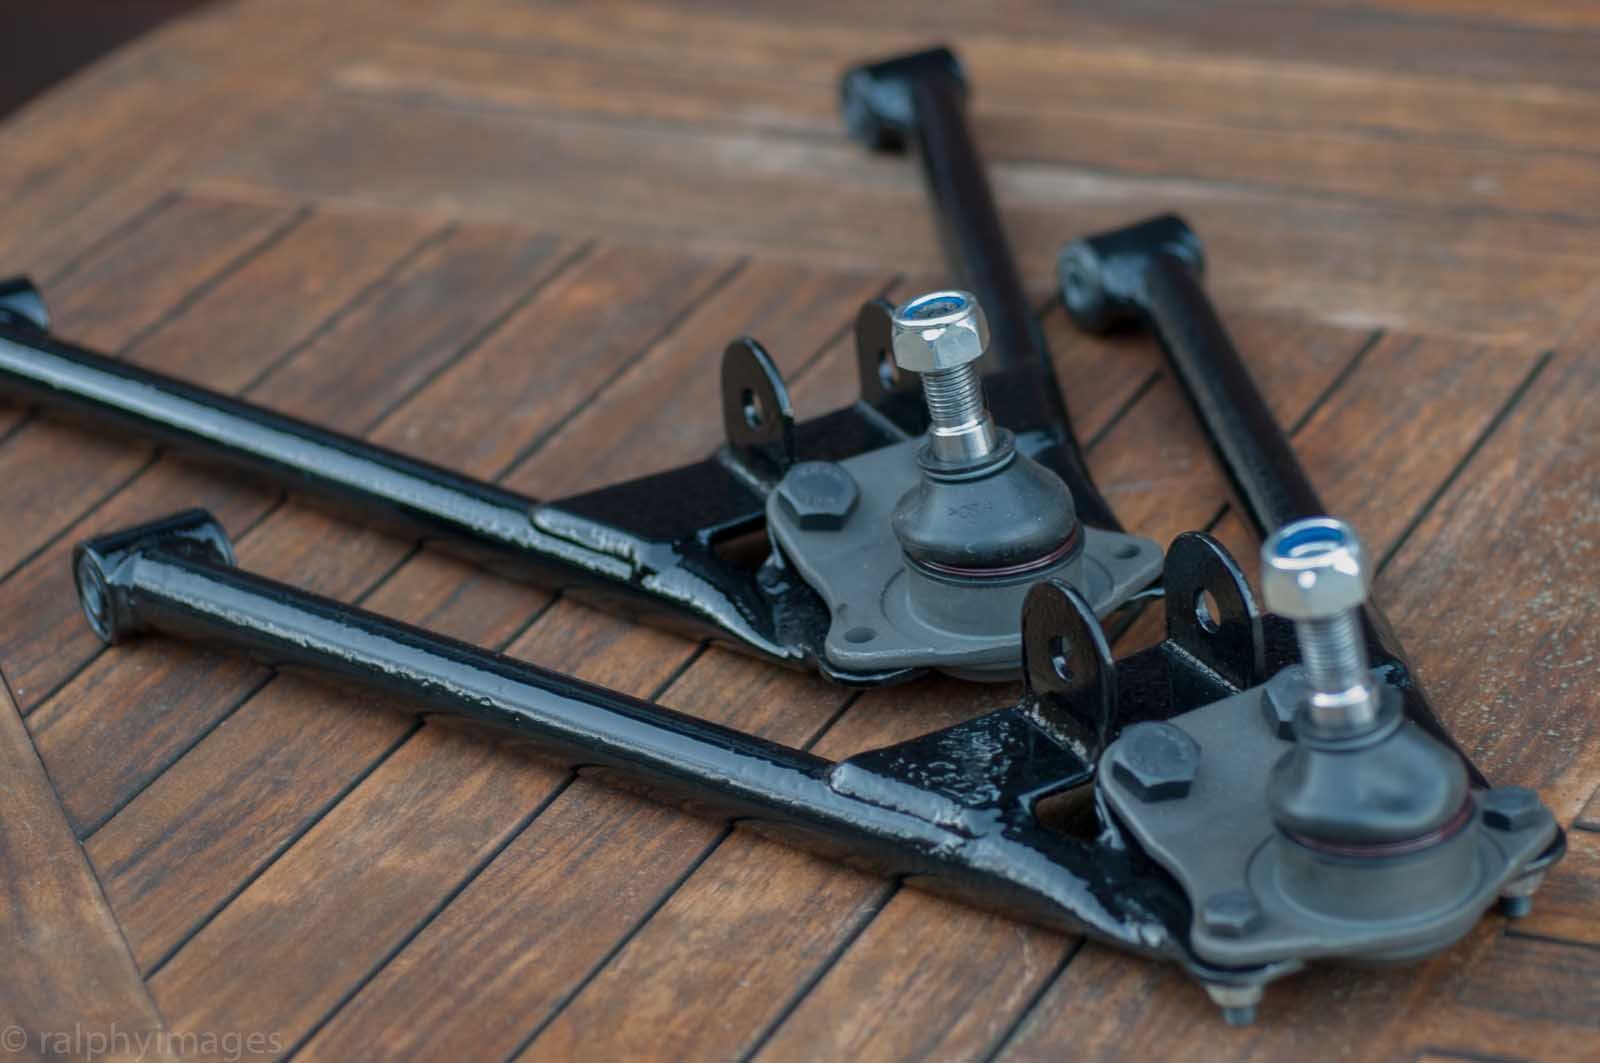
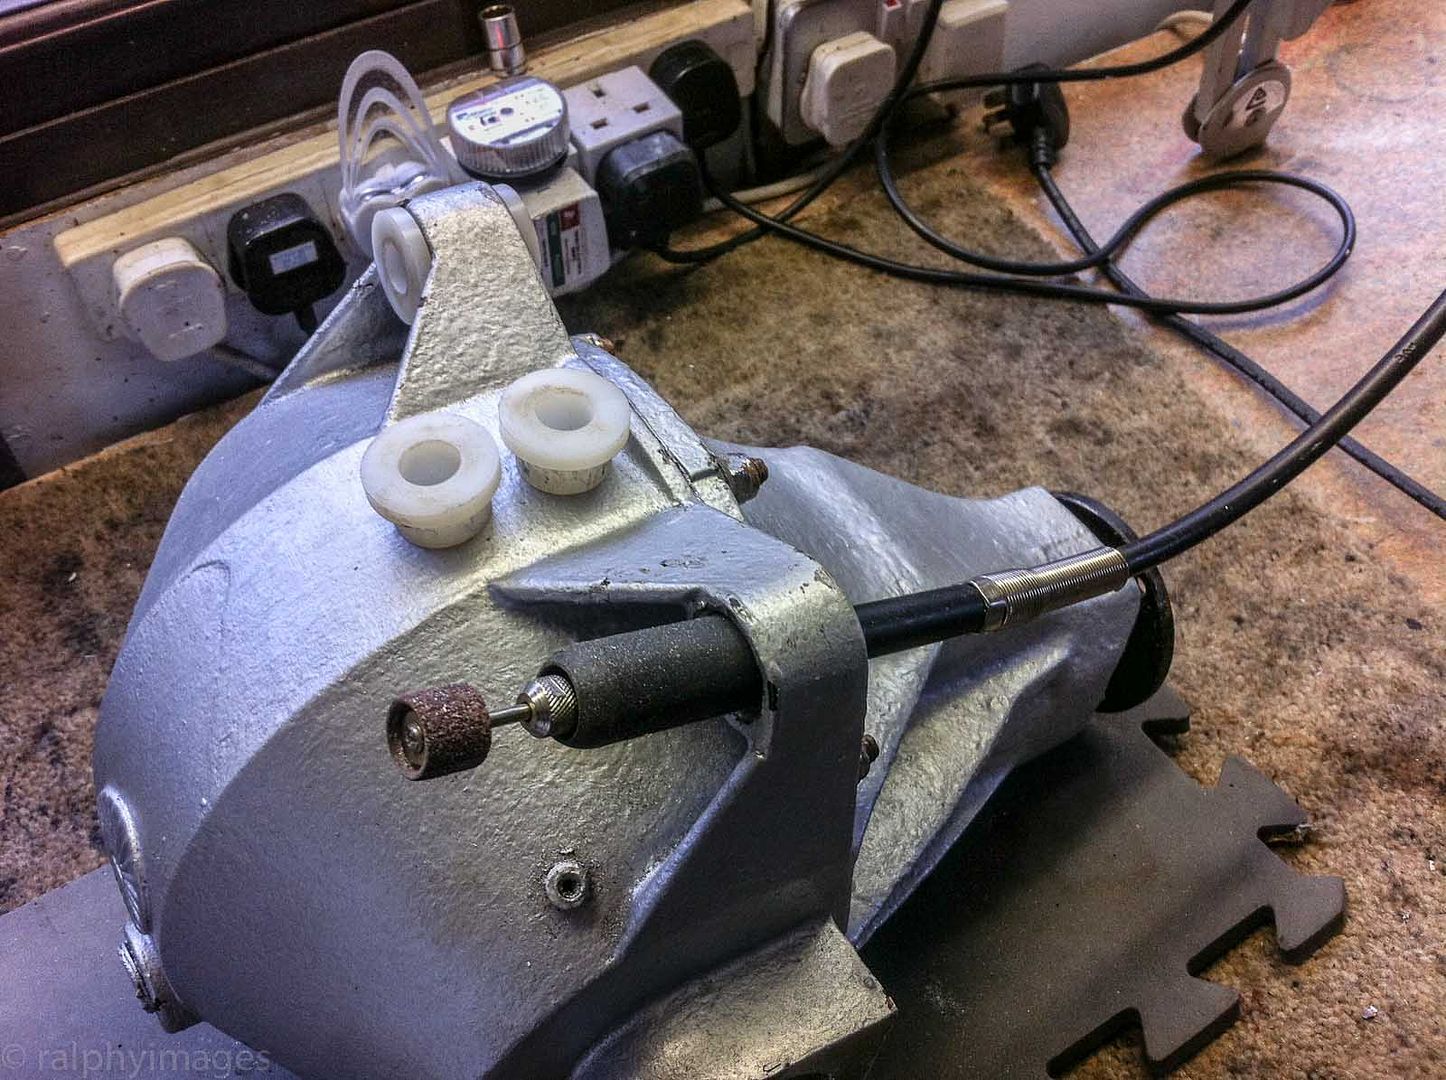
Suspension. Clean up the bushes post painting and check the internal dimensions for wear:
Then fit the new ball-joints:
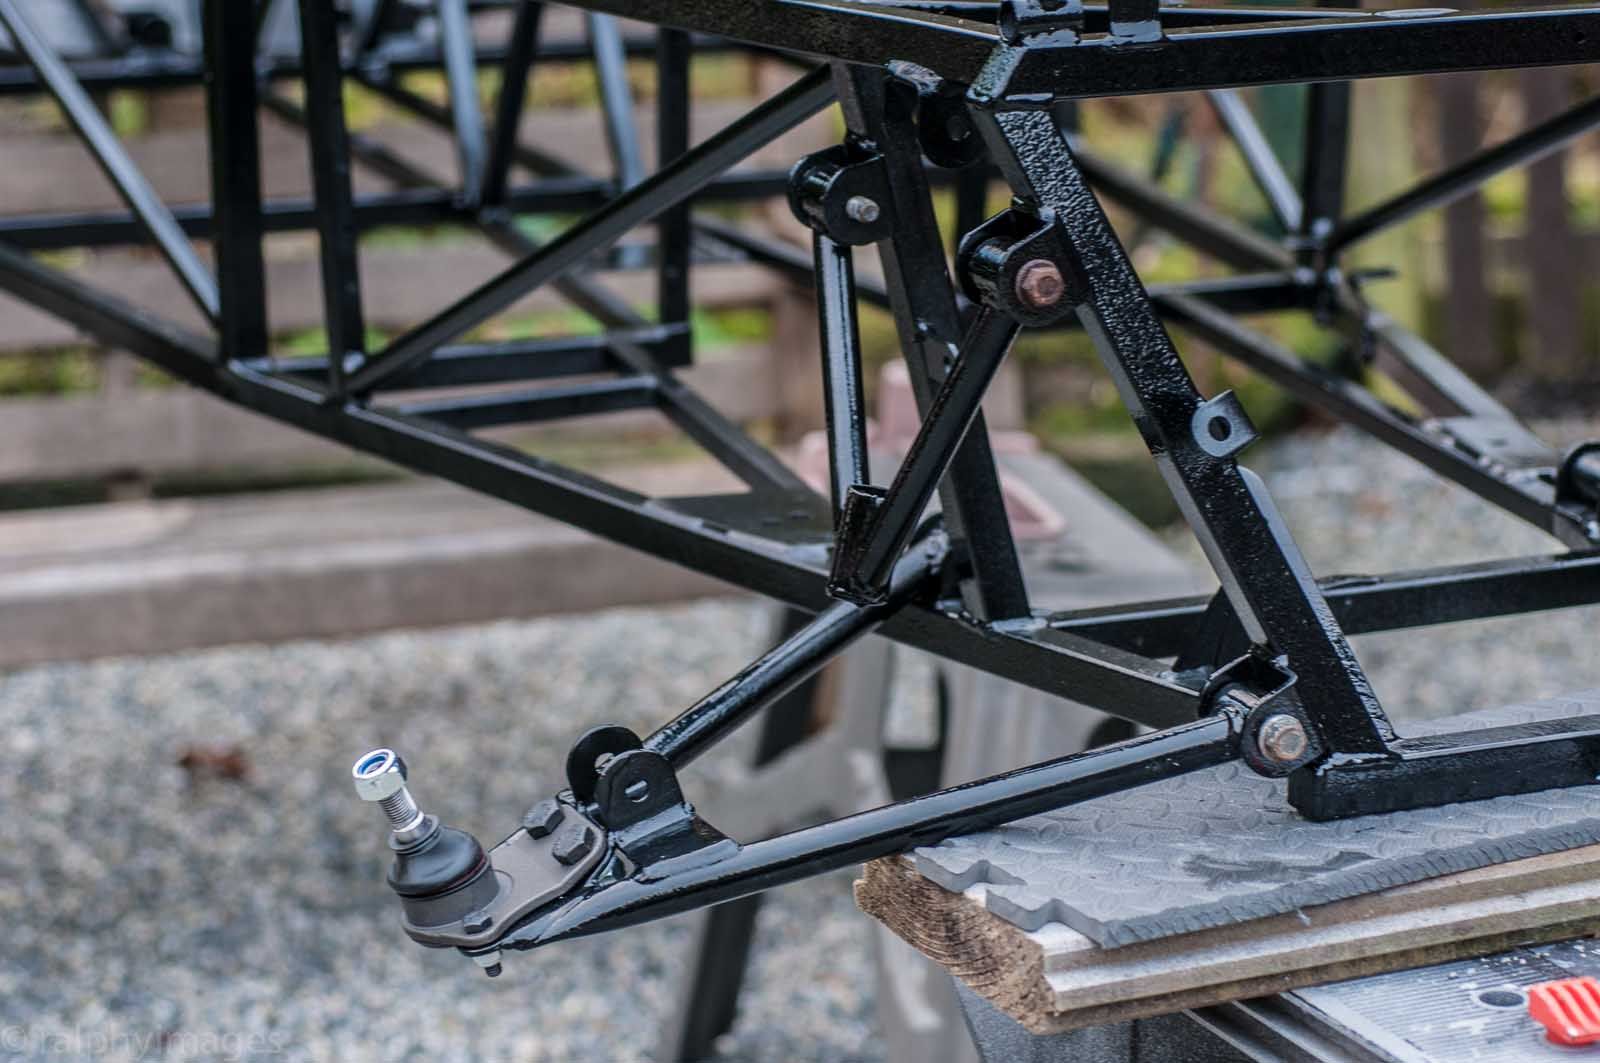
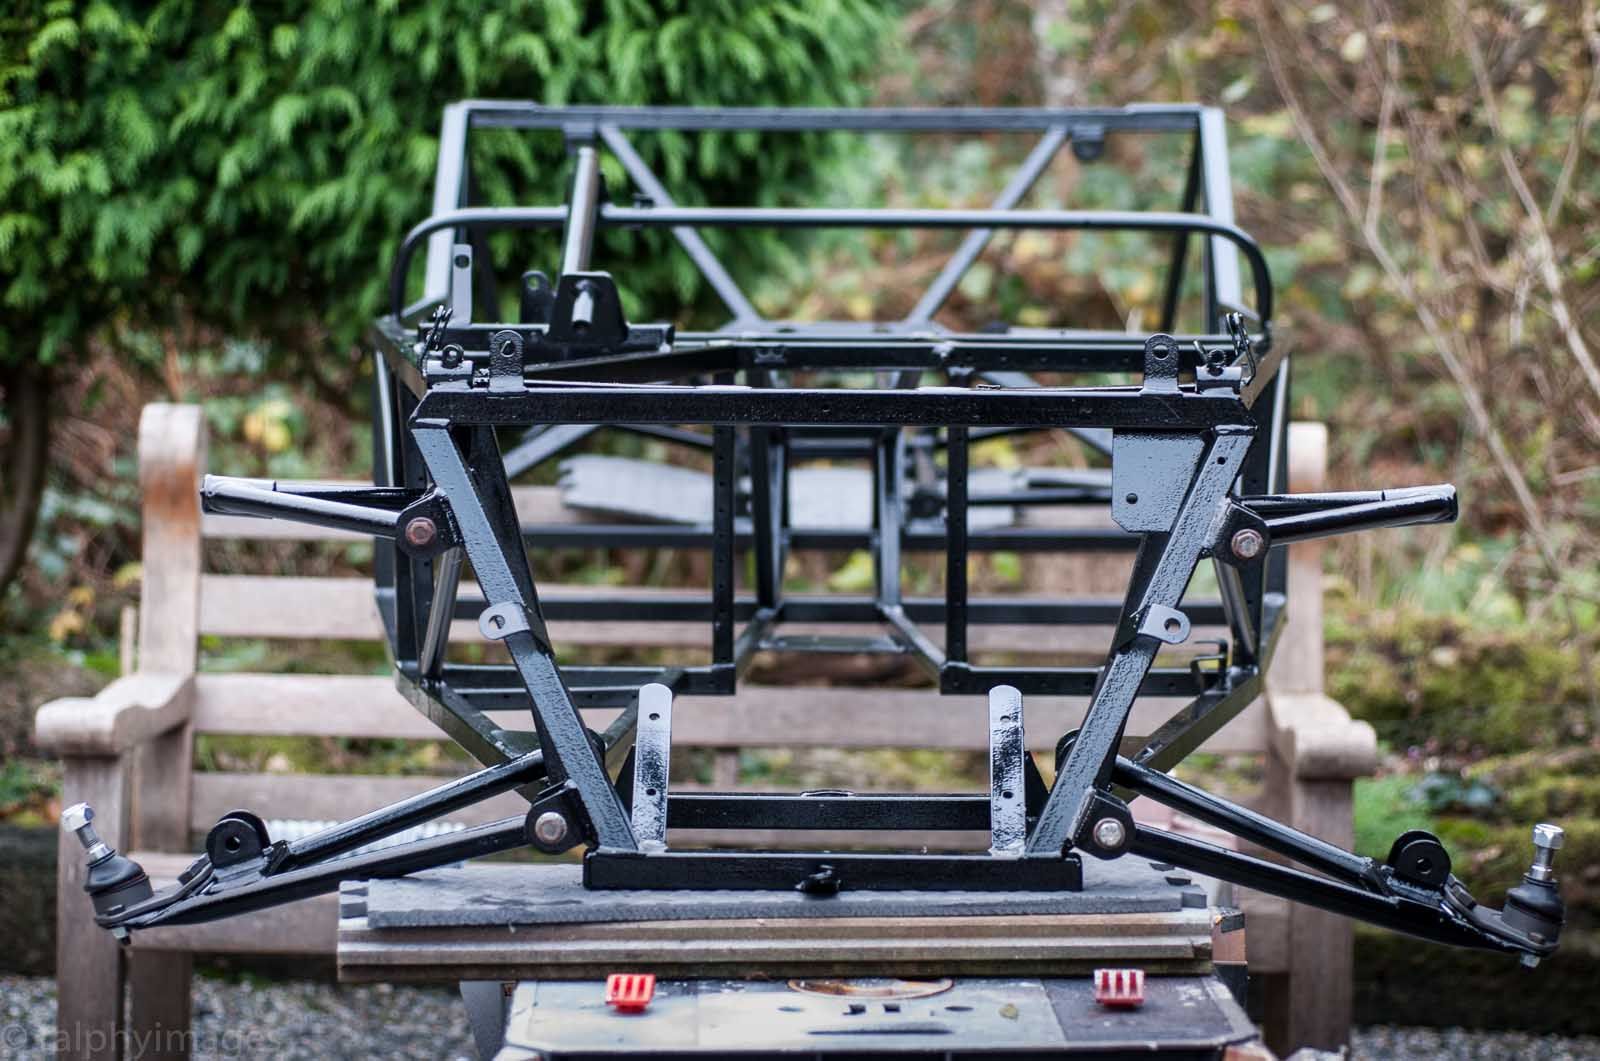
And then start the re-build of the suspension onto the chassis:
All suspension arms re-fitted (albeit temporarily with old bolts):
Planned for the coming week is to fit the upper wishbone ball-joints, wheel carriers and steering rack - and also to get on with the (rapidly-growing) list of SWMBOs things to do before Christmas, none of which include 'that bloody wreck of a car'...
R
Ignorance breeds Fear. Fear breeds Hatred. Hatred breeds Ignorance. Break the chain.
Ralphy, once again a great posting!
Personally, I wouldn't skimp (is that the correct term in English?) on suspension bushes. They aren't very expensive but new bushes certainly change the way a car drives and handles. Often, the 'performamce' version is too firm, the 'comfort' version is just about right for street use.
Menno

https://www.google.co.uk/search?q=we...w=1024&bih=651
its got me interested,not so many of the older style mudguards it seems so I would keep them.
I went through a learning curve with bushes on the Chimaera: after trying various configurations I ended up with rubber as being the most preferable compound. So Ill stick with that for the Westy, the only change Im making is the differential box mounts as finding rubber replacements proved to be so expensive that I've got a friend to machine out polymer ones for me. Im just cleaning out the mounts for these now with my Dremel by coincidence.Originally Posted by thieuster

I will be keeping them, as Im keen to keep the look of the car to be reasonably close to the original build: not to the point of obsessiveness but more as a guiding premise.
R
Ignorance breeds Fear. Fear breeds Hatred. Hatred breeds Ignorance. Break the chain.
I'd go along with that. A very light car with no compliance in the suspension bushes is a nightmare to drive anywhere other than on a race track.
Although no trees were harmed during the creation of this post, a large number of electrons were greatly inconvenienced.
I agree i had a old Kawasaki Z400j with marzocchi race shocks so firm the slightest bump threw you out of the seat.
leave it for the track lol
Performance and Comfort are titles given by Polybush. According to what I've read/understand, I think that Ralphy is trying to maintain the original compound: rubber. In many cases a good idea, but when rubber gets older, it will crack. As far as I can see there are 4 choices:
- re-using the original bushes
- searching for new 'old' bushes
- performance parts
- comfort parts.
Westfield raided various manufacturers' parts bins in the past, so searching for the original version will not bo too difficult, I think.
And given Ralphy's knowledge and experiences I'm sure the end result will be perfect!
Menno
Besides the point, but worth mentioning: removing the old bushes can be done with a torch. Only to be performed with no H&S officer in sight. Installing new bushes can be very difficult without a hydraulic press. But, there's a trick: put the new bushes in the deep freeze for a night. They will shrink a little. With a lot of grease they can be installed when still cold!
Menno
Last edited by thieuster; 25th November 2013 at 18:55.
I find it's usually fairly easy to get them out and back in with a couple of sockets and a big vice.
Last edited by Groundrush; 25th November 2013 at 19:05.
+1
We called that the 'poor man's press' when I was growing up :)
Never just bash em with a hammer... I know Ralphy wouldn't do that, but I'm just adding it for those reading later who are picking up tips...
Will Christmas bring an influx of natty goodies for the Westy Ralphy?
A bit late commenting on this thread but I have been following avidly. Great work, Ralphy.
I am re-doing the rear suspension of my Stag and the old rubber bushes took a fair bit of persuasion to come out. A hacksaw, a home made puller, a vice and plenty of choice Anglo-Saxon did the trick.
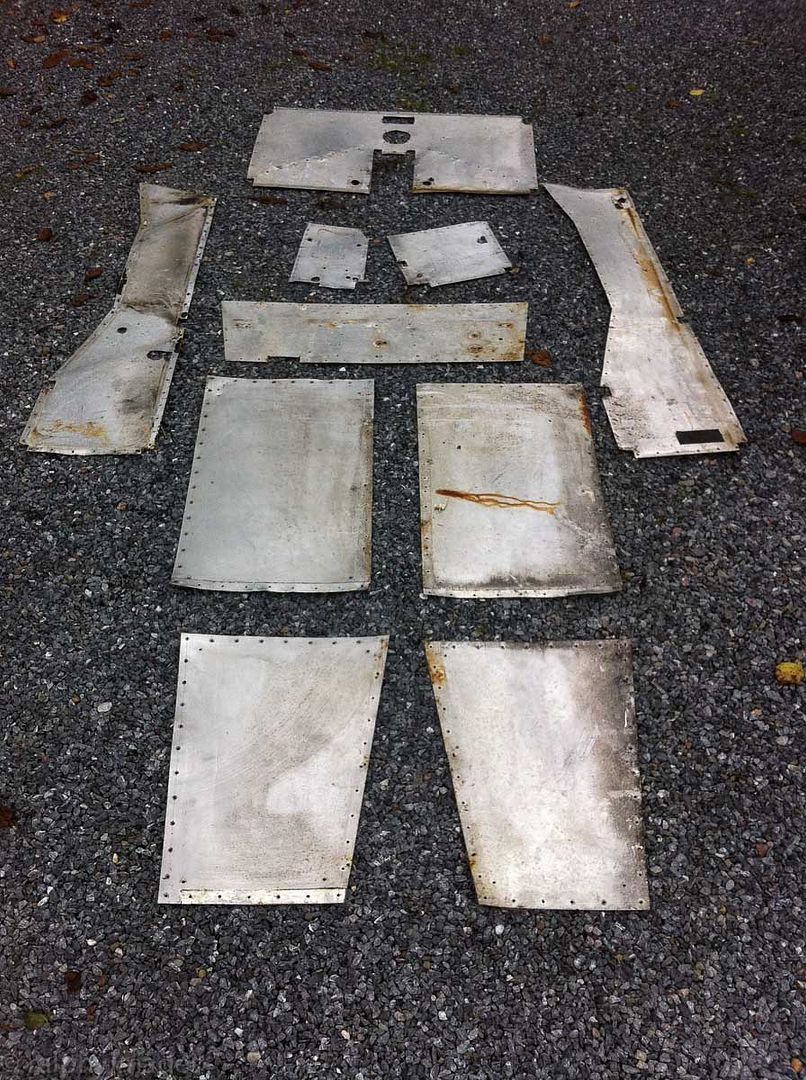
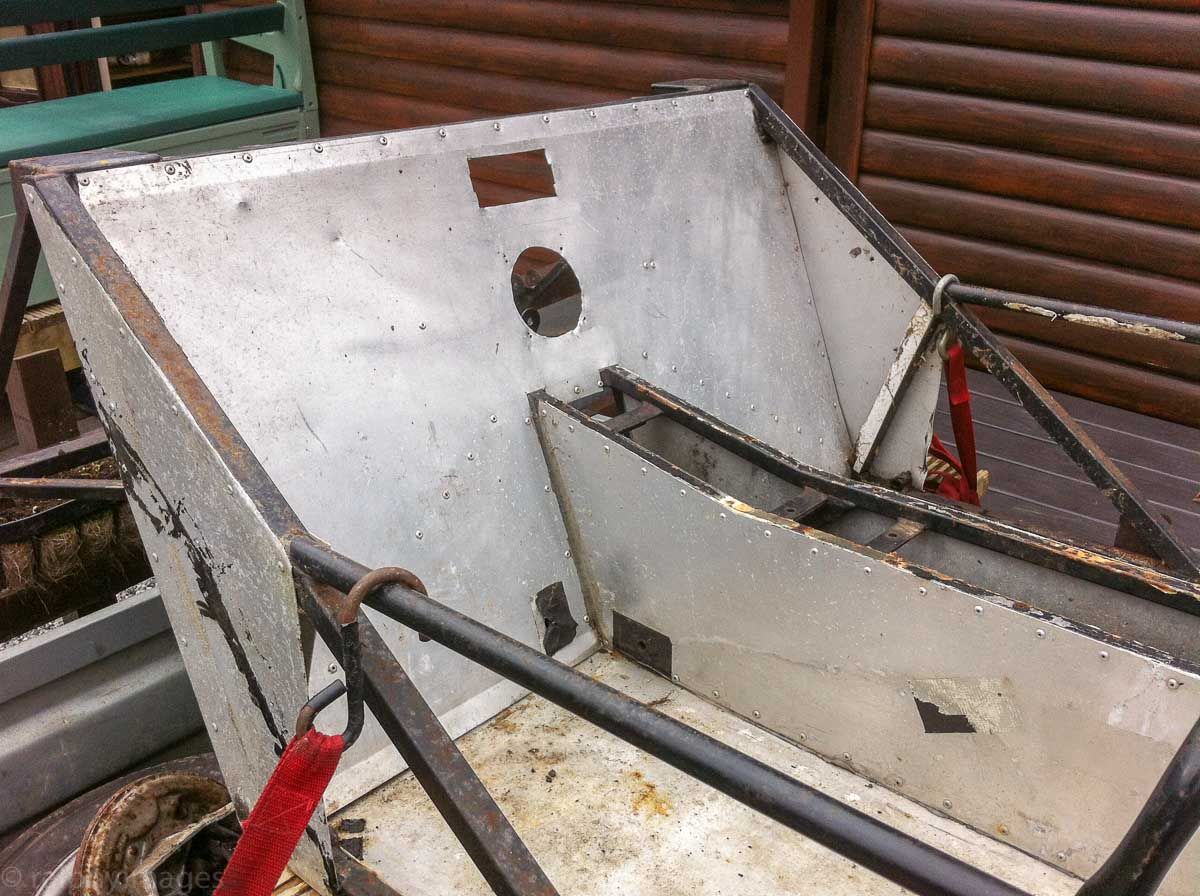
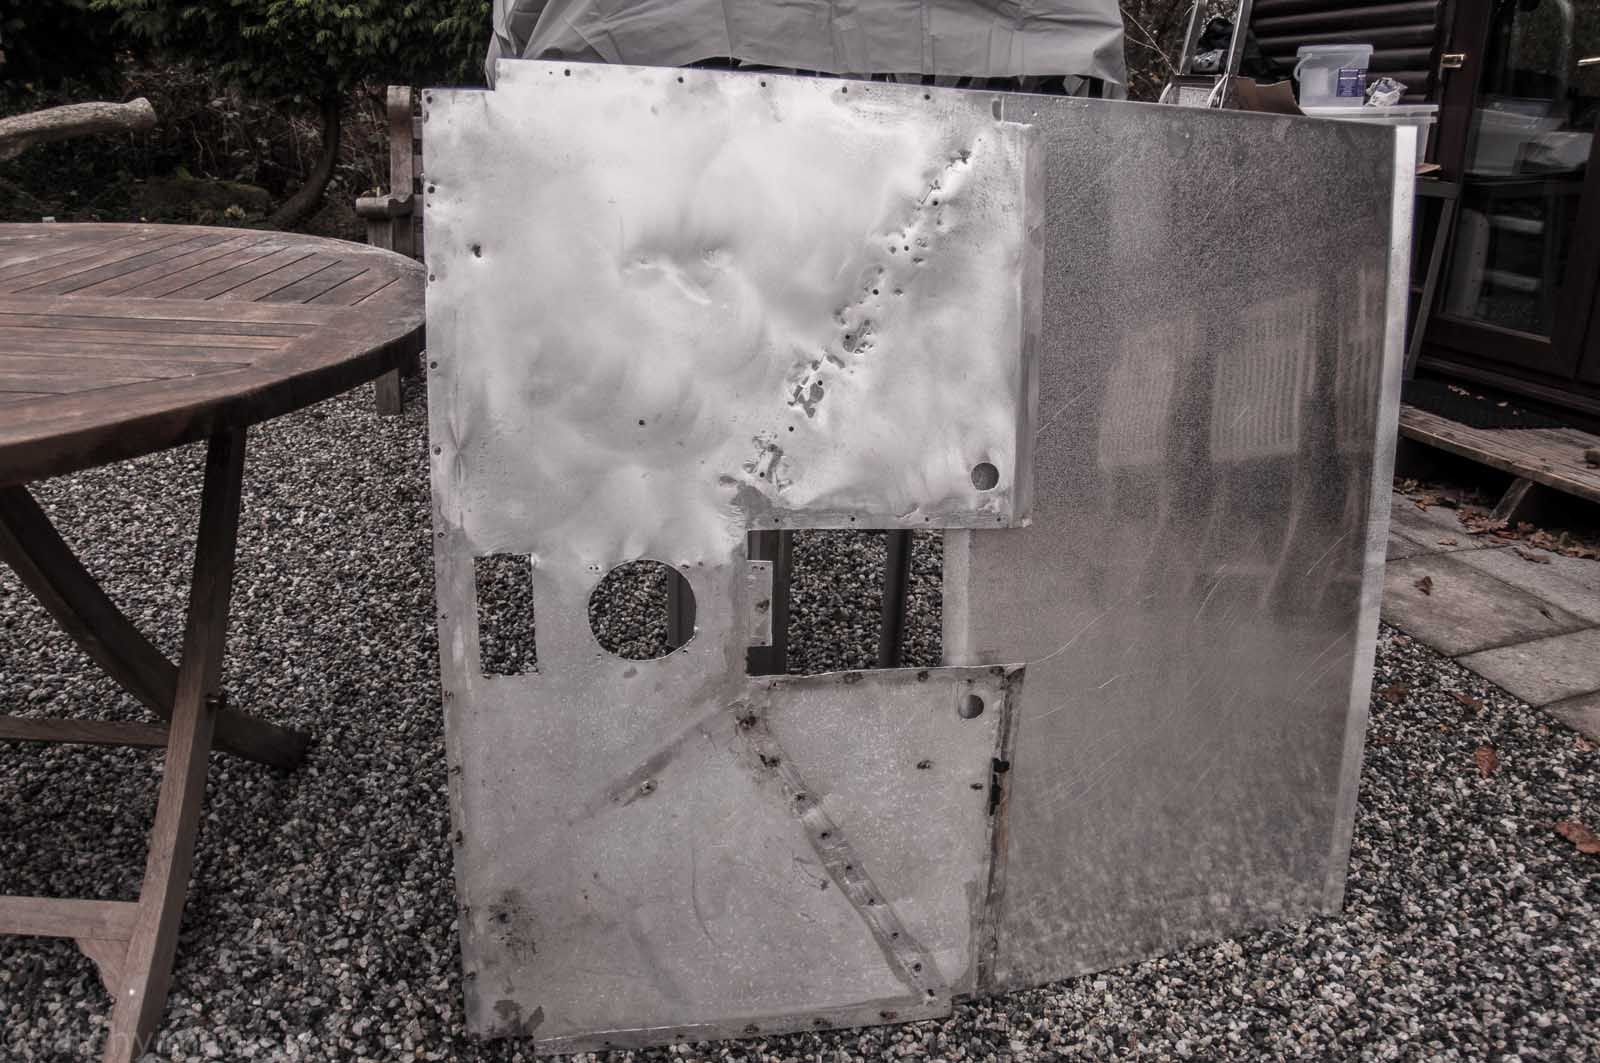
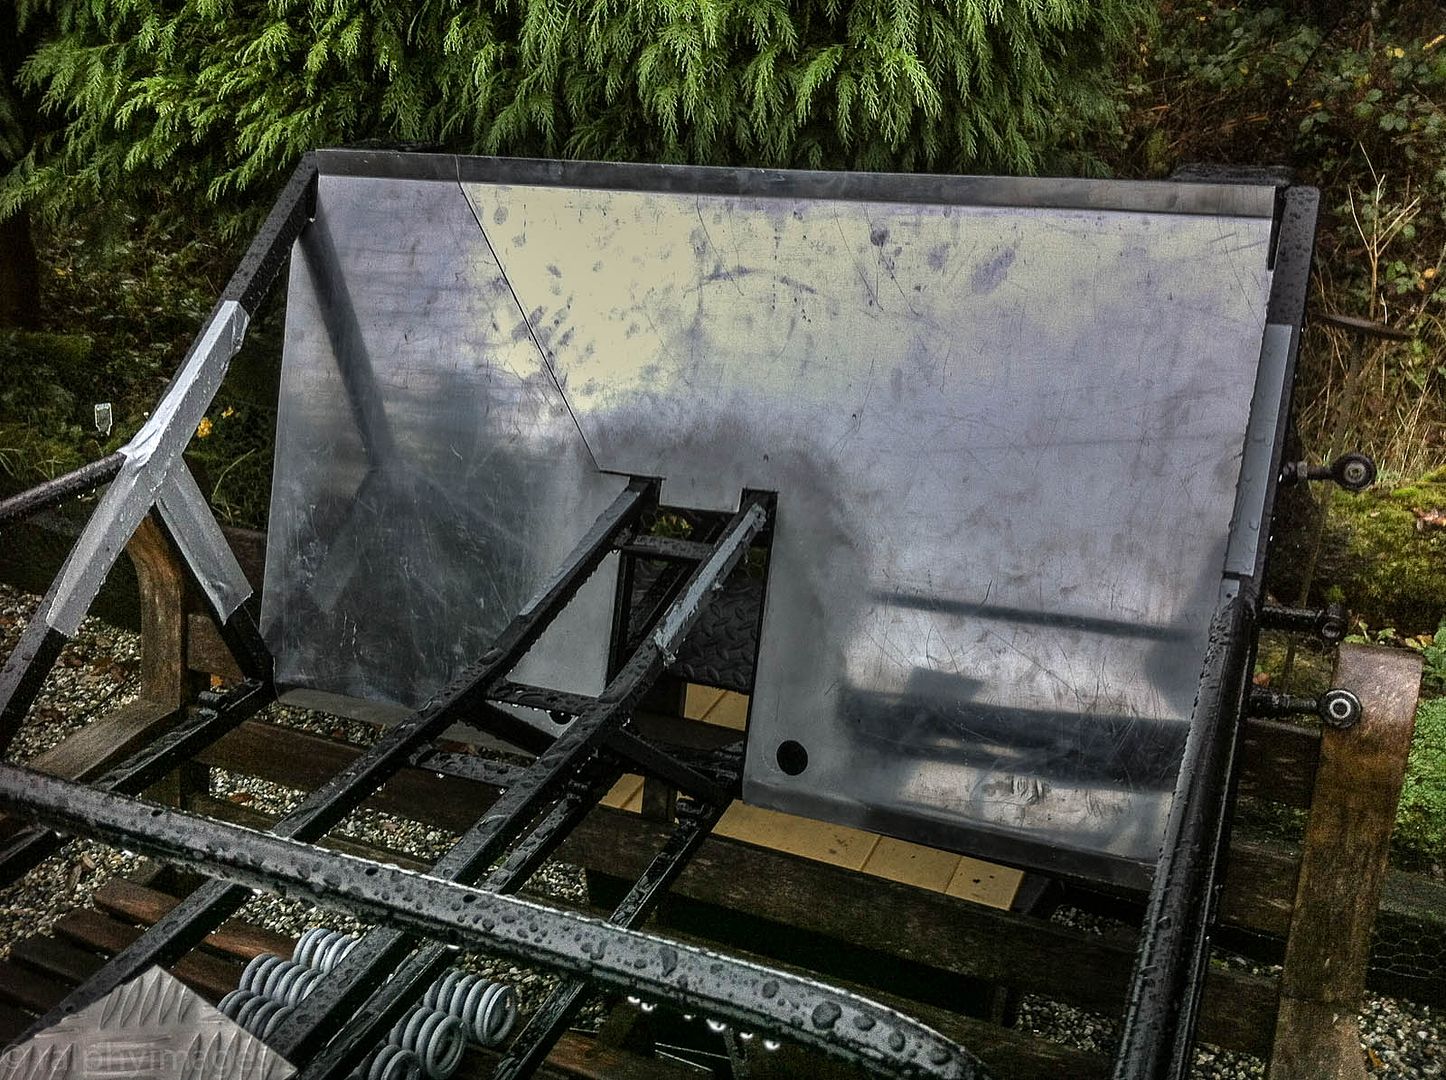
Most of the chassis is covered by aluminium panels which are held in place by a combination of rivets and bonding and Id removed them at the beginning of the strip-down:
The plan now was to clean them up and then paint them before refitting. Last weekend I started the clean-up and chose the rear bulkhead to start on first (this is it before removal):
However, after hours of removing the old bond material and trying to flatten it down I realised this was going to be a very long-winded process and furthermore that it was never going to look that good either. Part of the problem is that the panels are quite thin (1.2mm) and so they had suffered a fair amount of dents over the years, plus further damage when Id removed them.
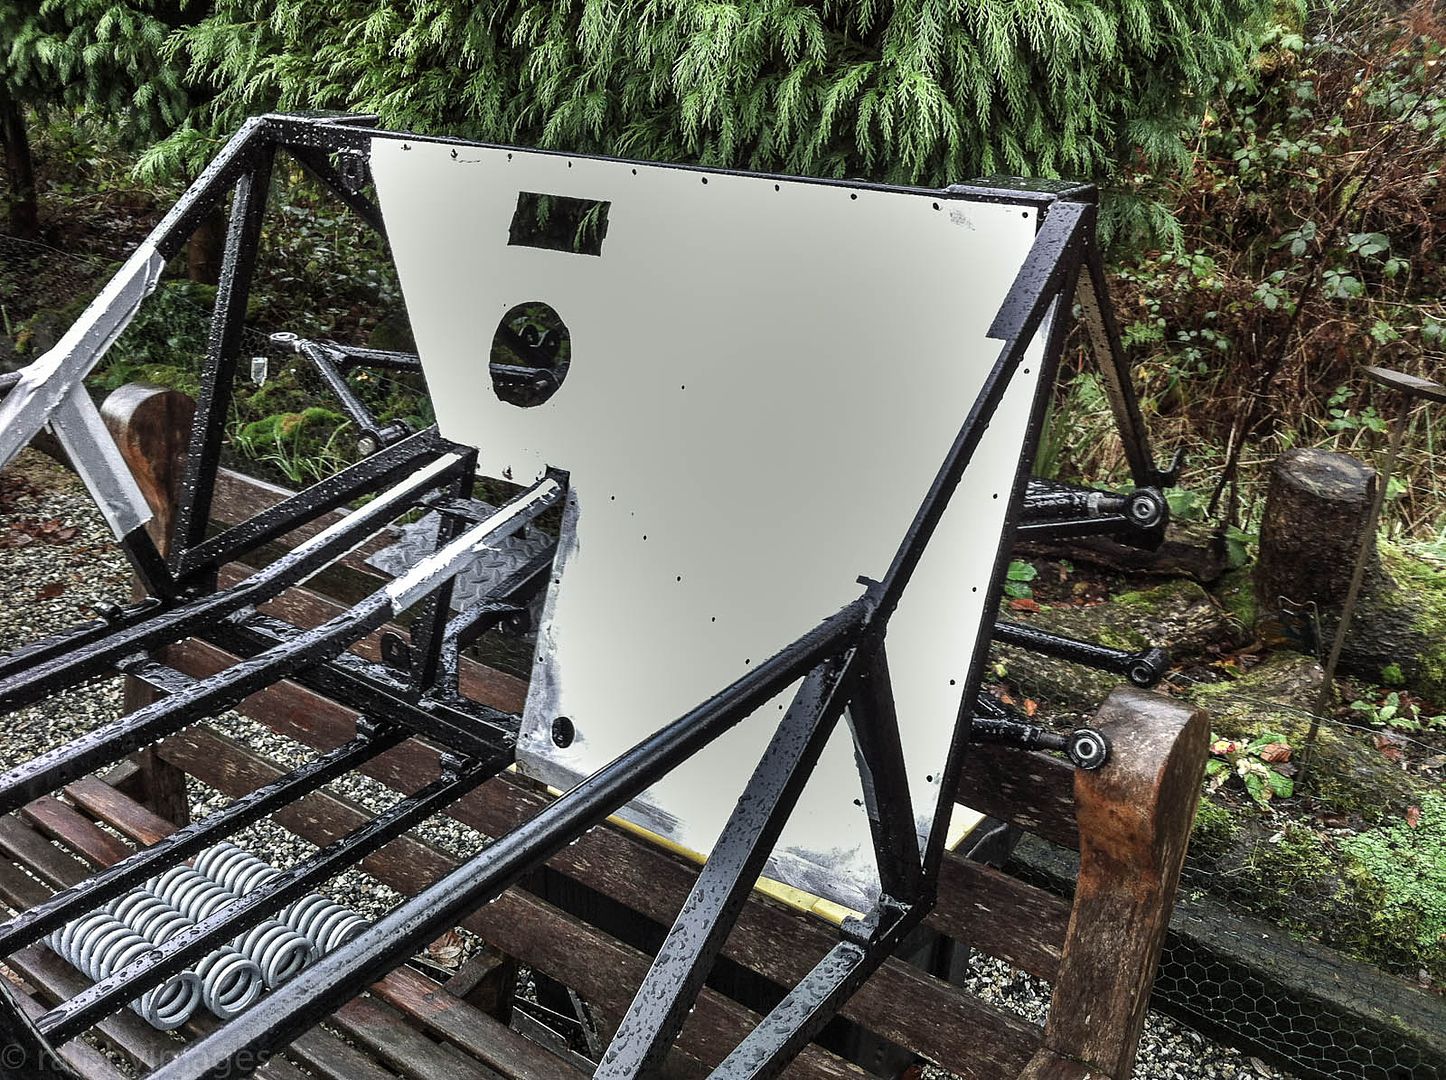
So I decided to look at replacing them with new - and to also to increase the thickness to 2.0mm. First Im going to replace the bulkhead panel and see how I get on, so off to a materials supplier who kindly cut down a sheet to the external dimensions of the original panel and also replicated the two bends on the upper & lower edges:
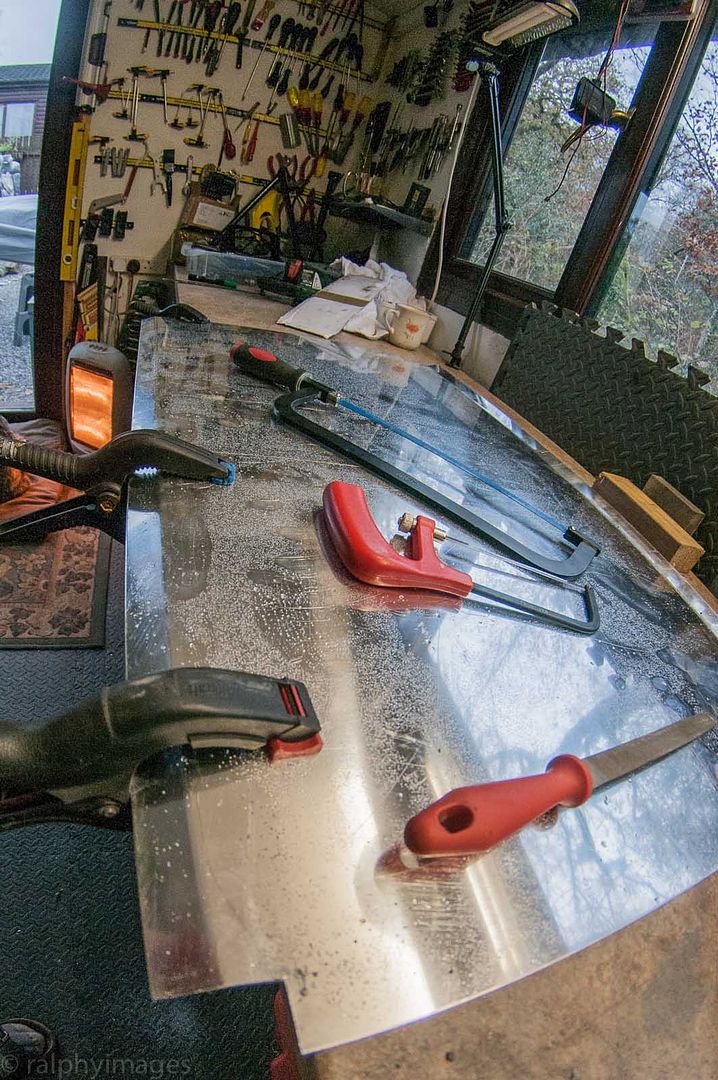
Next stage is to cut out the internals and then drill out the holes for the rivets, today I got this far:
But before I replicate all the rivet holes I need to see if the new panel will physically fit back in: taking out the old one required bending it and Im not sure how thatll work with a thicker panel. Tomorrow Ill find out!
R
Ignorance breeds Fear. Fear breeds Hatred. Hatred breeds Ignorance. Break the chain.
I doubt Ill be ready for any goodies by then. I was hoping to have the chassis ready to receive the engine & gearbox by the year-end but thats beginning to look unlikely: Im behind already and my intention to work between Christmas and the New Year has not gone too well with SWMBO - apparently Were going to be doing other things then.
R
Ignorance breeds Fear. Fear breeds Hatred. Hatred breeds Ignorance. Break the chain.
The ultimate Christmas goodie for you is a plasma cutter, Ralphy! With air powered tools, this pages is workshop heaven: http://www.frost.co.uk/automotive-ai...html?limit=all
You're doing a fantastic job! And this thread is a great diary of a proper resto! (I'm sure that if you ever want to sell the Westfield, there will by a queue of TZ members waiting to hand you the cash!)
For those of us thinking about the same 'journey': replacing the alloy plates is a typical example of Executive Decisions an owner has to make. Restos are always more expensive than you think. At the workshop, we tend to set aside about 100% on top of the estimated total sum.
Menno
Last edited by thieuster; 4th December 2013 at 09:16.
All progressing nicely there Ralph. Have you decided on the colour yet?
F.T.F.A.
Frost's have become quite acquainted with me of late, Menno. ;-)
Not finally decided, but Im rather taken with the Volvo Polestar that was suggested by Middo.
R
Ignorance breeds Fear. Fear breeds Hatred. Hatred breeds Ignorance. Break the chain.
That Volvo Polestar blue would suit the car very well IMHO!
Ralphy
For cleaning adonised Ali, magic sponges are fantastic. I have not tried it with the polished stuff though.
Last edited by Middo; 4th December 2013 at 19:40.
I spotted a V60 with the Polestar Rebel Blue colour today on the motorway. This colour really stands out in the crowd! I noticed the car in my rear view mirror when it was more that a half a mile away. Compared with all the dull colors on the road (yes, I was in a dull coloured car as well), this blue is a feast for your eyes!
I was already on board when Middo suggested this colour, I'm now totally convinced!
Menno
EDIT: it looks like I have to change this posting: the color I've spotted is Rebel Blue. Well, if the Polestar blue is even more bright, I'm sure I will like it even better!
M.
Last edited by thieuster; 14th December 2013 at 18:44.
Wow - that 'pops'.
Would it be rude to complain about the lack of updates to this thread?
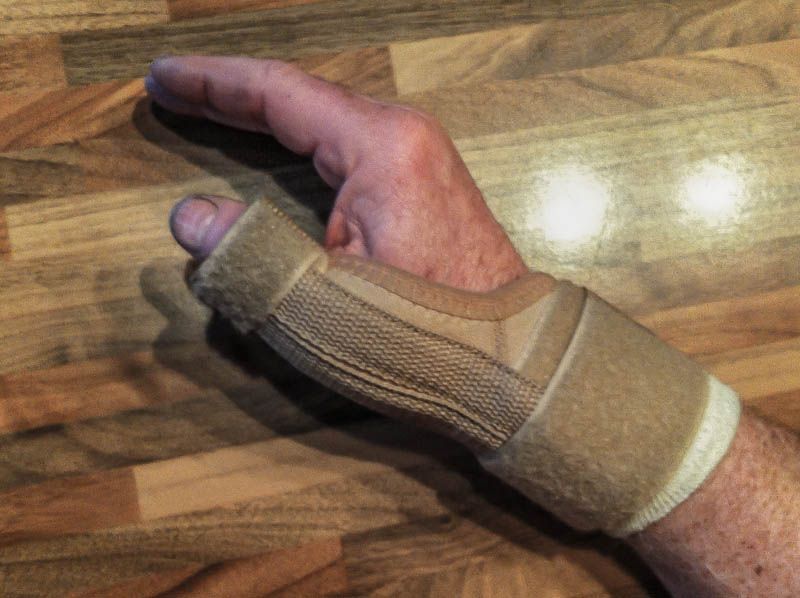
Somewhat impeded at the moment.
Broken scalfeld sceloid something-or-other bone:
(And yes, I know my nails are dirty).
R
Ignorance breeds Fear. Fear breeds Hatred. Hatred breeds Ignorance. Break the chain.
Ouch, get well soon Sir.
Ouch, that's sticking out a bit.
Scaphoid.
Were you sober when you fell...?!
Hope you recover soon.
Silly old sod, pissed again!.
Joking aside, get well soon Ralphy.
Cheers,
Neil.
I have only just seen this,an amazing thread and project! I am absolutely in awe.
I don't know where you get the time from to even attempt something like this.......
Hope your hand gets better quickly.
No alcohol involved, on my part anyway.
Ive been doing whatever I can one-handed for the moment, its been a bit surprising just how much Ive managed so far.
R
Ignorance breeds Fear. Fear breeds Hatred. Hatred breeds Ignorance. Break the chain.

Great blog, hope you get your hand sorted out.
Well done on the restoration!
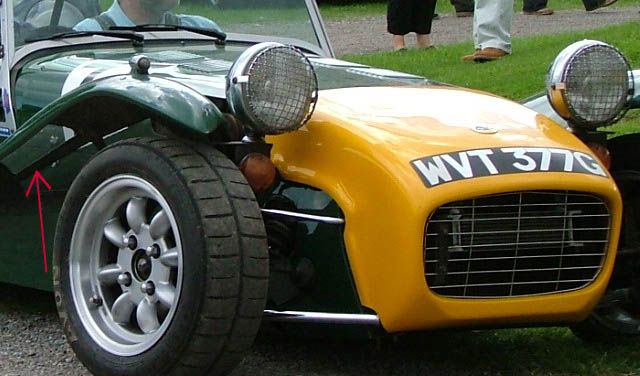
Re wings - my Lotus 7 BDA was rebuilt several times by James Whiting whilst owned by its previous keeper (who had it 20 years).
One of the may mods that James did to it was to install cut-outs on the wings. With mesh bonded in from beneath and painted the same colour as the wings , the potential "Lift" problem was addressed with minimal effect on the looks - worth a thought ?
I quite like the idea there, the only thing that concerns me is the amount of surface water that would be thrown through the mesh: did you not experience that?
R
Ignorance breeds Fear. Fear breeds Hatred. Hatred breeds Ignorance. Break the chain.
I think the idea was that mesh should be quite fine so as to give some protection from spray - but open enough for the air to pass.
I noticed no lift - but perhaps I'm not fast enough.
Although my 7 was road legal it didn't do a lot of road miles in my hands ( I didn't find the half- race BDA , loud exhaust and ACB10's conducive to smoth town driving) and most of those would have been on dry days.
Worth a try if you experience lift.
All the best with the project
JP
The problem with changing from the flared wings to cycle wings is that you're then stuck with a line of rivnuts along each side panel where the flared wings bolted on. The only solution is to re-panel each side.
This was the only reason I didn't change my Caterham to cycle wings.
Although no trees were harmed during the creation of this post, a large number of electrons were greatly inconvenienced.
As things stand I’m planning on keeping the swept wings as I like the look of them, but I’ll make the final decision prior to repainting & so could fill in the side panel holes if necessary.
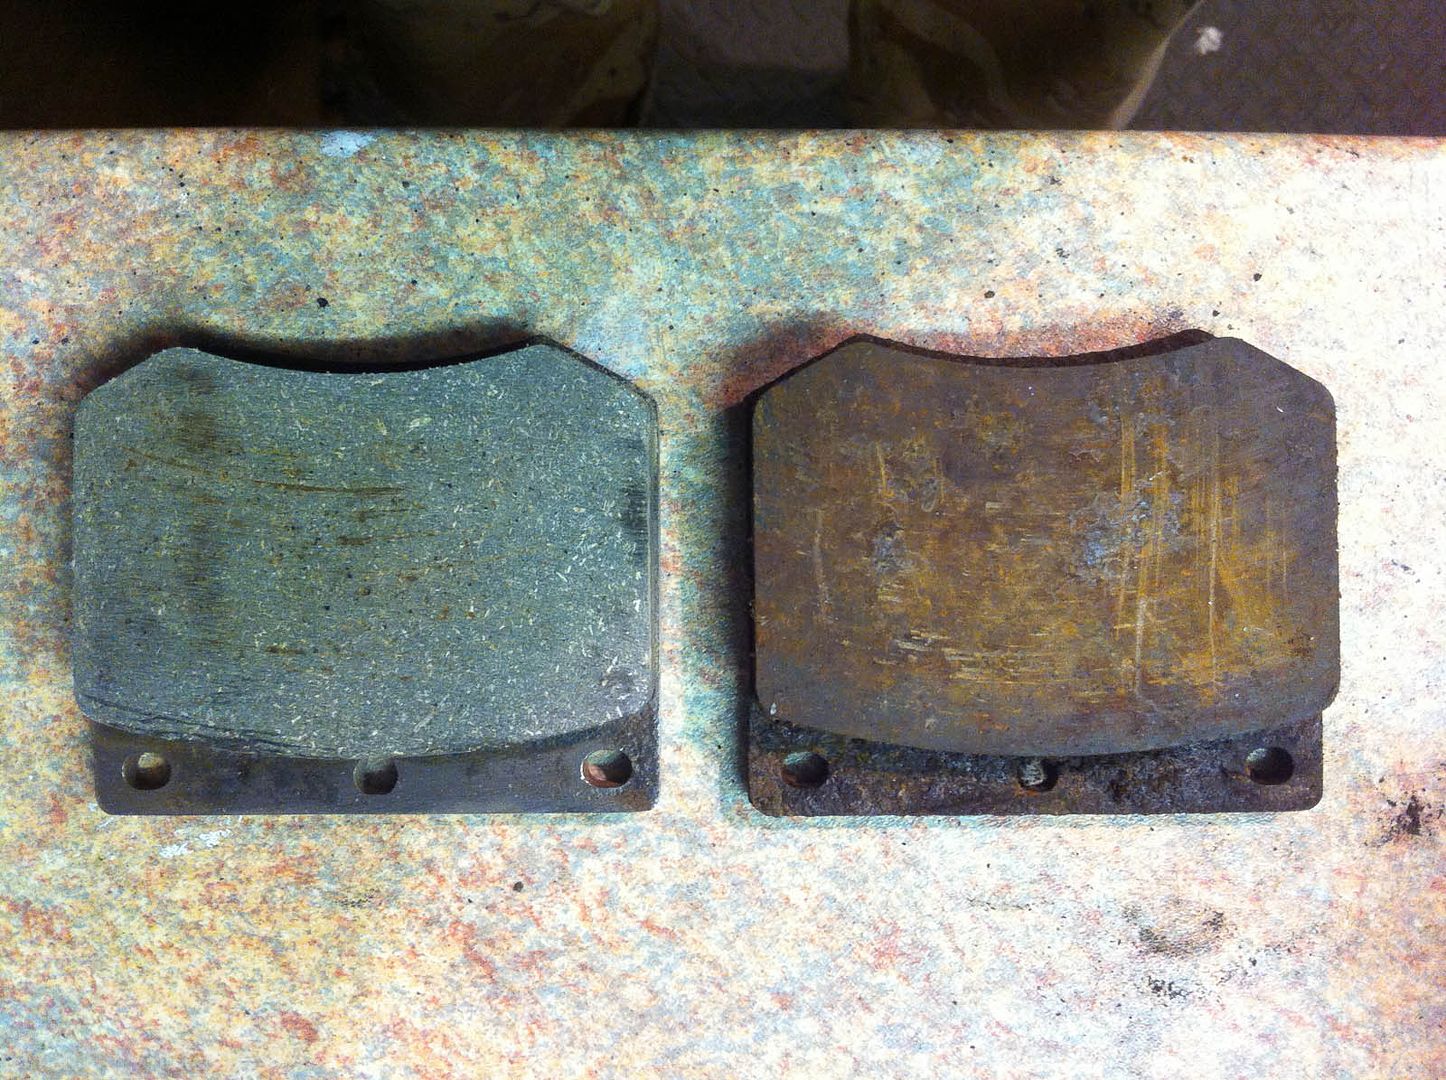
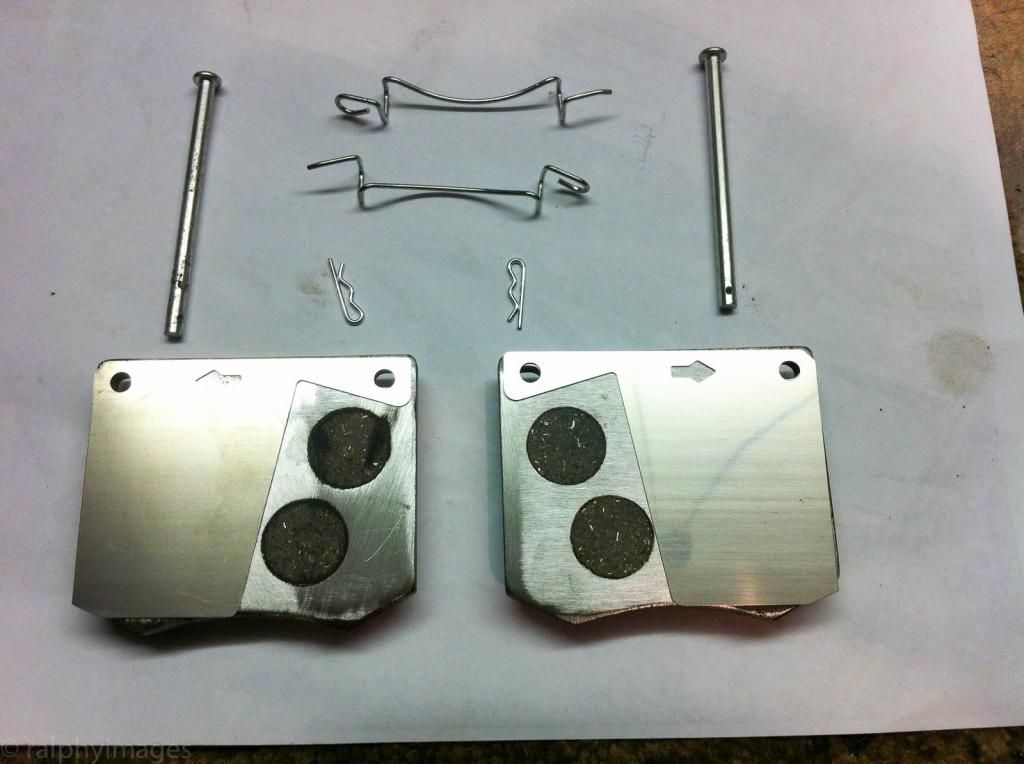
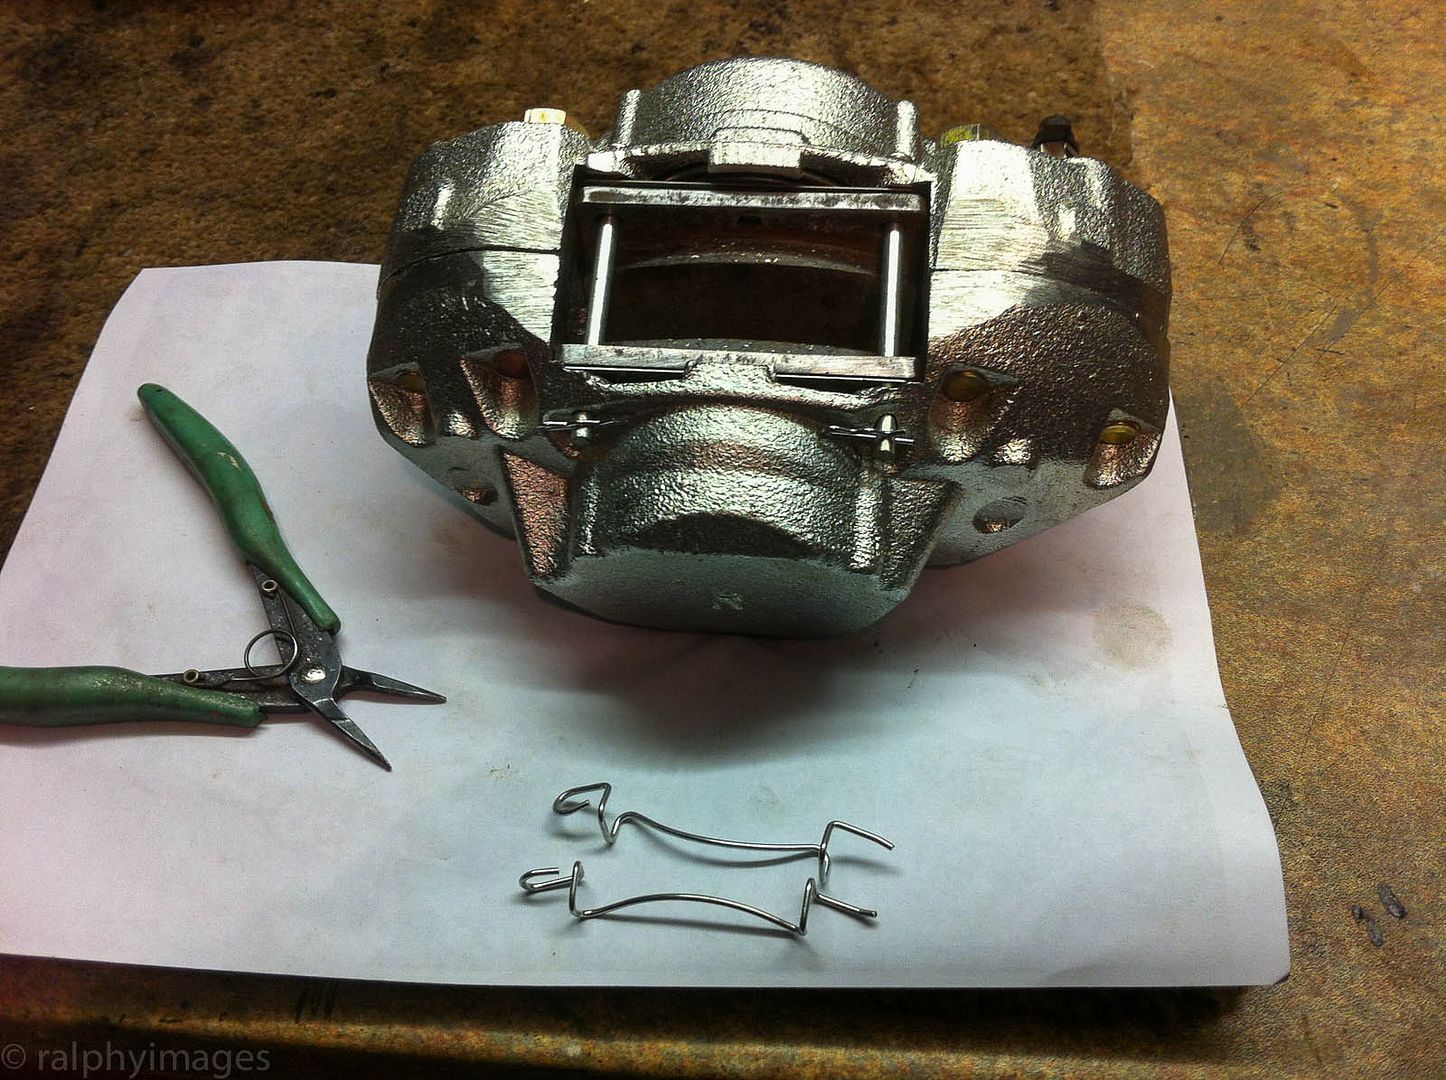
Managed to do a bit of work today, some measuring up for the aluminium panels (which I’ll report on at a later date) and also re-assembling the front brake callipers.
The old pads have a reasonable amount of material on them, so I elected to give them a clean up and re-use:
New ancillaries sourced:
Test assembly:
And offered up to the wheel hub, complete with new steering ball-joints:
Everything is on loose for now - as I can’t torque up the bolts one-handed!
R
Ignorance breeds Fear. Fear breeds Hatred. Hatred breeds Ignorance. Break the chain.
I had to Google both of those, such is my ignorance of such things.
It could be a consideration after all and thanks for the suggestions: my prime objective just now is to get the car up & running and then to see what I want to do with it. The as is suits me currently as there is a benefit to getting a feel' for the car before I potentially embark on upgrading it, also as youll appreciate with this type of car theres a lot less of unnecessary expenditure in changing things afterwards than would apply to non-kit vehicles. It was a long-considered thought process for me to change the engine at this early stage, but the deciding factor was the faff of doing it post-build. The replacement engine arrives tomorrow, its a Zetec black top and again at the moment Im planning on installing it with the standard induction fitted - but as youll know, theres plenty of scope to increase the power on these.
,
R
Ignorance breeds Fear. Fear breeds Hatred. Hatred breeds Ignorance. Break the chain.
Quite right. I think the Alcons were 2 pots but perhaps my memory was clouded by the difference they made over the original single pots.
Clearly things have moved on in the 6 or 7 years since I've had a 7 as my Alcons cost a lot more than £350!
I tried greenstuff/Mintex before shelling out for Pagid greys ( though I used Mintex on both Radicals)
'Will continue to watch this thread.
Last edited by stiglet; 17th December 2013 at 00:27.
Groundrush - you are right
I think I must have had "delusions of solvency" when I was running my Lotus.
Another thing I remember was the LSD. I replaced the diff in my Westie for an LSD for 100 quid and it took an hour or so.
In the Lotus (which had been upgraded to de Dion ) the "bespoke" LSD cost well over a grand and took hours, skinned knuckles, SWMBO holding a ratchet over the roll bar and several bad words to fit!
Dont go blaming me - even partially - you know you wanted it really. ;-) Can we see some pics please?
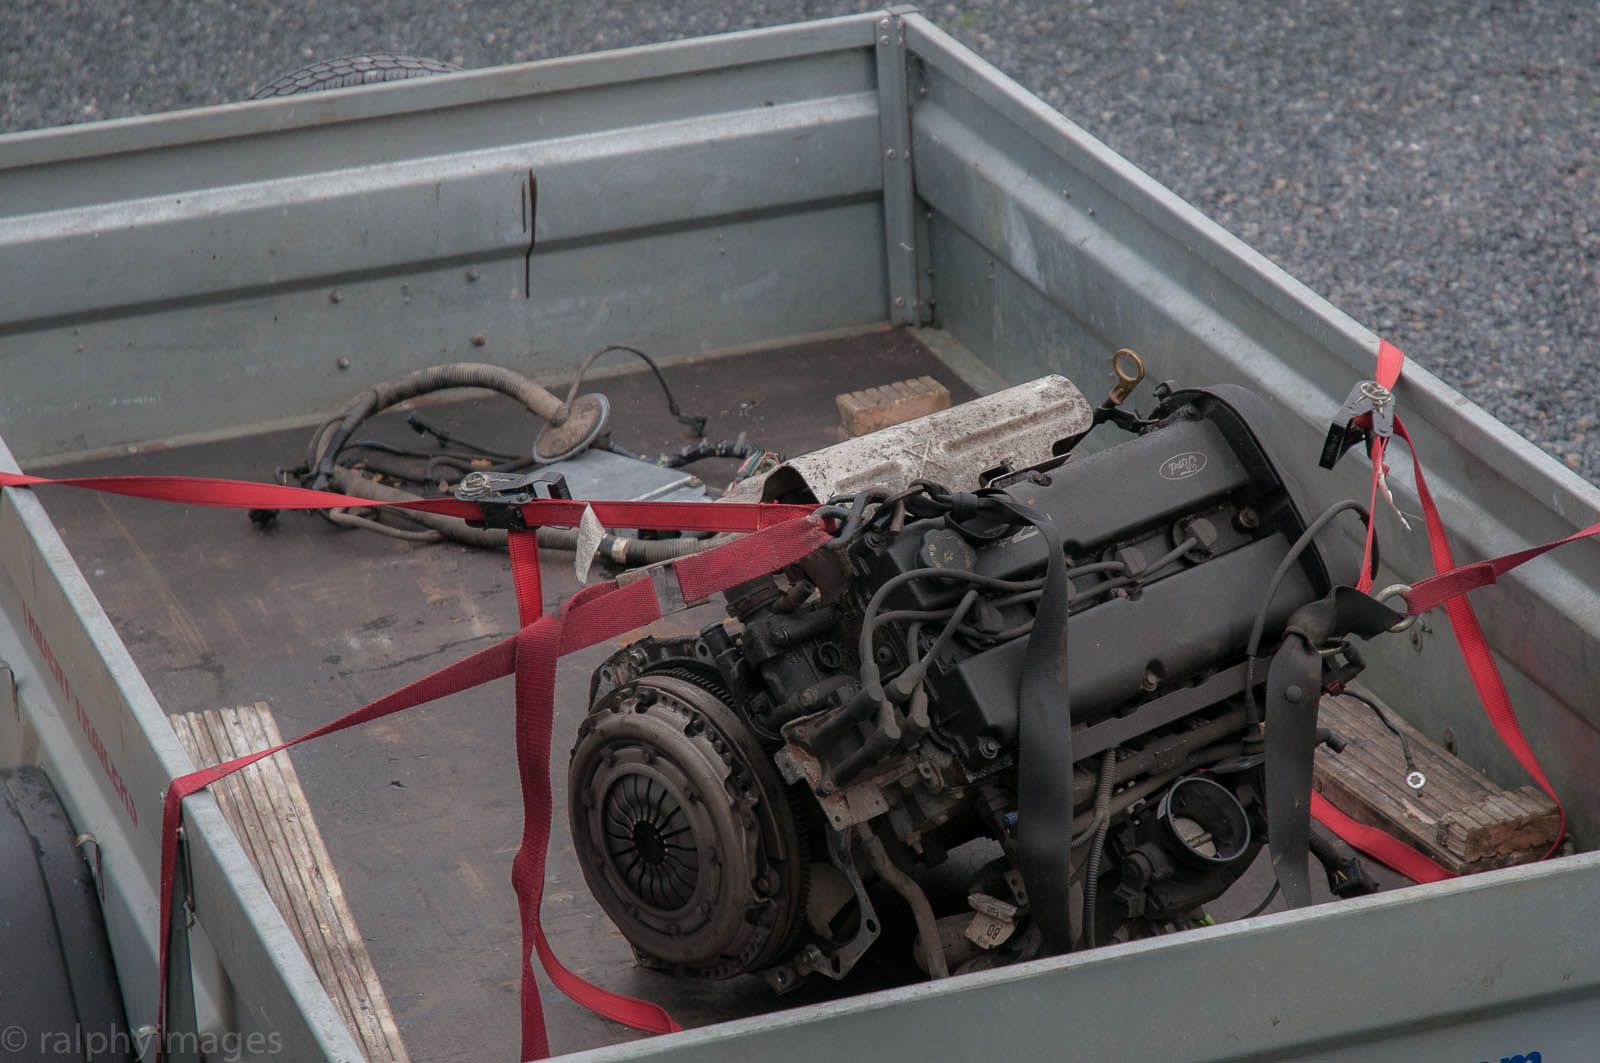
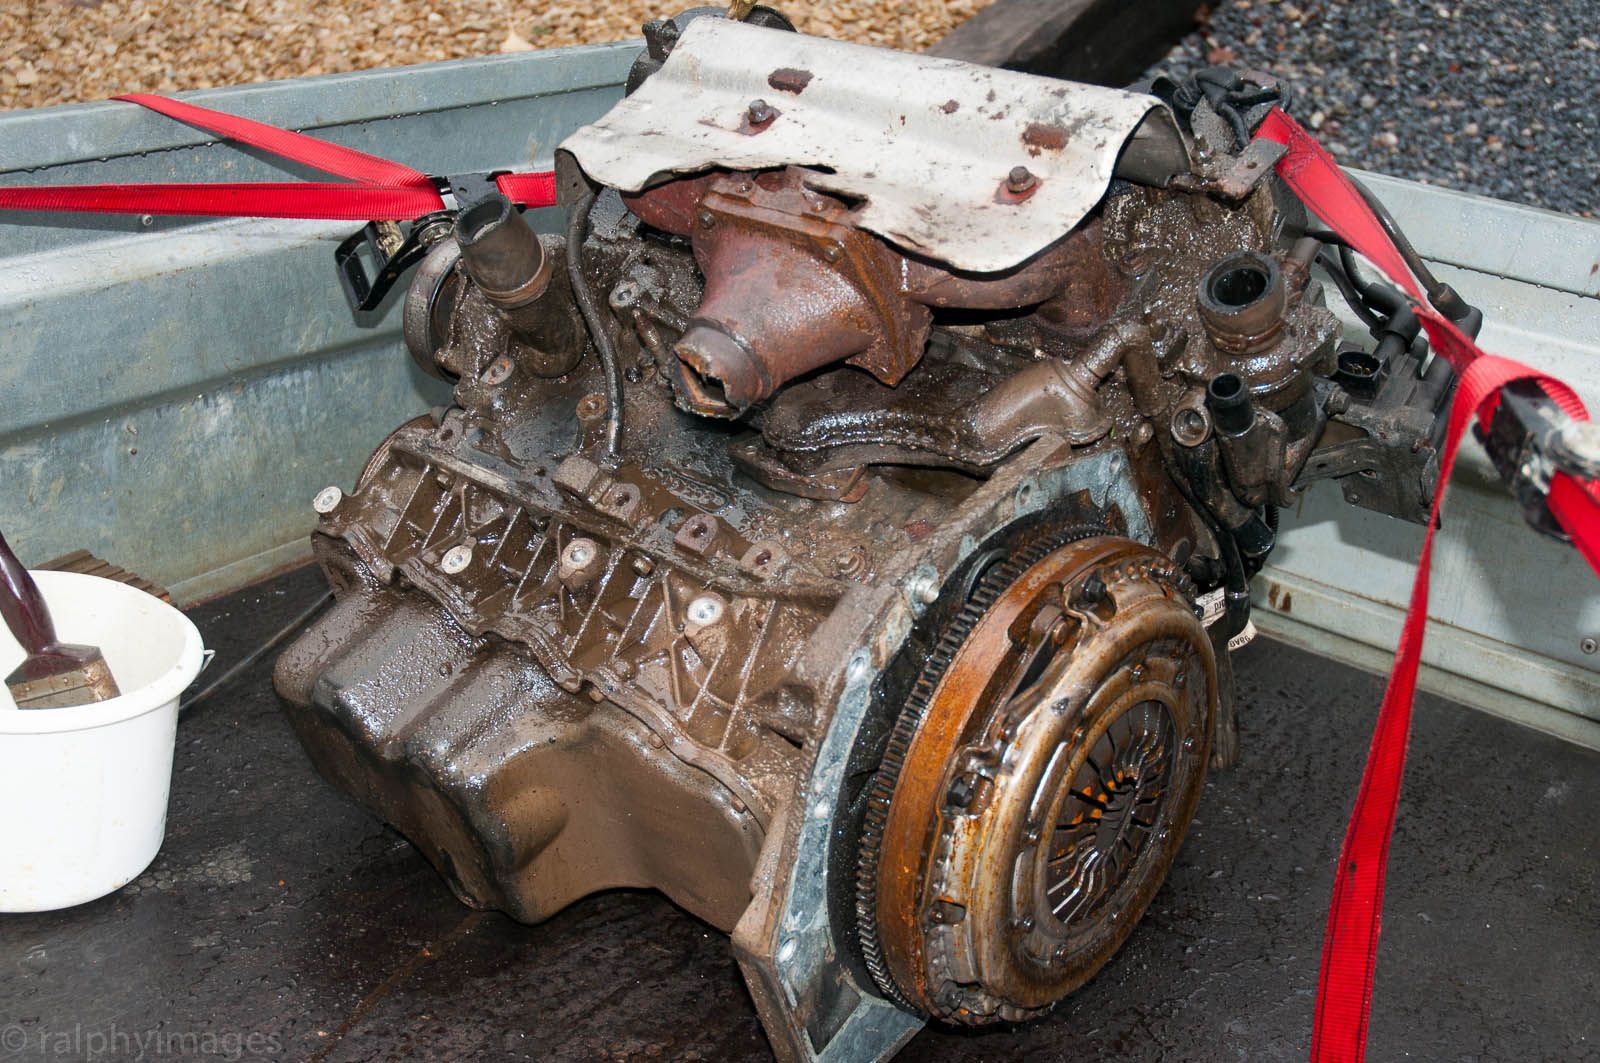
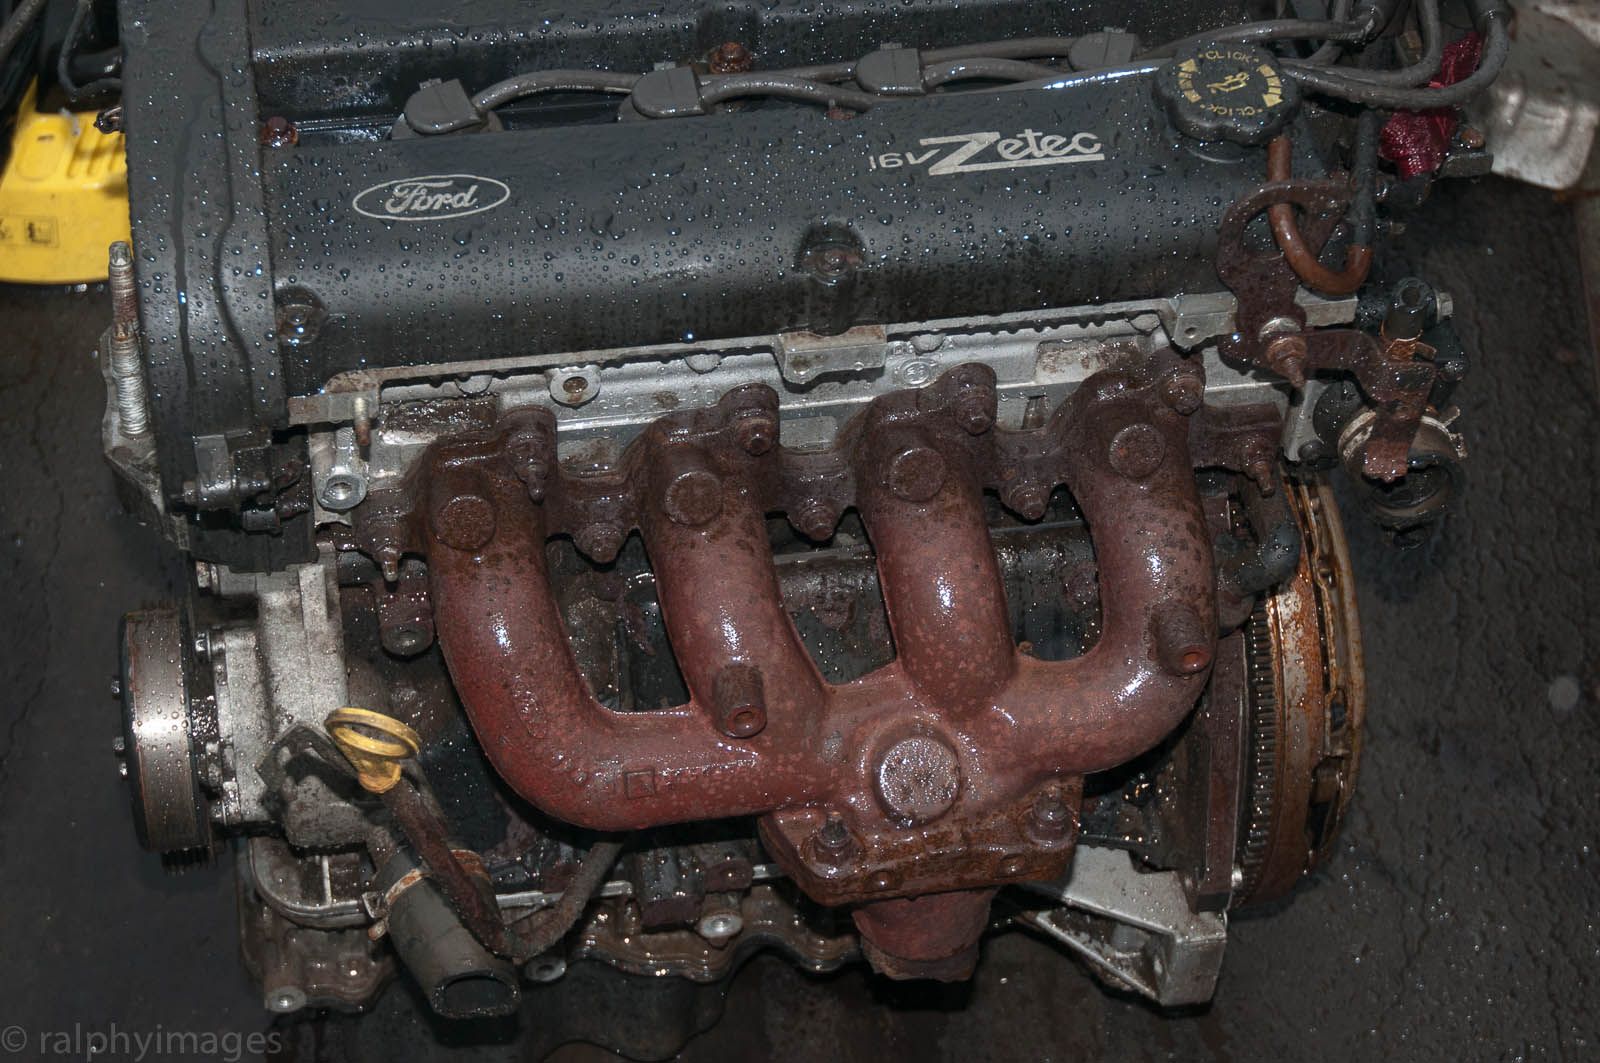
Today I went and collected my chosen engine, Ford Zetec 2L black-top. Originally I was looking at one from a Mondeo, as the manifold faces the necessary way but one from a Focus became available that was in better overall condition, had the ECU & engine loom and also had a newish clutch in. The problem with Focuss is that the manifold faces the wrong' way, but the breaker agreed to swap over the manifold from the Mondeo for me.So its now back home, but frustratingly itll need to sit on the trailer for a while as I cannot man-handle it without the use of both hands.
What I will be able to do is clean off all the muck on it in situ though, in preparation for painting it.
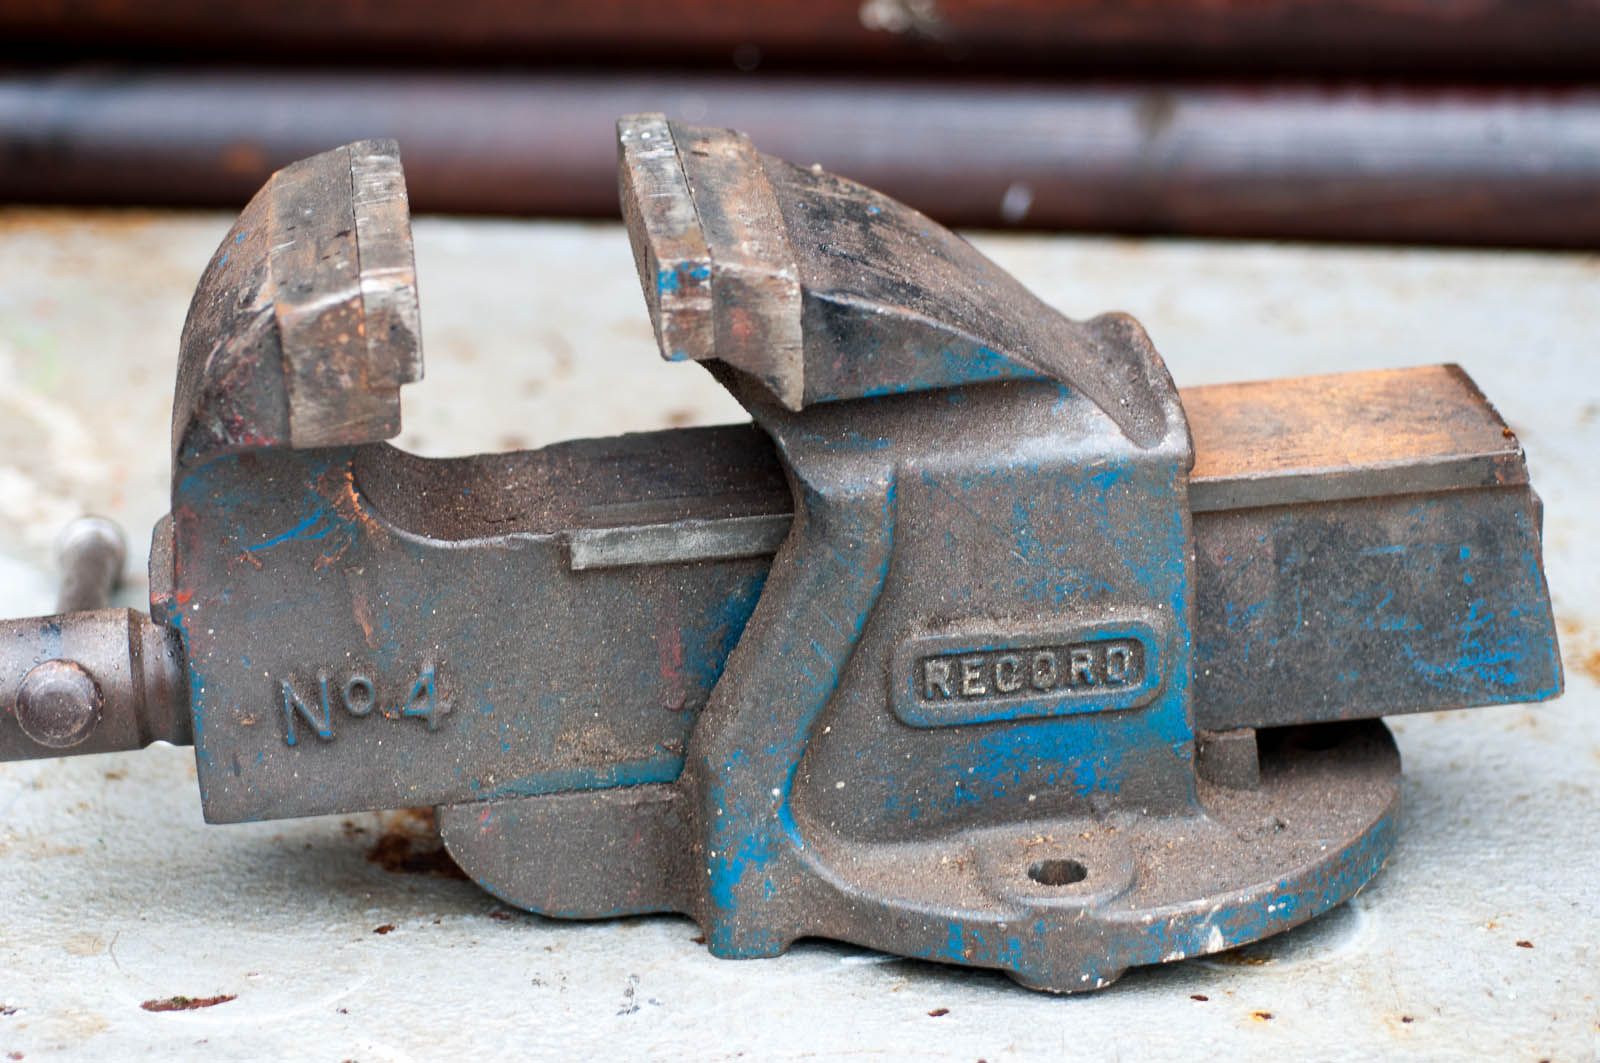
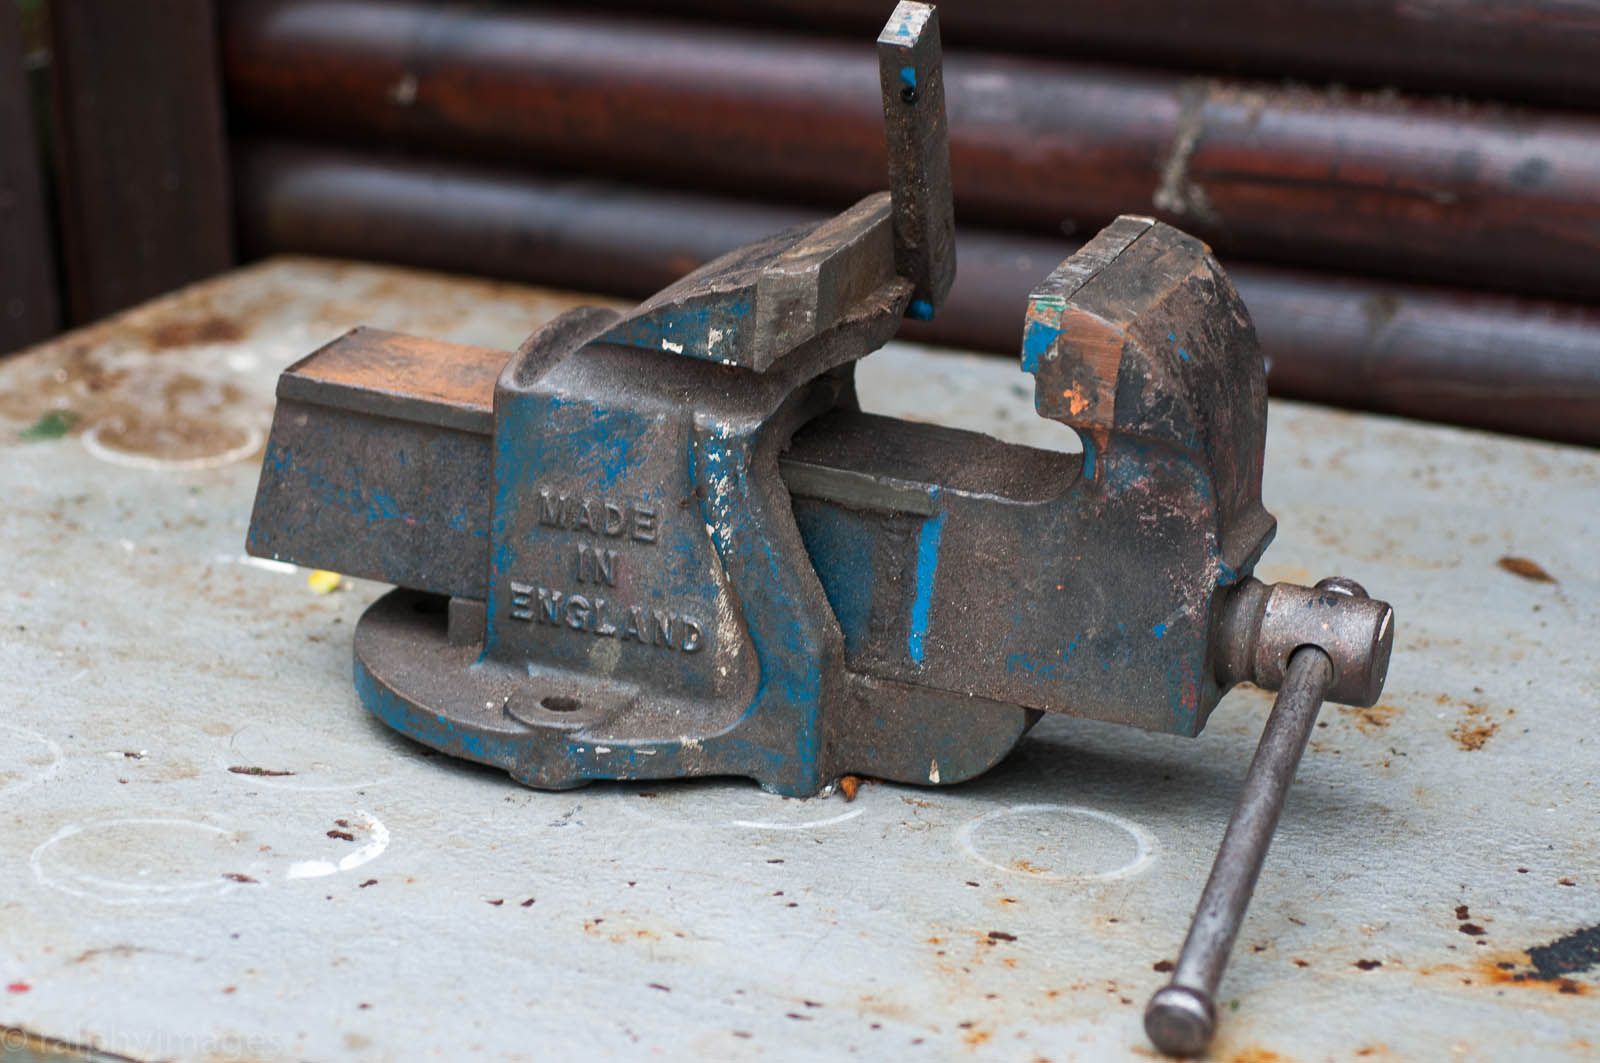
Meanwhile, I needed to find a decent bench-vice as my own wasnt man enough for some of the work Im doing. Looking at new vices left me rather disappointed: the Chinese-made ones arent really up to hard usage (due to the brittle iron they use) and I prefer to buy British whenever possible. However, new vices are seriously expensive and as Im a sucker for 'old-school' tools Ive been looking for an old vice for some time. My father had a Record vice and it lasted throughout his life so I was keen to find one and finally last weekend a pal who buys & sells old tools came up trumps: a Record No 4. Well-used and in need of some TLC, but as Im limited on what I can do on the Westy at the moment I can at least spend some time getting the old girl looking her best again. ;-)
R
Ignorance breeds Fear. Fear breeds Hatred. Hatred breeds Ignorance. Break the chain.
Have fun, Groundrush.
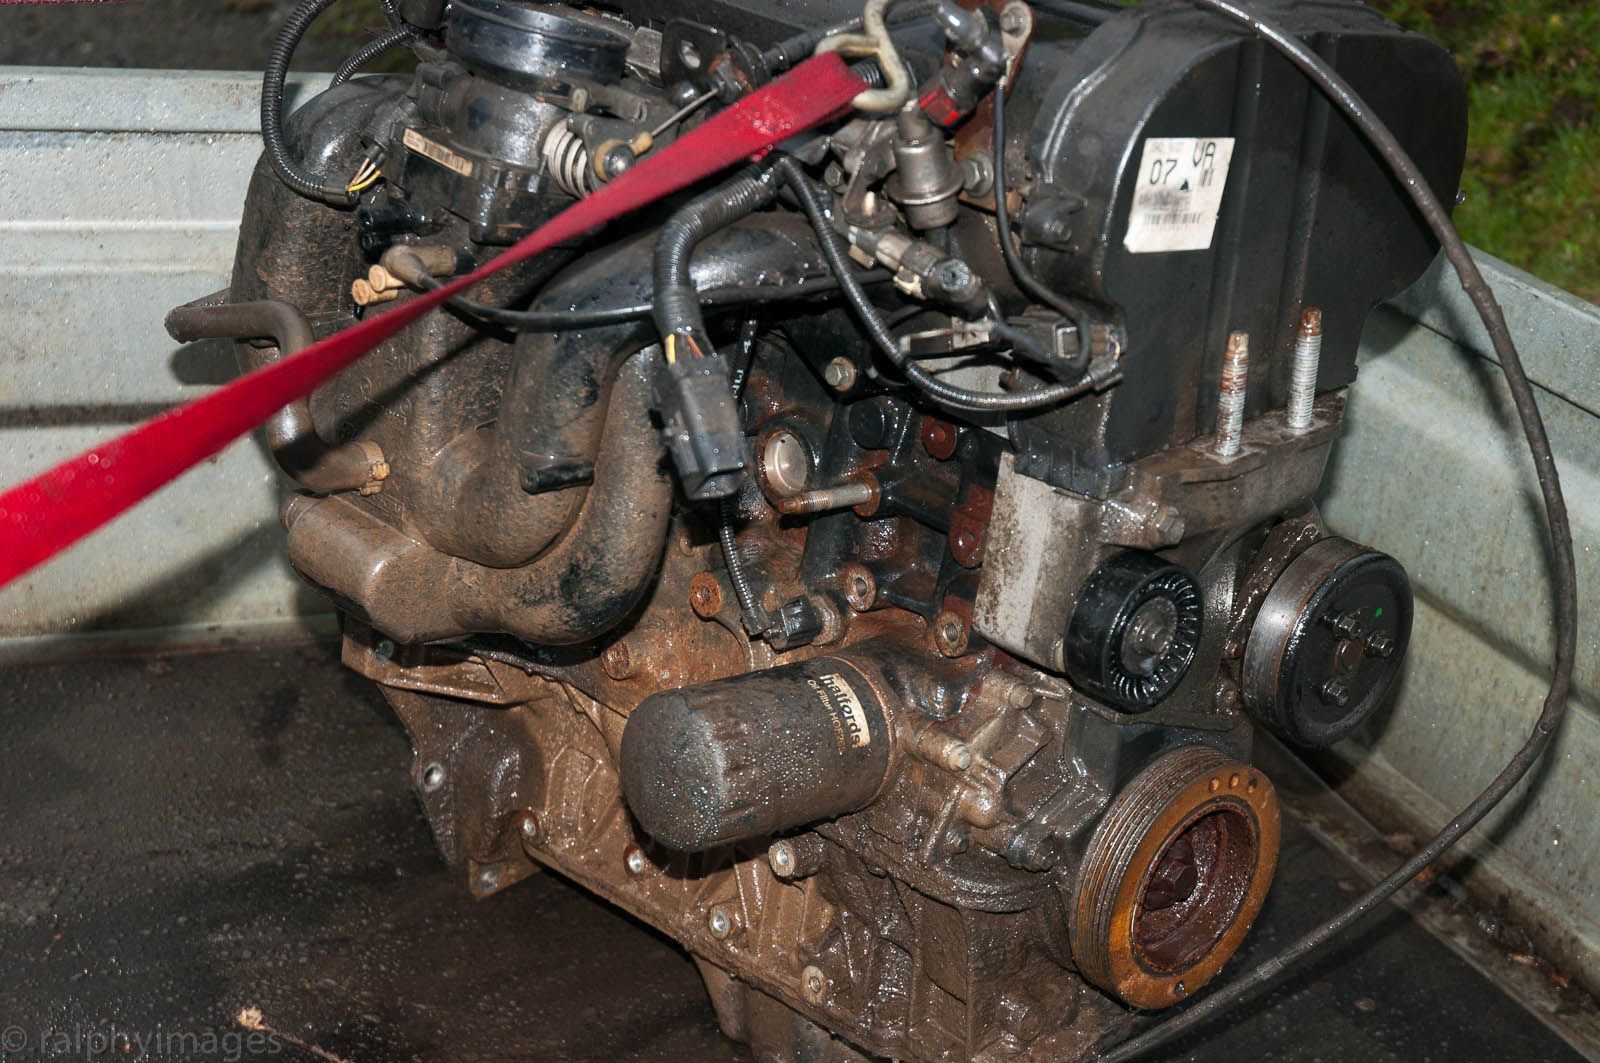
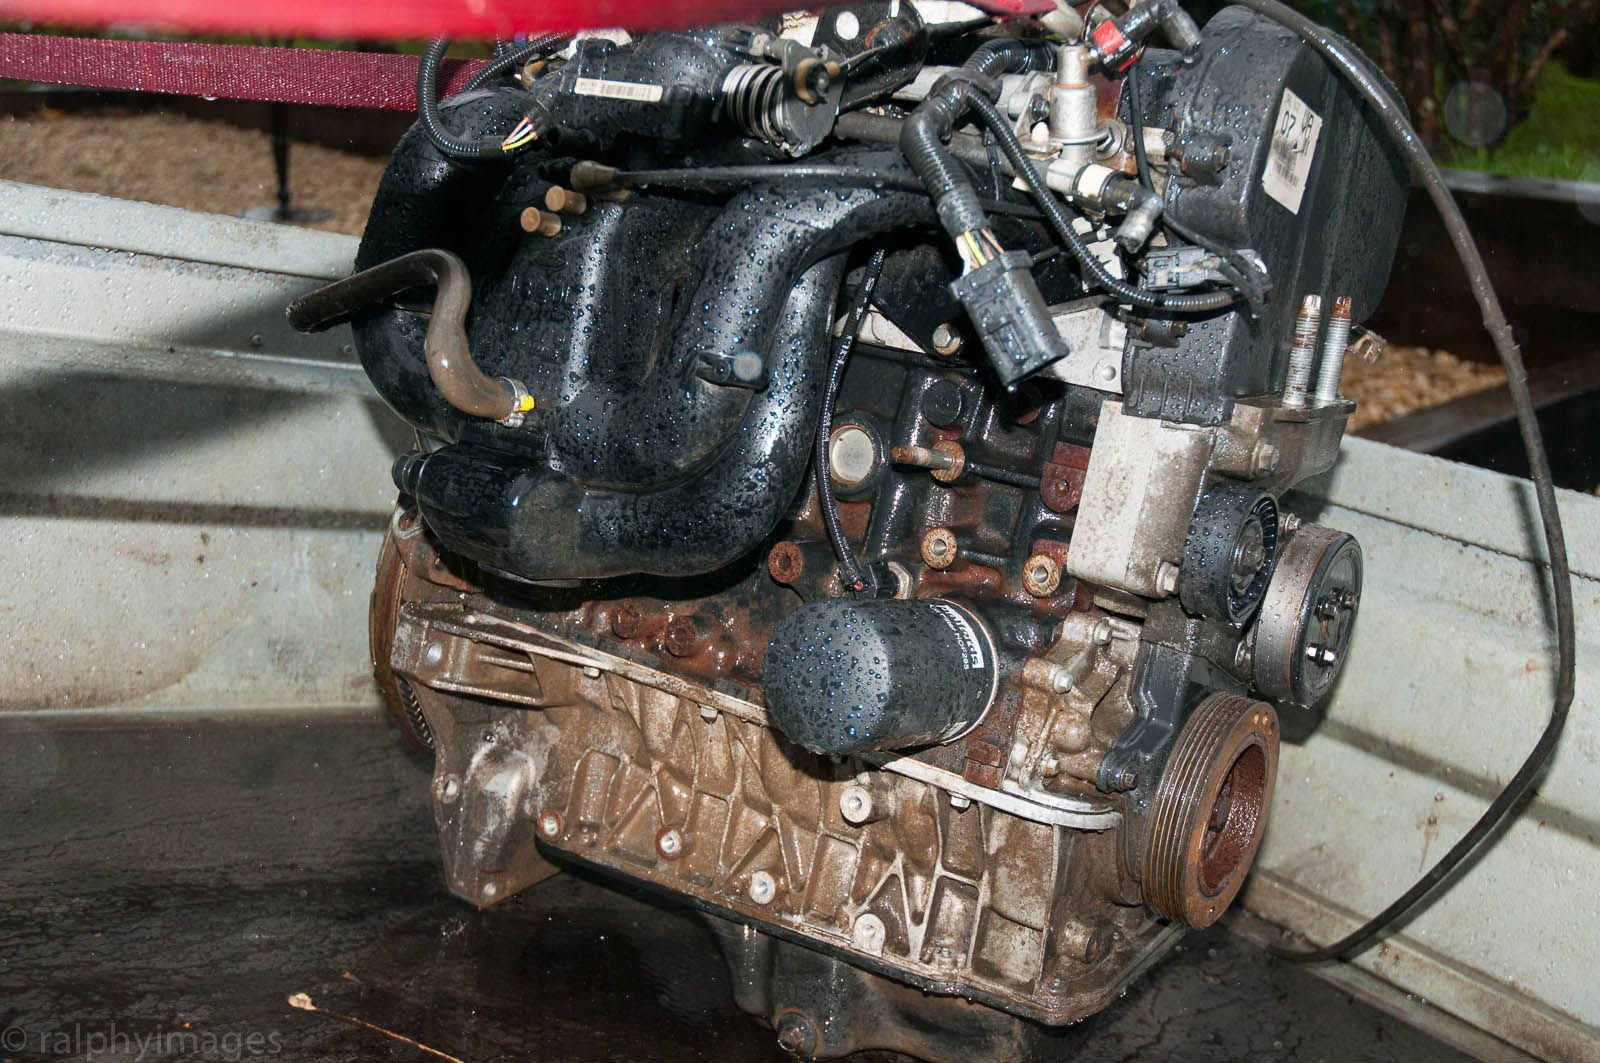
The last couple of days here has been lousy weather, but in-between the downpours I managed to get out and clean off the worst of the muck on the engine. Once again, the trailer proved invaluable as a work-bench - and I couldnt get the engine out one-handed anyway.
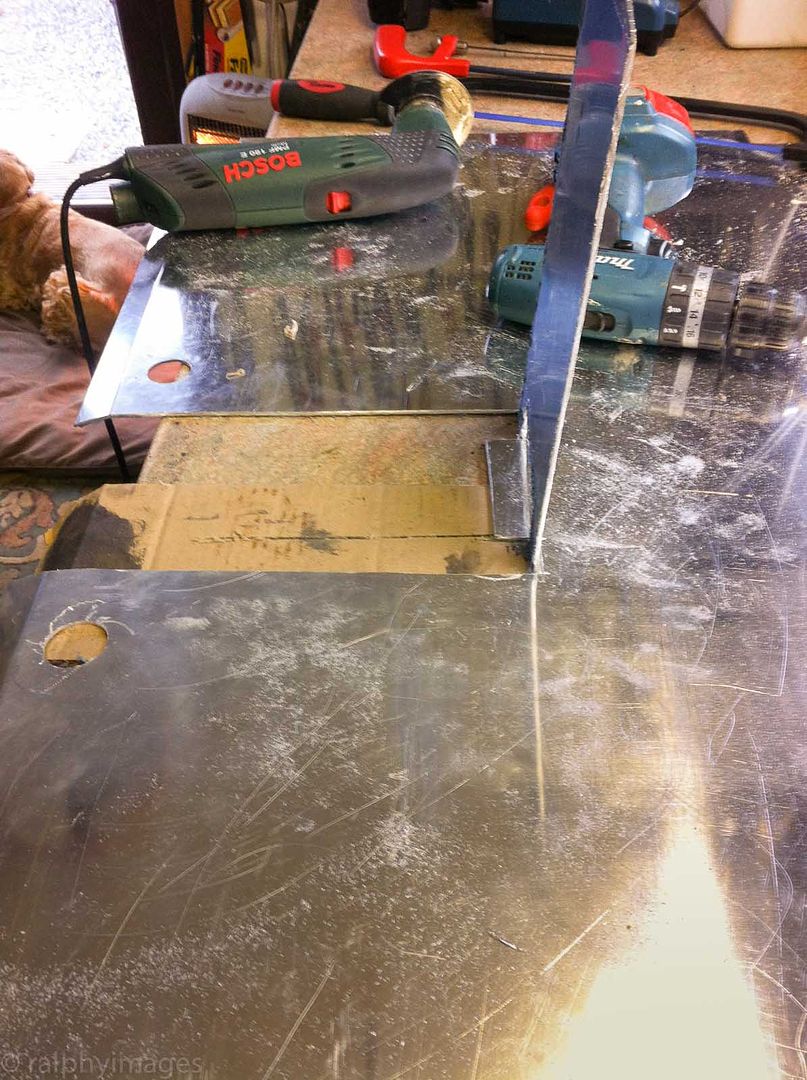
Id bought some 3mm aluminium to replace the rear panel, however there was a snag: having cut it to size I found that the only way to fit it would been to have bent it too much (presumably this is why Westfield used 1.2mm) So, sooner than waste it I cut it into two pieces and will then overlay an extra sheet over the join. (Im rather keen to have more thickness between me and the fuel tank - which sits up against this panel).
Old panel with cut in for templating the new aluminium):
Double-checking the fit of the old panel prior to cutting the new one - measure twice, cut once - as they say:
Still filing the new one for size, hopefully Ill get it finished tomorrow - if it stops bloody raining...
R
Ignorance breeds Fear. Fear breeds Hatred. Hatred breeds Ignorance. Break the chain.
What a great thread, look forward to seeing the pictures once its finished.
Thanks, so am I!
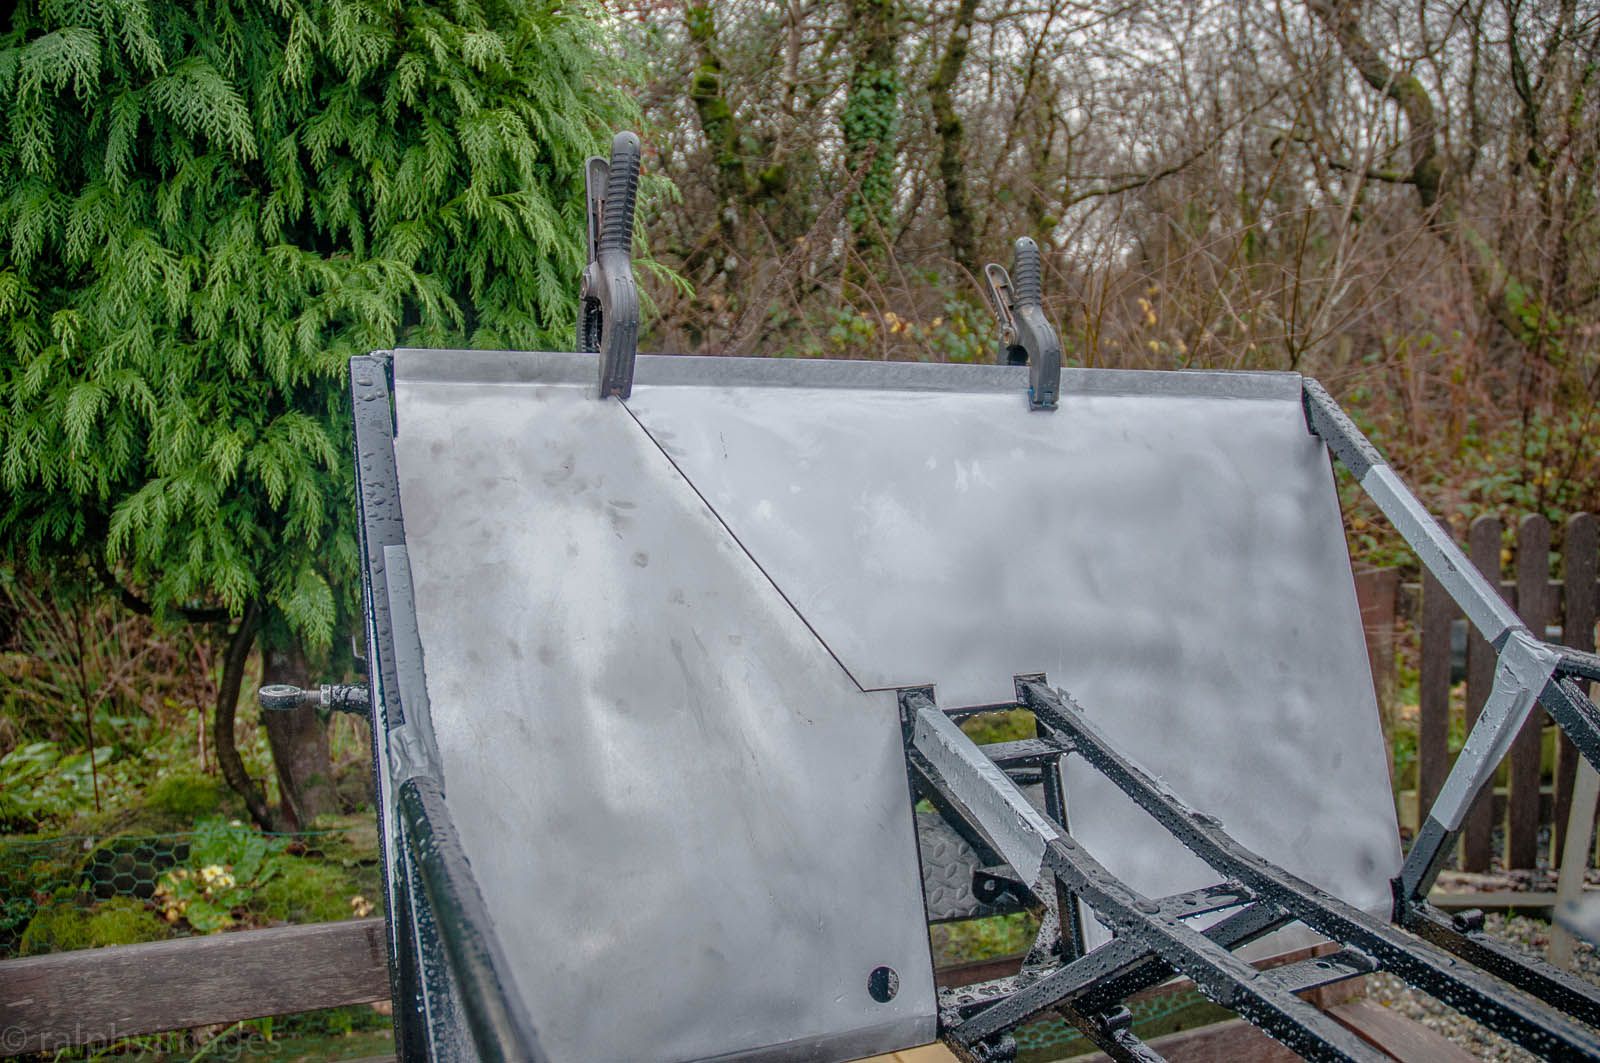
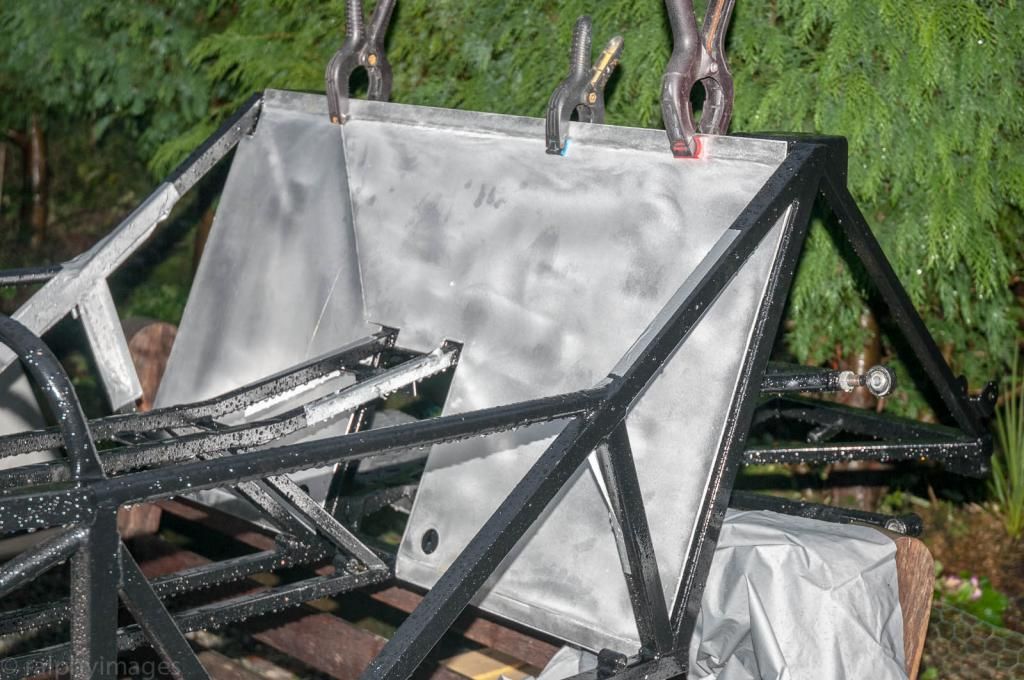
Today I finished sizing up the new rear panel and gave it a trail fit, pretty good I reckon and a lot better for being thicker than the original spec. The cut through will be covered by a further panel and I hope to use the original rivet holes to bind them all together. Im a bit undecided as to whether to paint the panels black or leave as original, but as nothing will now happen until the New Year I can ponder the options at leisure.
A bit more cleaning of the engine block was fitted in and if the weathers kind enough tomorrow I might get the front suspension back onto the chassis, but the forecast isnt good - and the outlook regarding SWMBOs determination that we go shopping is looking very stormy.
R
Ignorance breeds Fear. Fear breeds Hatred. Hatred breeds Ignorance. Break the chain.
Hoping to get some more chassis work done since the Christmas-fest proved to be a step too far: the combination of the entire British motor vehicle suppliers going on a two week shut-down and SWMBOs insistence that we enjoyed the holiday (which actually meant visiting numerous relatives) proved a insurmountable challenge.
Duty done, I initially turned my attention to cleaning up the existing engine for selling and quickly had some interest resulting in a sale on New Years Day. With that done - and still no suppliers open to take my money off me - I got started on the replacement engine.
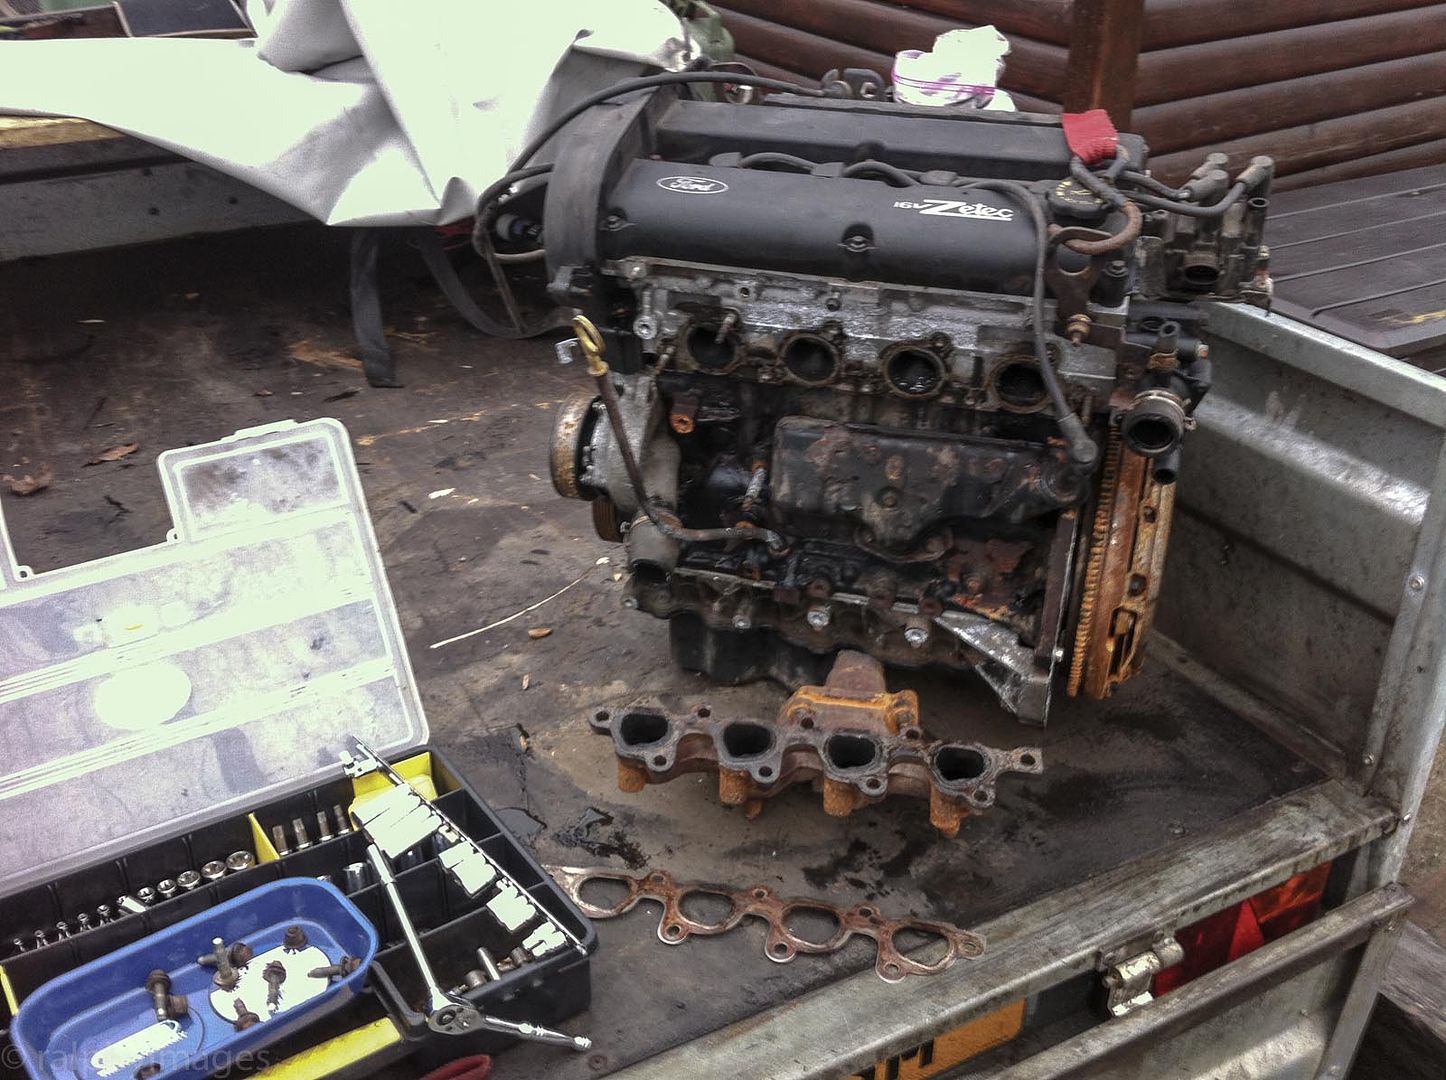
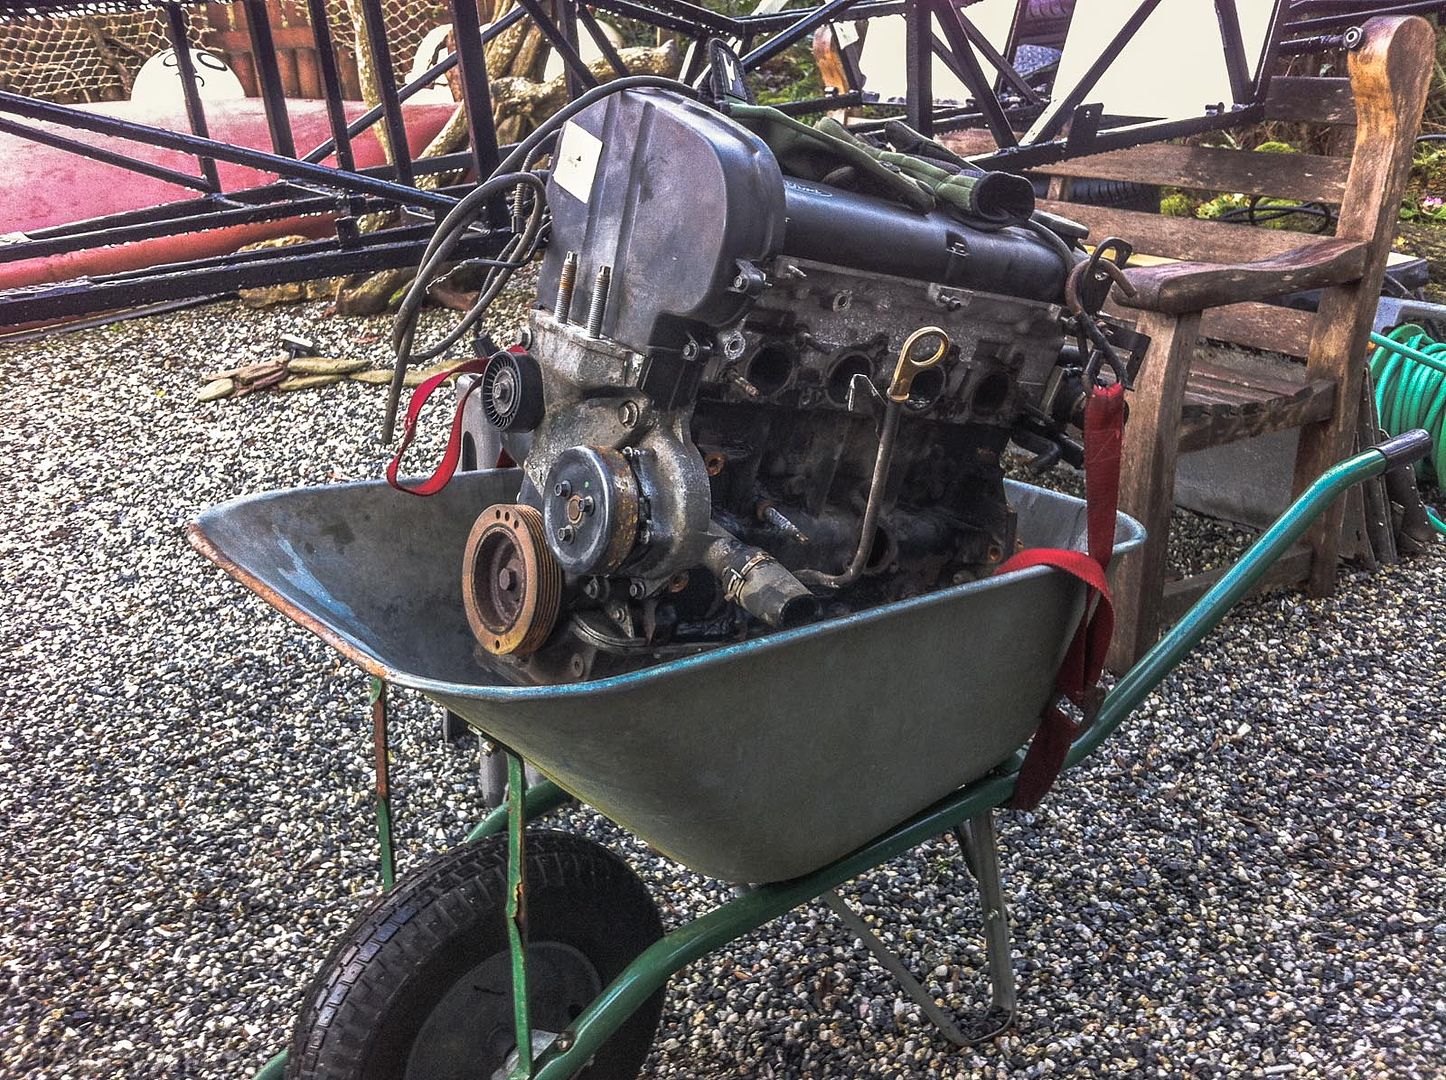
The plan is to strip it down, do anything thats needed to it and get it prepared to fit into the chassis. It had remained in the trailer since purchase and it being far too heavy to carry by hand I started the process of breaking it down in situ.
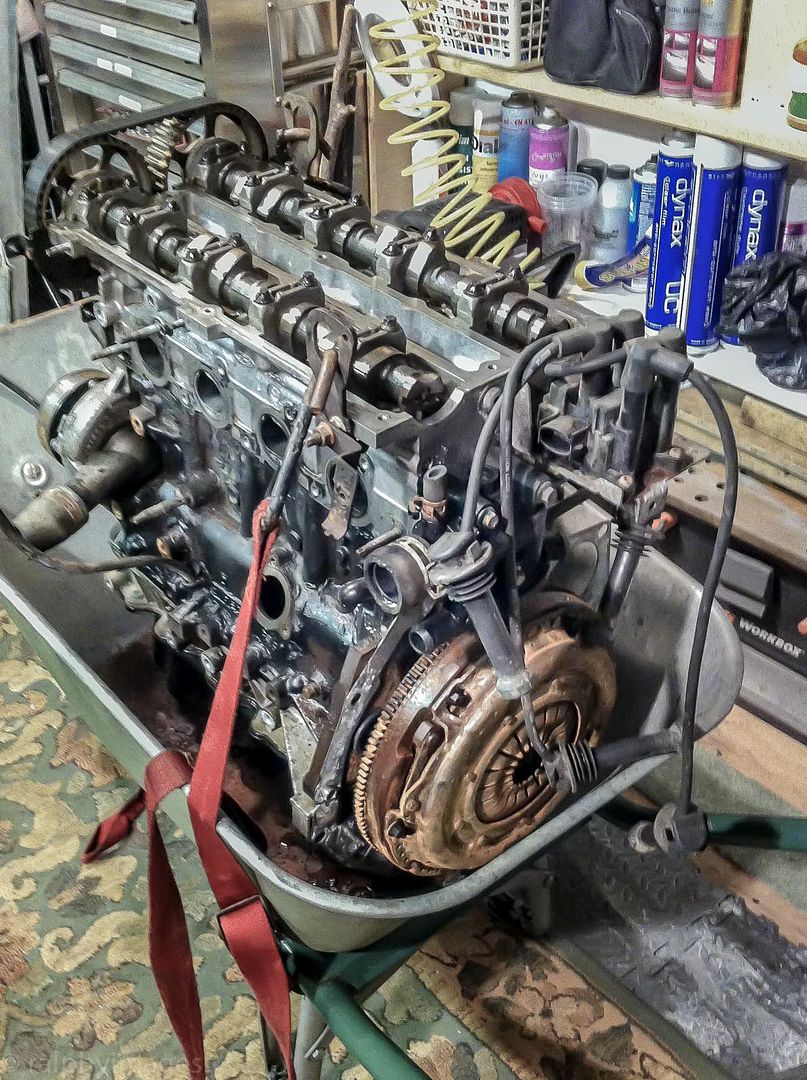
The break in the weather proved to be far shorter than Id hoped and I was keen to get on with the work, so in order to get the block and myself into the dry I dragged it into the wheel-barrow and trundled it to my shed:
But a problem arose: I simply couldnt work out how to physically move it up onto the work-bench. :-( Nothing for it but to carry on the work in situ, so I present to you the new concept: the wheel-barrow work-bench!
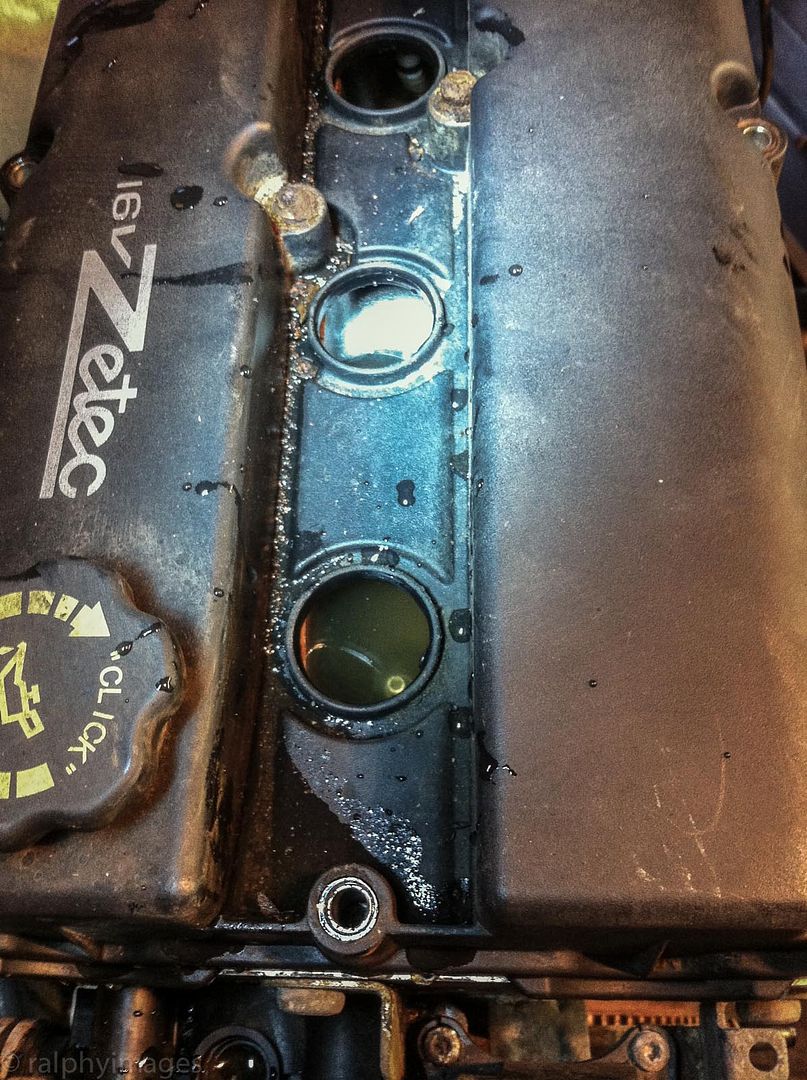
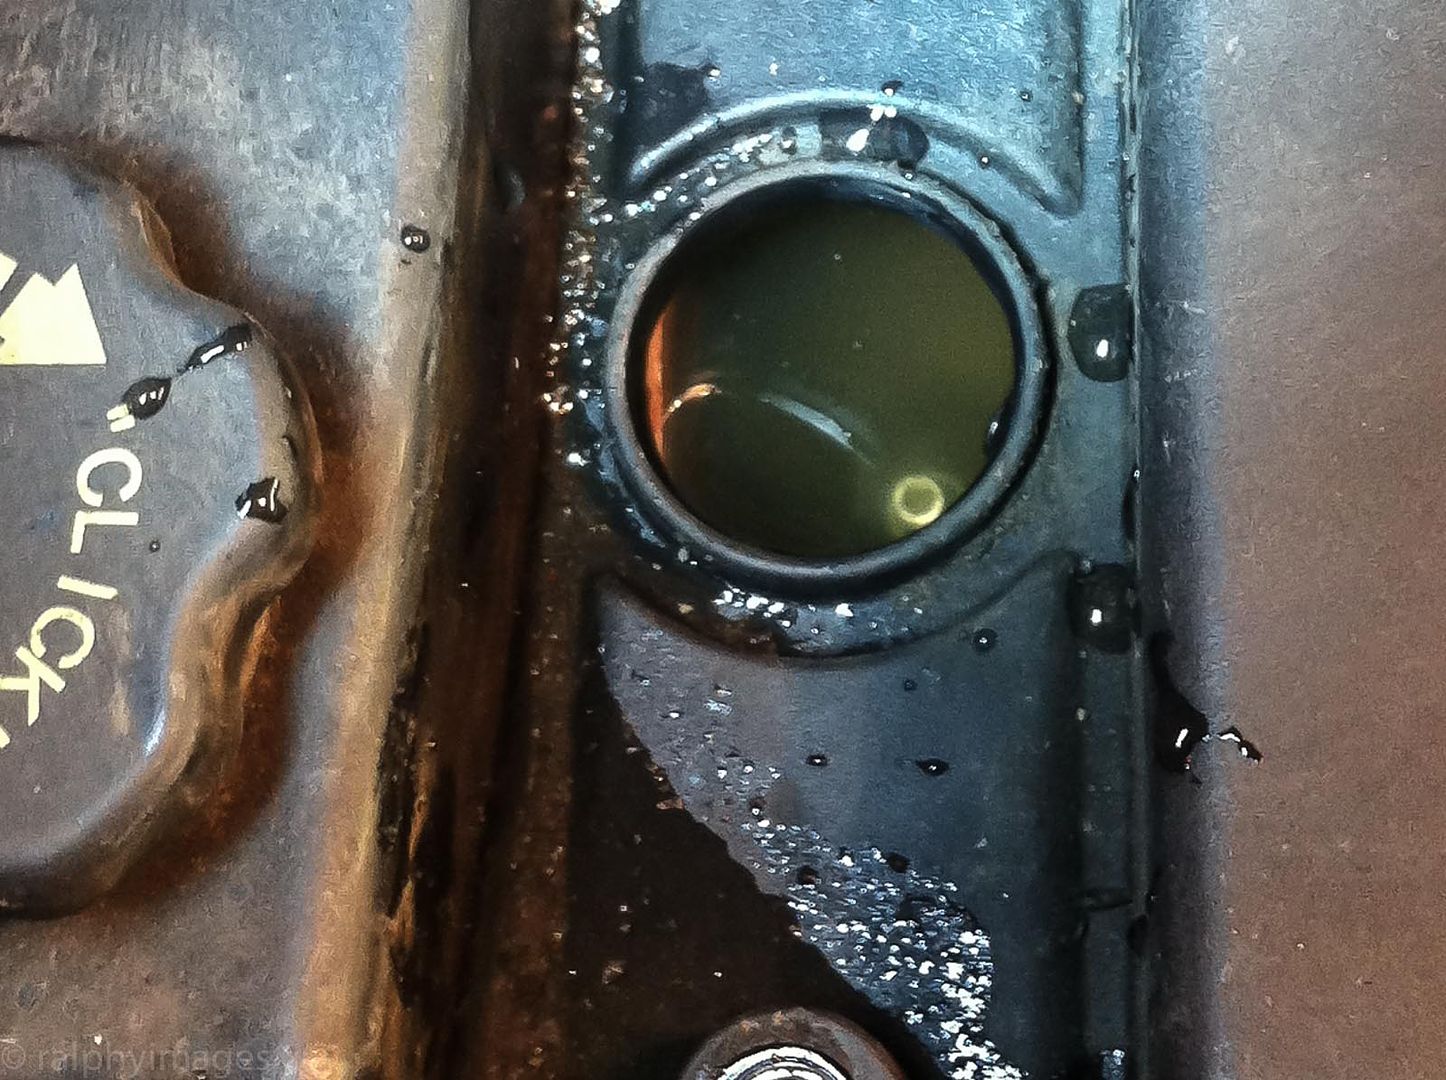
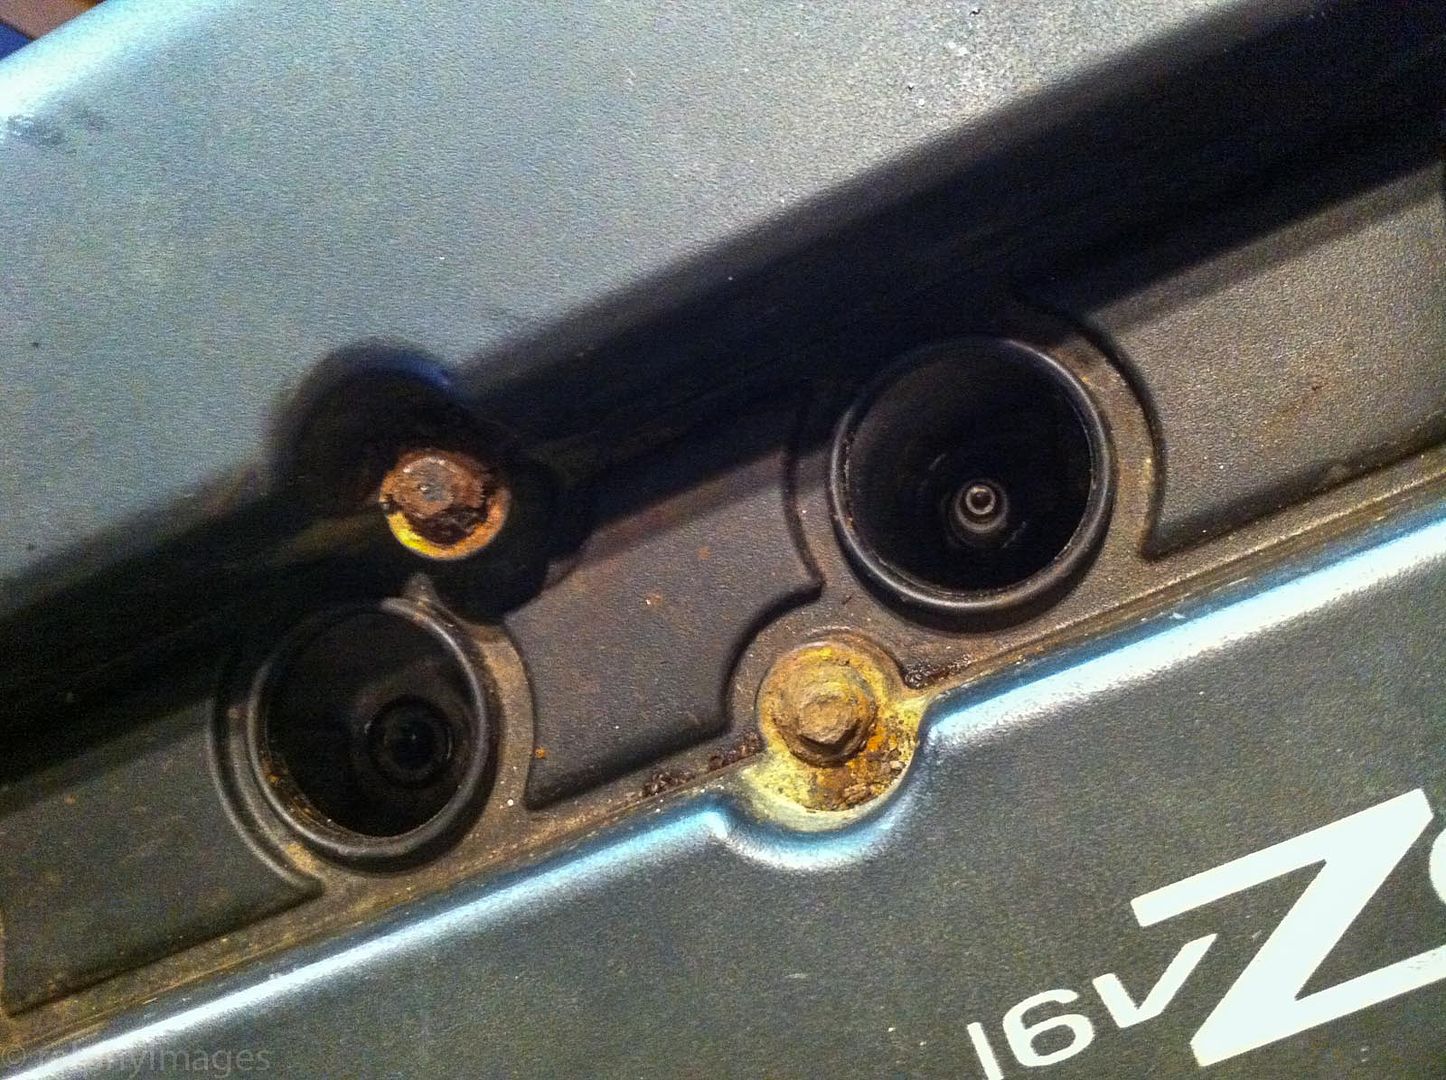
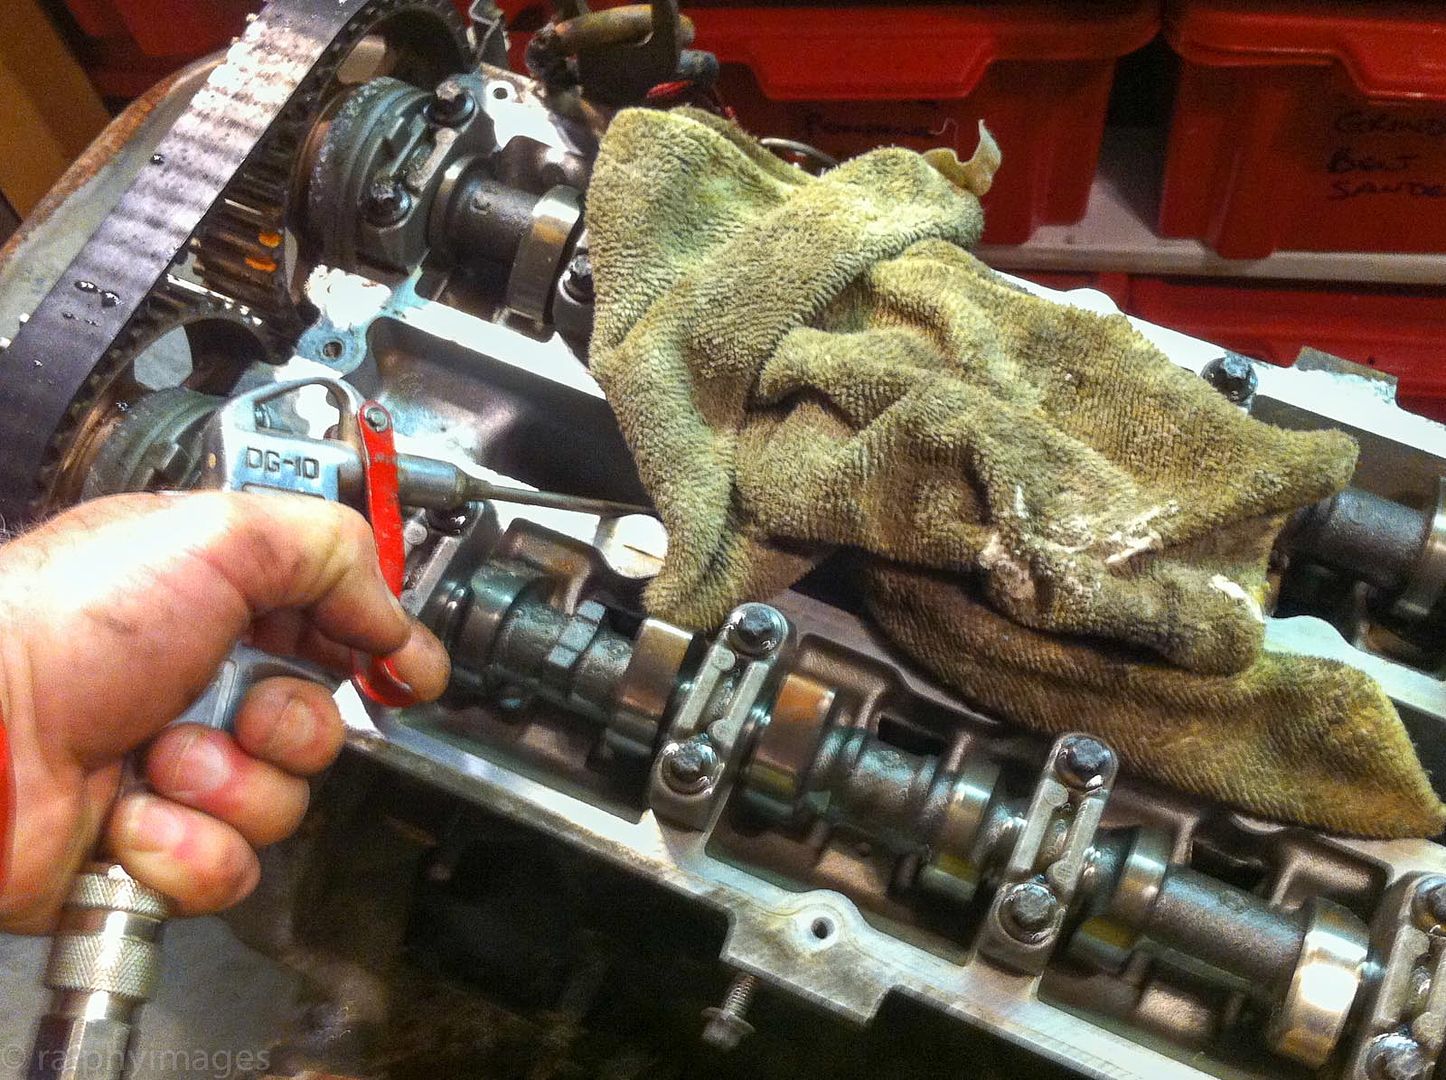
As is so often the case with this sort of work, unexpected problems arise: in this case it was water ingress into the valley that had rusted up two of the bolts holding the head-cover on. (You can see the laying water below the cover here - thats the top of a spark-plug underwater at the bottom of the pic).
As Ive nothing capable of sucking the water out I resorted to blowing the water out with the air-line: messy but ultimately effective.
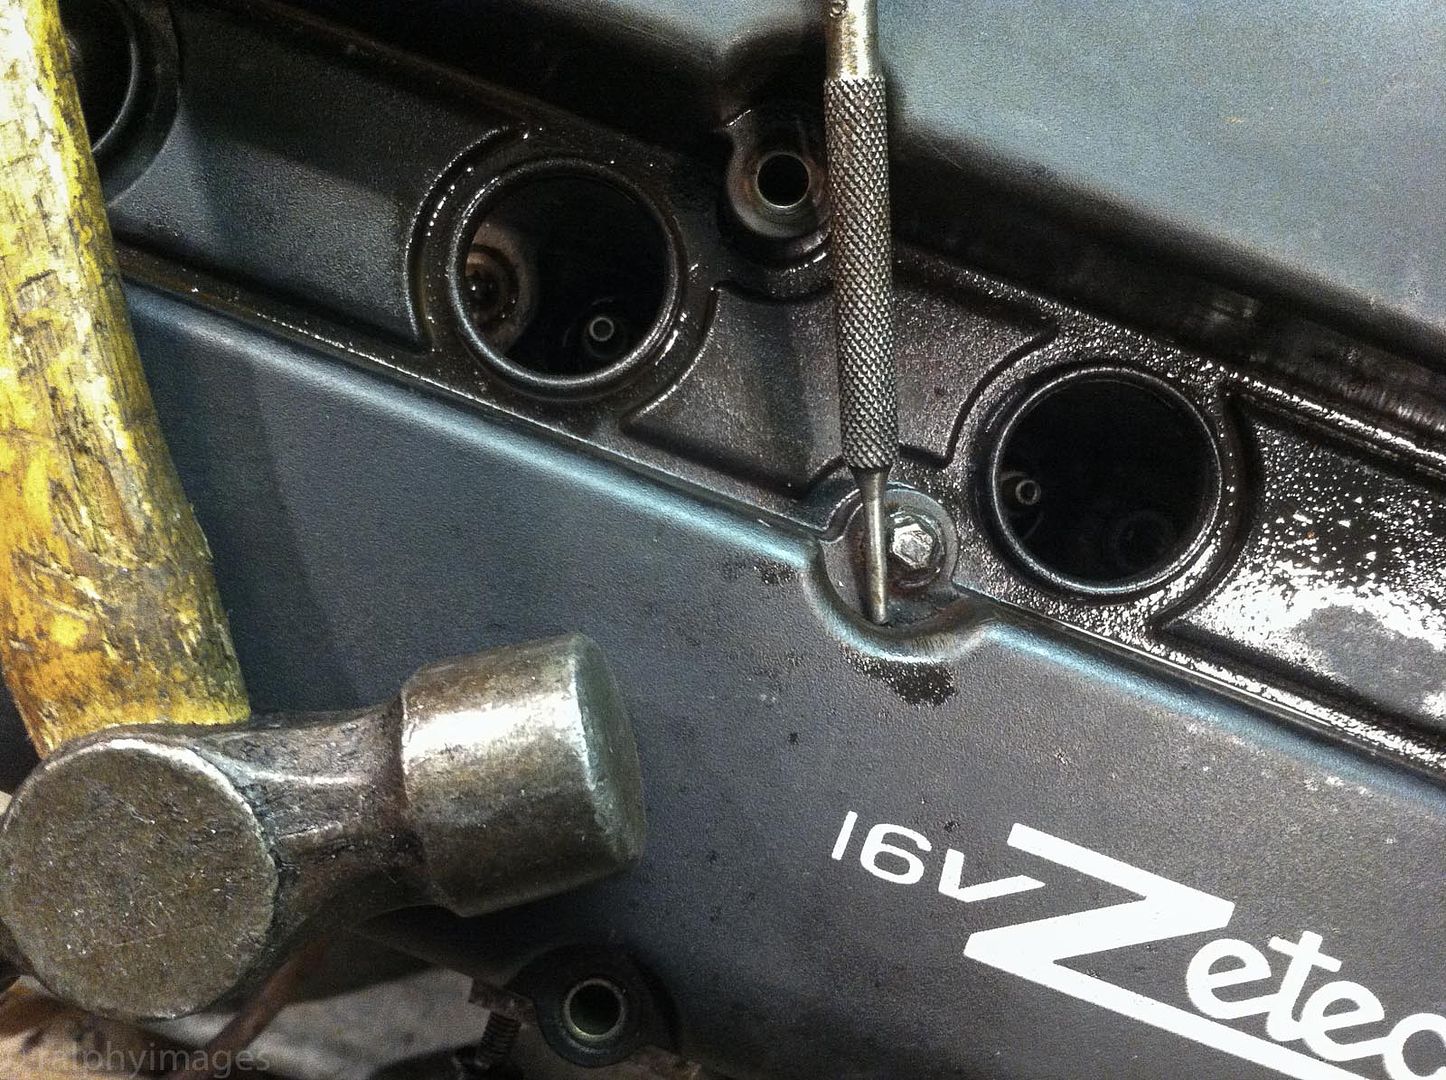
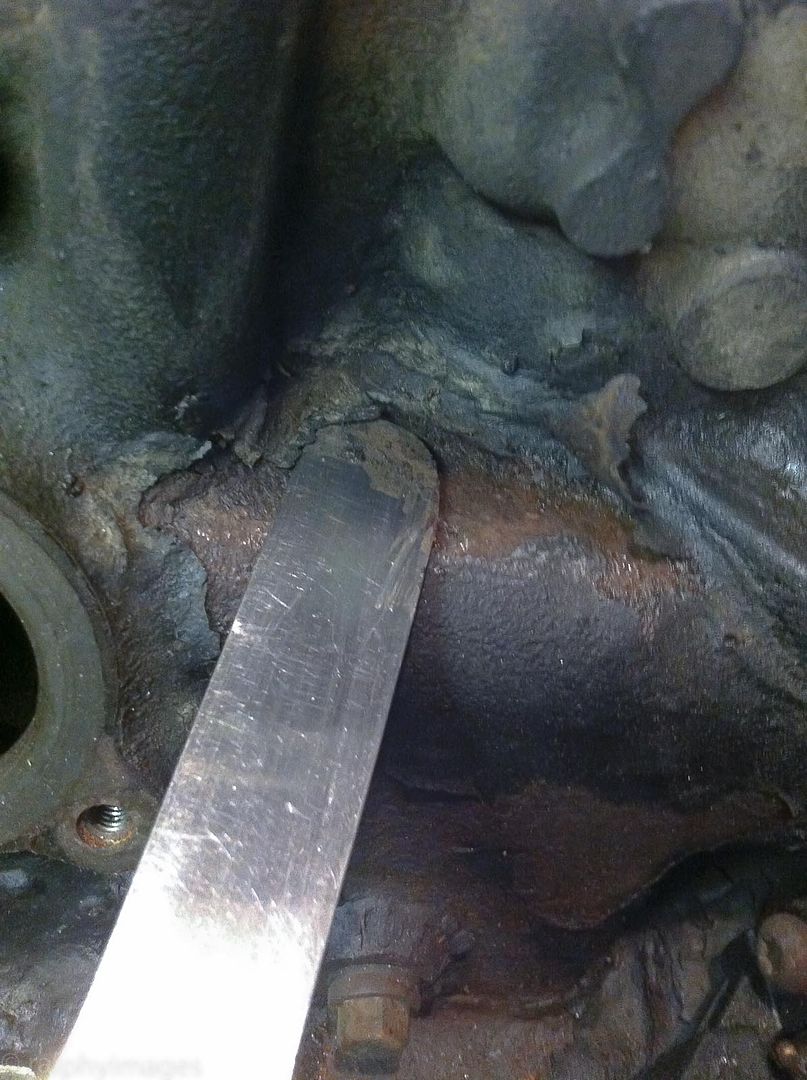
Turning to the two rusted bolts:
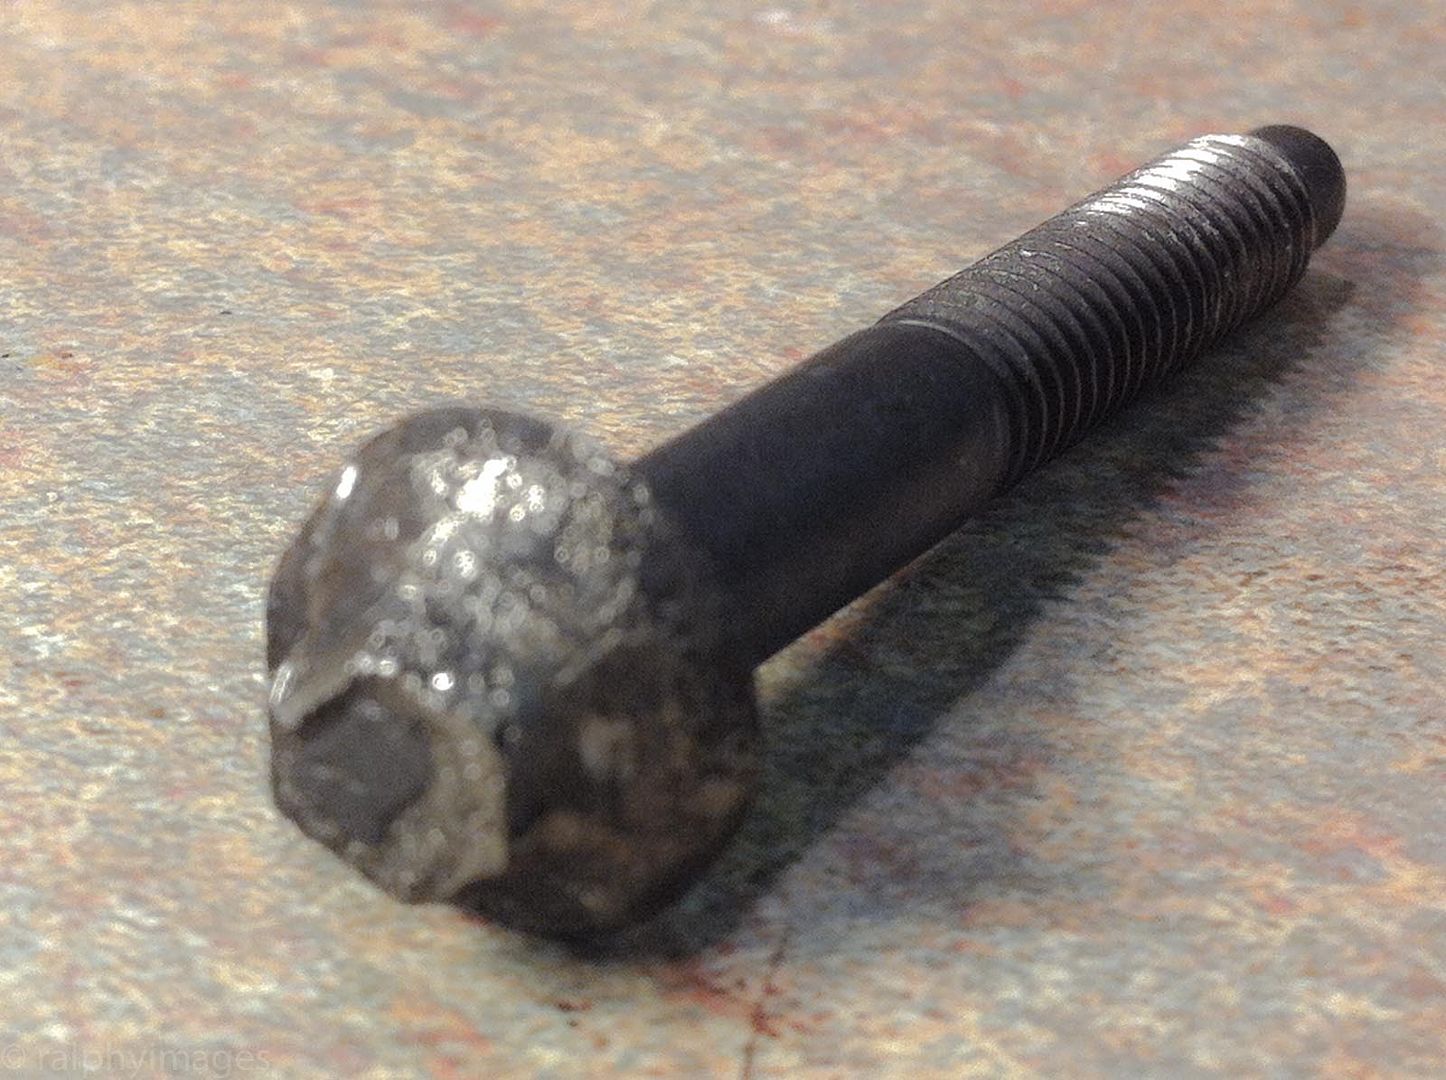
I tried a combination of penetrating fluid, heat and mole grips but to no avail, so finally it was down to a hammer, punch and brute force:
Finally success: the little b*stard that had taken over an hour to shift:
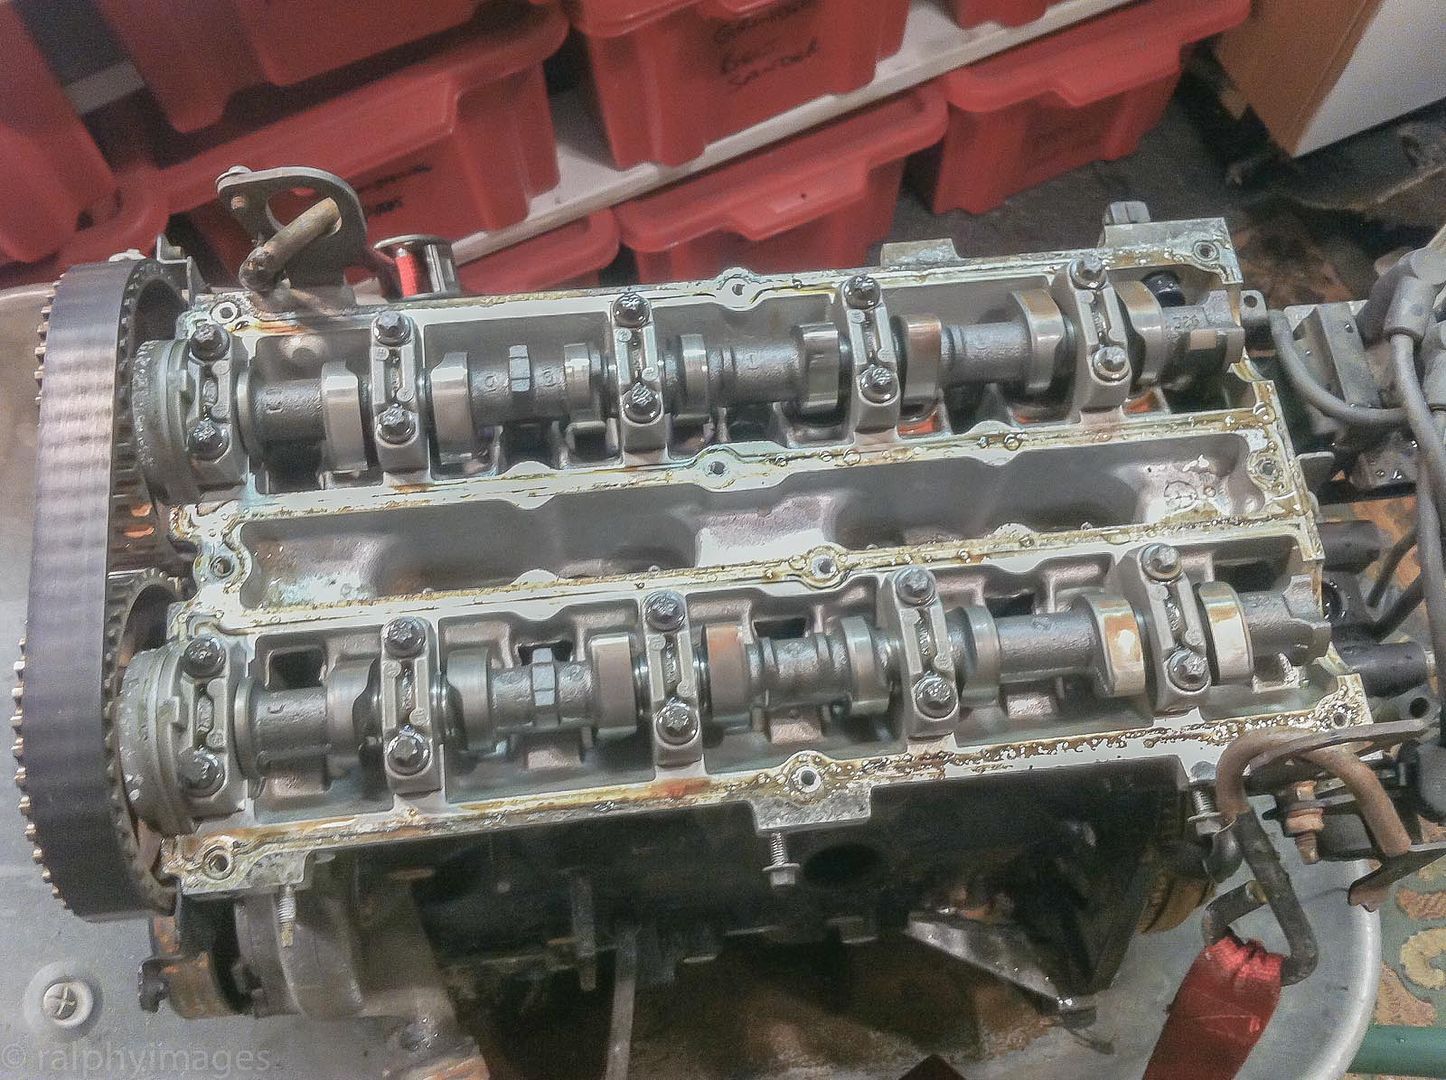
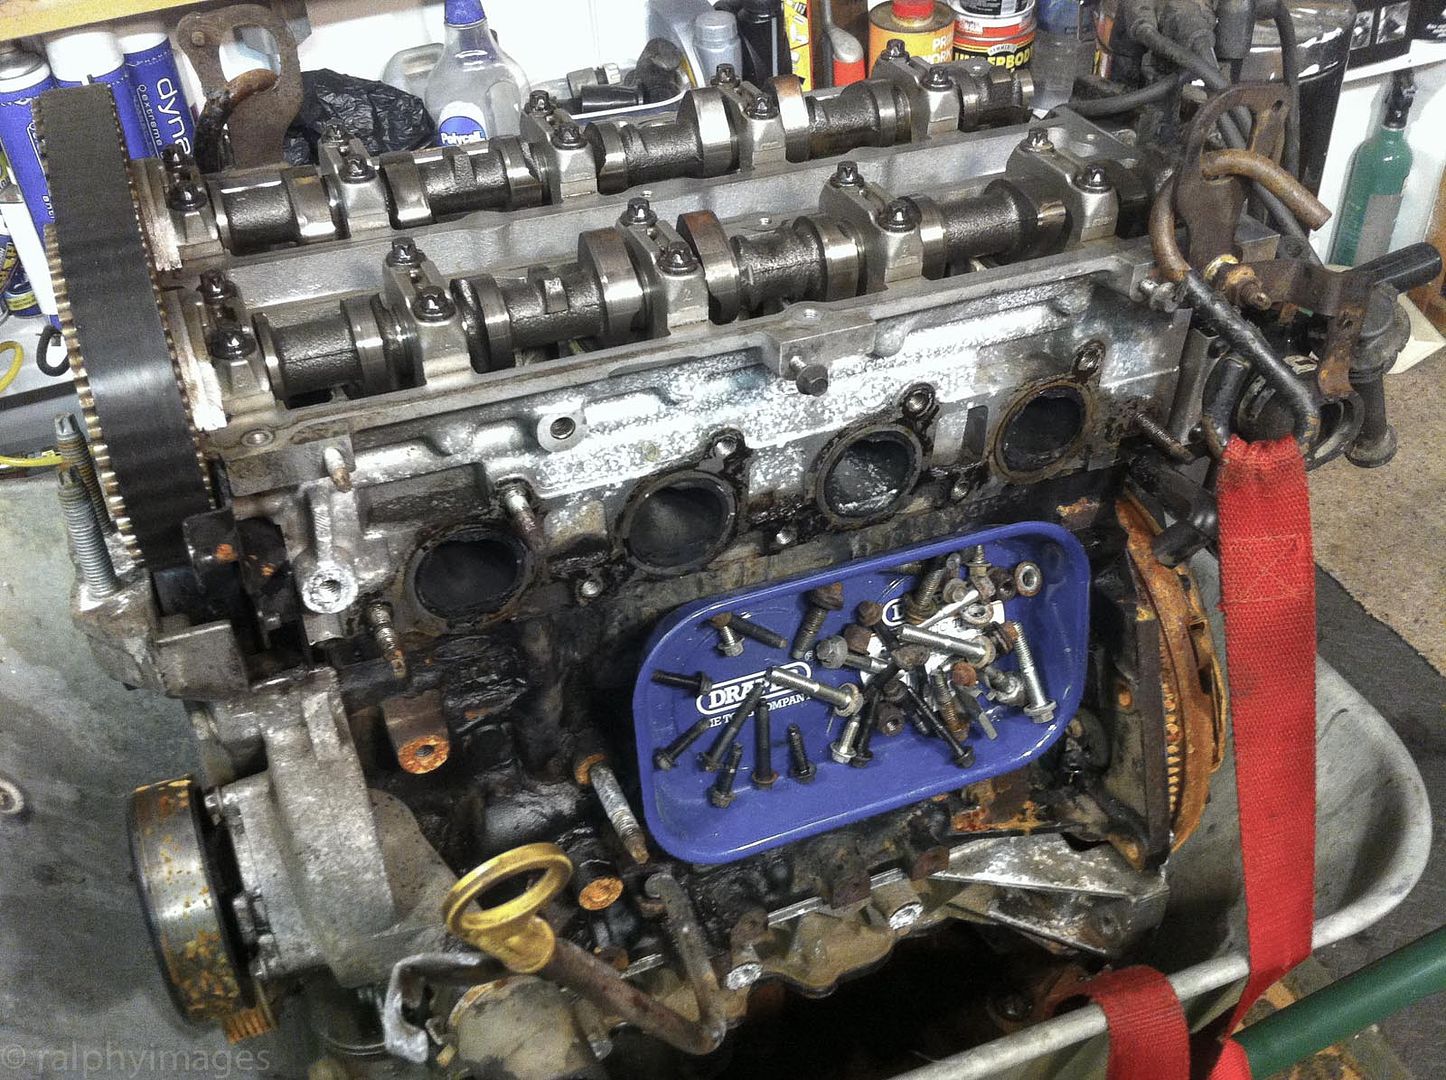
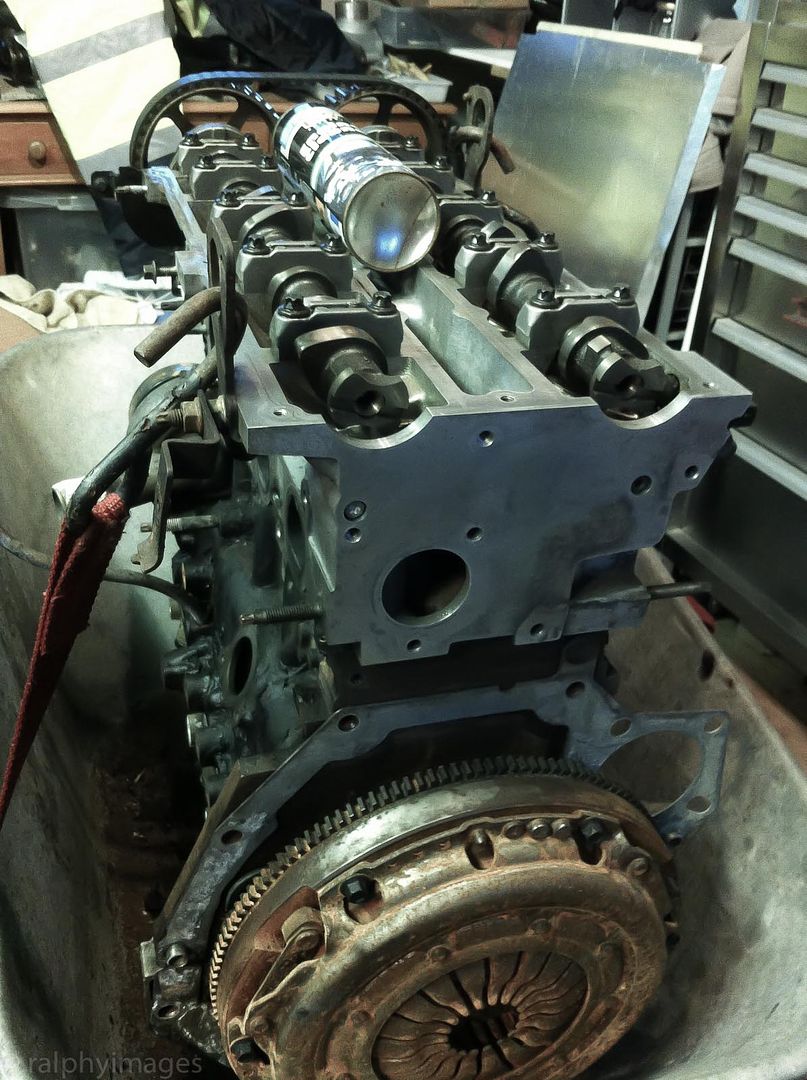
So cover removed and the head in all its glory:
Further removal of the water by air-line:
A brief clean up of the ports:
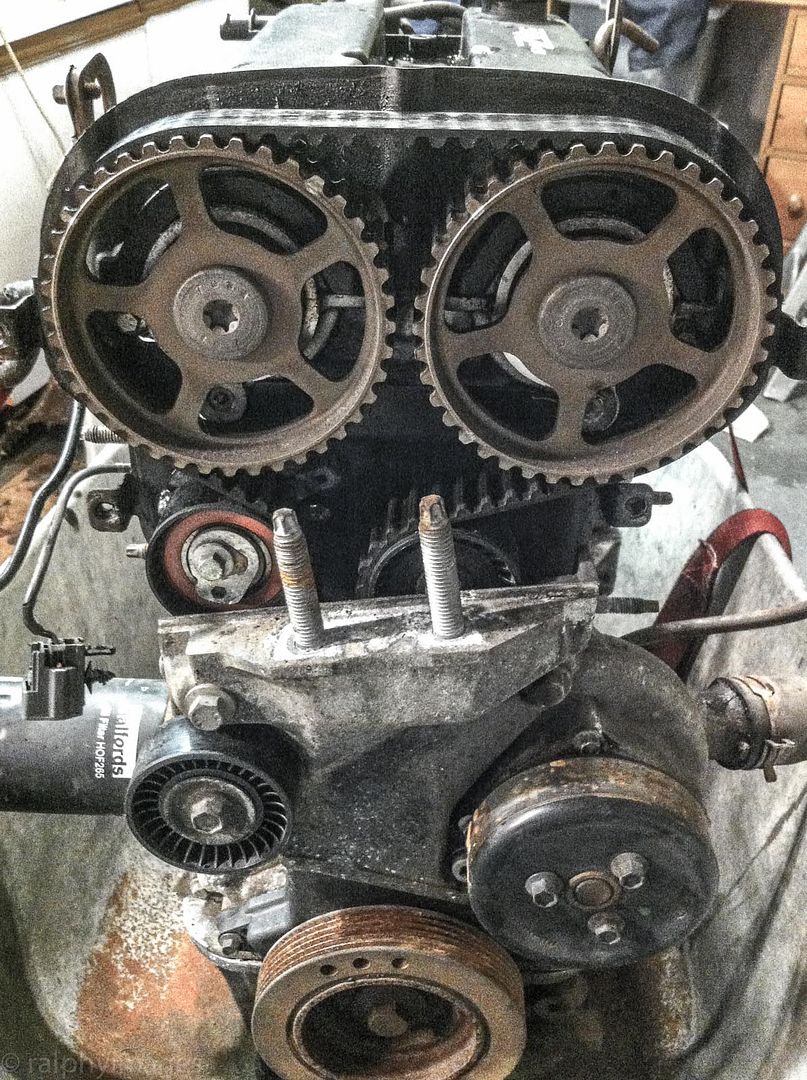
Front cover removed:
And work finished for tonight:
R
Ignorance breeds Fear. Fear breeds Hatred. Hatred breeds Ignorance. Break the chain.
Good to see things moving along Ralph. Re the final colour, I saw a Volvo in town yesterday in that blue colour, and very nice it looked too.
You need a wheeled engine hoist Ralphy.
Cheers,
Neil.
As Magirus said: good to see things moving along! I hope your hand is good again.
I once had the same 'transport issues' with the engine of a Saab 96 (a Ford V4). Very compact engine so I was able to wheel-barrel it in some sort of heavy duty plastic tank used by masons... The hard bit was checking the bottom end of the engine. Guess what part needed the most attention!
When looking at the pics, something crossed my mind: we (the classic car fraternity...) tend to restore the engine at the very end of the rest. Reason: despite liberal amounts of proper lubricant, engines tend to suffer from being unused for a longer time, leading to (surface) rust in the cylinders, dry bearings at staring up etc. Up to 5 months isn't too bad, longer - even up to a year can be a disaster for a rebuilt engine. I'm sure that you've taken these things in account before you decided to start working on the engine.
Menno
- - - Updated - - -
Very nice find! A quality made tool with removable jaws and proudly made in your own country. I am a firm believer in buying American made goods even if they can only be found as old used tools. I myself am looking for a reasonably priced Charles Parker bullet vice made in Connecticut.
Last edited by jk103; 5th January 2014 at 18:06. Reason: posted twice
I’ve yet to see one in the flesh Bob. But when the time comes to get painting I’m planning on chucking the body-panels onto the car, taking some pics and then find someone with the ability to add the Bluestar with Photoshop to see how it looks. ;-)
I do indeed, Neil! I have the offer of one from the guy who will be installing the engine & gearbox, but it’s a big & heavy workshop one and I thing getting it into and out of my shed (coupled with the loss of space around it) would prove counter-productive.
Never assume anything about my planning ability Menno ;-) and tbh I hadn’t considered that point: but fortunately the time-scale should be within 3 months - and I’ve got a de-humidifier available for the shed to help reduce any rust issues.
Interesting you should say that: my chap in the tool trade advised sticking with either British or American-built vices. What I wouldn’t ever buy is Chinese-made; every one I’ve seen has been lousy quality. :-(
A good three hours work today and there’s a bit of change to show from yesterday:
Some more ancillary items removed, further cleaning of the ports and some sprucing up of the water pump:
And one end of the head cleaned up:
The block needs all the old paint and rust cleaned off and I’ll hopefully get that done in the coming days:
Given the weather forecast I’ll leave the chassis for now and press on with the engine this coming week: the plan is to do as much as I can at home & on my own before final disassembly at the specialist’s premises. He’ll be advising on anything mechanical that needs checking or replacing & then there’ll be a thorough clean of any debris before the re-building of the engine.
R
Ignorance breeds Fear. Fear breeds Hatred. Hatred breeds Ignorance. Break the chain.
Wow looking great cant wait to see it finished.
Your photos and Menno's post about the engine put me in mind of the 1980's BMW Formula 1 turbo engines. The engine guys used to trawl scrapyards, buying up engines from cars which had done very high mileages. They would then throw away everything except the block, which would be stored outside in all weathers for at least 12 months, after which they were cleaned up and the bores sleeved (the regs dictated 1500cc capacity).
The theory was that using high-mileage engines and then "weathering" the cast iron blocks would stress-relieve them. These engines, when using qualifying boost, would turn out anything up to 1200bhp from 1500cc.
Although they didn't last long.
Anyway, carry on. I must say that looking at photos of somebody else rebuilding a car during the English winter is much more agreeable than doing it myself! Been there, done that, got the scars, etc!
Although no trees were harmed during the creation of this post, a large number of electrons were greatly inconvenienced.
 Posting Permissions