


 Reply With Quote
Very interesting ... you might consider posting a link to this post in the TZ UK Digital Photography forum - together with more examples of your photos.
Best wishes
dunk


*Go to page three for another, more complex tutorial example*
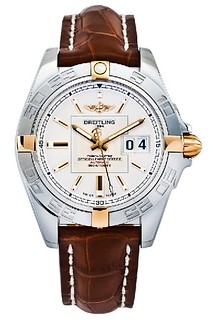
Ever wondered how those almost unreal press images of watches are taken, like this one?
Its a time consuming type of image to get, but nevertheless it is very possible to achieve without spending professional levels on your camera equipment.
It all starts with the lighting:
This complete lighting set can be assembled for less than £1000, yet will give excellent control and power for watch photography. The lighting kit is mainly Lencarta. The camera is a Nikon D90 with a Sigma 150mm macro lens.
The key to lighting a watch, particularly a curved, reflective one such as the Breitling Galaxy, is to do it in stages. First, we compose the shot by positioning the watch on our white paper background with c clips and white tack and framing it up on the camera. You can't see it in the image, but the dial of the watch is facing up.
We then use the two softboxes to light the sides of the case, using the modelling lamps to get an idea of the reflections caused. Set the camera to live view for a real time update of the lighting setup.
The third light with honeycomb grid is used to shine a spotlight on the watch from above and behind, lighting the dial. The translucent reflector diffuses the light - experiment with the angles to pick out detail on the dial and get the watch looking how you want.
We then use pieces of black and white card to minimise unwanted reflections on the watch and bounce light back onto the underside. Being curved and polished, it wants to reflect everything, so propping up the card will help us control that. We can't control every reflection, but we can minimise the amount of work we need to do in post production.
Lastly, we can use more pieces of white card held between the translucent reflector and the watch itself (known as a gobo) to add some gradients to the reflective surface. Holding a thin strip (long enough so your hands arent reflected), see how you can control the tone and gradient of the metal on the case and hands to create a pleasing shape to them.
Now we can take the shot. I shoot in RAW, using live view, and the camera set to manual, aperture around f16. The shutter speed and lighting power on the flashes is then adjusted to suit. A remote shutter release is handy, because it leaves your hands free to hold pieces of card, and you don't knock the camera when you shoot. Some press images are made up from several images, building up a composite of the dial and various elements of the case with varied lighting to create a perfect (although often unbelievable) image. In this instance, just the one shot was taken.
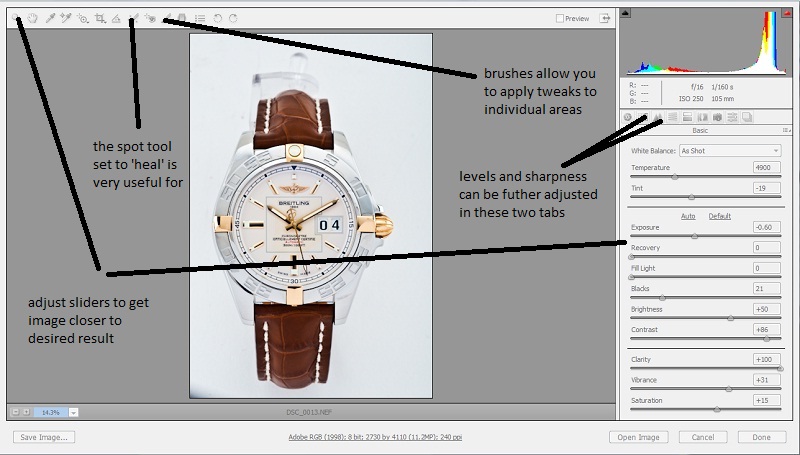
Once you're happy with the image, open it up in Camera RAW:
Adjust the sliders until you see the image 'pop.' RAW images are very flat, awaiting the adjustments to be made in post production, so don't be afraid to whack sliders like contrast and clarity right up.
The great thing about Camera RAW is the ability to edit the image non destructively, ie, the original data is never lost. Do as much work as you can in Camera RAW as it makes the workflow a lot simpler.
The spot tool in Camera RAW is great once you've got the hang of it, allowing the removal of dust blobs (which are inevitable) quickly and easily. I prefer it set to 'heal' mode rather than clone, as it blends the change in. It's a clever tool because if there is a definite line though the part you are trying to heal, as long as you set the target point as an area with the same line, it won't blur the line, but it will heal the dust blob.
The last part of Camera RAW to use is the brushes tool. This allows similar adjustments to the first part of Camera RAW, but in select areas, allowing some further adjustment to the image, again in a non destructive way.
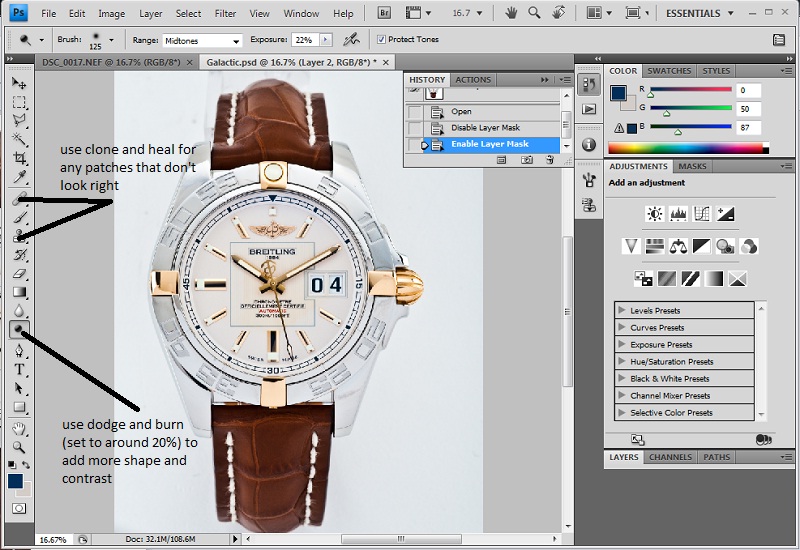
Once happy, we can open the image in Photoshop:
Use the clone and heal tools for any patches too complex for the Camera RAW tools. As well as dust, you can also use it to clean up any unwanted reflections too. Then you can use Dodge and Burn (set very low) to add some more shape and contrast to the watch, darkening the darker areas and lightening the lighter ones. Plain chrome can be quite flat, so it makes it pop a little more.
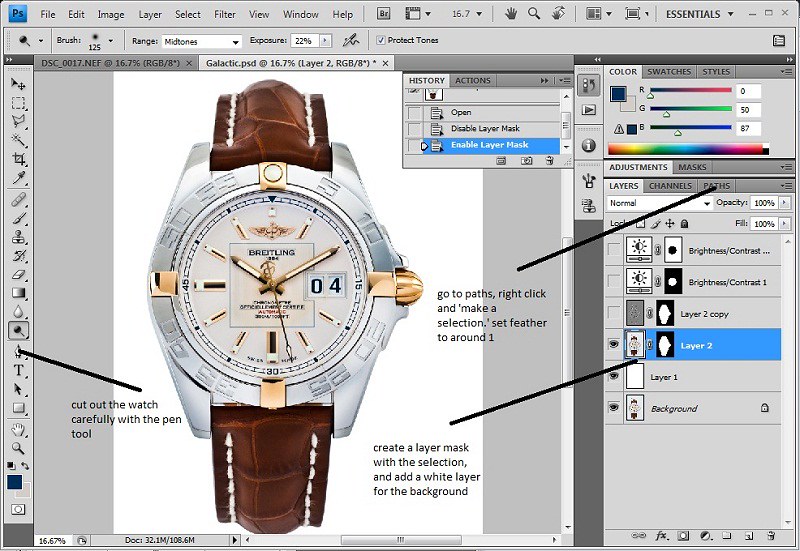
Next we cut the watch out:
Set a solid white layer below your watch layer, then use the pen tool to carefully cut the watch out. The pen tool can be quite tricky to master, but the click and drag to create arcs makes it very quick and accurate when you get the hang of it. Once you've made your path, go to the 'Paths' tab, right click and 'make a selection' from it, with feather set to 1. Use the selection to make a layer mask, and voila, one cut out watch.
Now we can make the final tweaks:
For added definition and contrast, we create a high pass layer. Duplicate your watch cutout, layer mask and all, and desaturate it. Then, go to 'filter,' 'other,' 'high pass,' and select 10. Set the layer blending mode to 'soft light' and opacity to 50%.
Lastly, we can balance out the dial and case with two layer masked brightness/contrast adjustments, bringing them more into line.
And that's it!


Very interesting ... you might consider posting a link to this post in the TZ UK Digital Photography forum - together with more examples of your photos.
Best wishes
dunk
"Well they would say that ... wouldn't they!"

Impressive. And it makes me feel better about my dodgy pictures :mrgreen:
As simple as that eh? :wink:Originally Posted by 24/7
You got it :wink:
Will do!
Dear God! Now I know why all my pictures look rubbish... I'm a point and click merchant
These aren't press type photos - they are called pack shots. A set formula for a flat shot.
Many moons ago in another life i used to do at least one a week, amongst other advertising work, for those packets on supermarket shelves.
For instance, Greens cake mix, every picture on a packet of greens cake mix was taken by me :D
Gingham table cloth, in the colour to match whatever cake mix packet was in the shot, big fish fry light, 5x4 sinar, bish bosh. Next.... :D
Don't mention bernard mathews turkeys :drunken:
Very interesting.
How do they take pictures that you can rotate around 360* ?
http://www.jurawatches.co.uk/products/b ... tch-bm-063
I presume the watch is on a rotating platform and the camera takes many shots which are then spliced into an animation?
Is this something the home photographer can achieve ?
Carl
Bang on. You can get kits (we have one) with a rotating table that plugs into a computer. The software, also plugged into the camera, then rotates the table whilst taking images, and then stitches it all together.
Technically, with a tripod and rotating platform of some sort, you could mark on even intervals to turn the watch around on and take a pic for each position. You could then make a .gif or a flash file with the images.
The watch industry (with a few exceptions) seems to use these types of shots for pack and press shots. Makes for a rather dull inbox sometimes!
Very good. Should be made a sticky in the proper foum.
Speaking of panoramic shots; I bought one of these - they are great fun.
GoPano
http://www.gopano.com/products/gopano-p ... technology
If you have an iPhone you can make similar 360 panning shots with the free Photosynth app too, plus it lets you save the shot as a single panoramic image
I have that, it's great fun. Output into your photo library and into photshop for tarting up!!!
A company called Outsphere 360 (no connection to me) have just started up a commercial service for 360 degree shots aimed at web sales, if I remember correctly a 50 shot animation costs around £85. Might be useful for the ultimate Sales Corner post :lol:
The normal model is to send them stuff to photograph but their facility is in St Albans therefore they might accept hand deliveries from someone local. Link will take you to their sample gallery
http://outsphere.co.uk/gallery/
Elsewhere on their site is a video showing how it's done
regards
grant
I also have the capability to do this, I've completed a job for a sports wear company shooting their products as 360 objects. Also done it for a shoe company.
Good article on the watch photography. I've seen multi shot set-ups were different light set-ups are used for different parts of the watch with all the files masked we're appropriate and bought together in the final shot. Rarely is one light set-up suitable for all the watch.
I've also used focus stacking as well to shoot watches.
Ash
These links show videos of watch shoots. The first is a 40min video showing multi shots with different lighting for different parts of the watch.
The second video shows the post production involved in professionally retouching the images and combining the different exposures.
The shoot: http://www.youtube.com/watch?v=1LzpD...e_gdata_player
The retouching: http://www.youtube.com/watch?v=_TjYncOgE7M&sns=em
If anyone is interested I have a 1 hour 20min video from one of the worlds top jewellery and watch retouching artists that walks through the retouching of a Rolex Datejust for the Rolex catalogue. The file is over 1gb though.
If anyone wants it pm me by 23:30 and I'll send it via yousendit to all the email addresses I have by that time.
Ash
Yeah, Breitling in particular seem to make their press images from many, many images, with different portions of the case and bezel being lit separately. There is a point where it starts to look too fake though! I usually limit to a maximum composite of a separate dial shot, but only if I can't light the whole thing as one.
These are very good, I absorbed these a few months ago. Between these and the book 'Light: Science and Magic,' there isn't much else to learn about lighting!
Interesting. Thanks for the tutorial.
Always wondered how they did that - very informative and interesting
Snap! Exactly the same, except substitute Pharmaceuticals for cake mixes... and a curved light table.
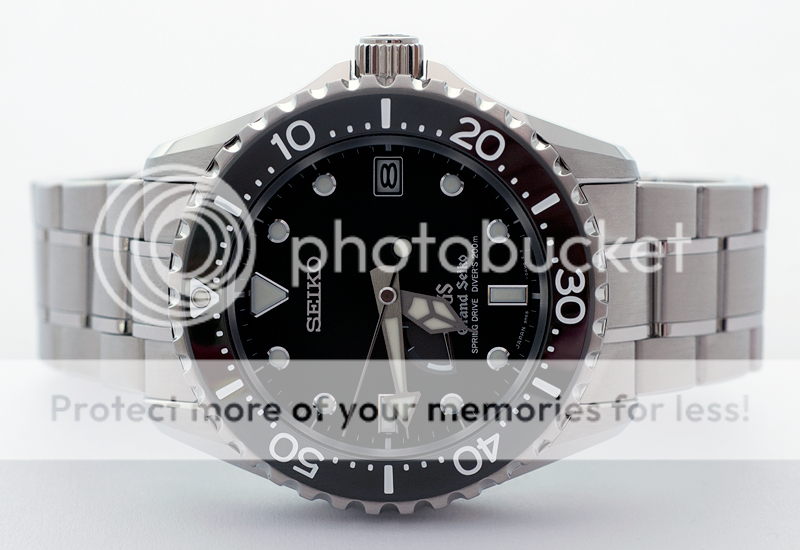
As has been said, for a pack shot perhaps, although the dial on your seiko shot would be too dark (I know, I know, it's a black dial) :D and the shot doesn't really have any 'pizazz'
The brochure shots for all the top brands are multi-shot,multi-lit and focus stacked (although utilising tilt from a technical camera would help in this regard). If you deconstruct the interplay of light over the brochure shot watches as well as the depth of field you'd realise they would be impossible to light or shoot in one shot with those results.
This shot of mine is focus stacked, the clasp is in focus as is the dial along with everything in between. One shot of this watch, even at a high aperture, would not yield near and far focus like that. This was 7 images:
At the extremes, this was the clasp shot:
And this, the dial shot:
Ash
Great tutorial, but I think I'll stick to my point and shoot technique :roll:
The most trouble I went through to photo watches was to stick them in a closet, leave the camera on a tripod and set it up for 30 sec exposure. Other than that, I'm happy to shoot away until I get a decent photo. Suffice to say I'm not fussy!
+1
I learned from this well-thought-out OP that lighting should be carefully adjusted to suit the watch shape, surface materials, and so on. My own tendency has been to find a set-up that "worked" and barely ever change it. Never was good on attention to detail
Thanks!
Now that is certainly getting it right! Looks great.
This was one of the most informative posts I've read in a long time. Really nice. Now I know why the pros get such great results and I can appreciate all the effort that goes into getting a good shot. But I have to say sometimes I get pretty similar results with my " poor man's studio." I first remove the clasp links and lay my watch flat on a white sheet of paper which is positioned on a cookie pan on top of the stove. My main lighting comes from above via the exhaust fan light. Additional lighting comes from a flashlight held in my mouth and a third light source comes a headlamp. Any glare or shadows are handled with a sheet of paper in my left hand. A little tricky when the burners are on, but it works.
Stunning watch AND photo!
Thank you so much for the excellent tutorial.
Regards,
km9
Thank you! The full on Rolex/Breitling etc press shots go even further than that, with many photos and lighting arrangements all combined into one composite image, which then has extensive retouching done...!
But it's more of a feeling of achievement when you create a beautiful shot with more basic equipment, I have to say.
As a follow up to my previous post and a response to discussions regarding composite photography, I have picked another example that required several shots to be lit and taken separately to complete the final image. I have assumed that you have read our previous tutorial, so I have not described the processes in as much detail. If you are unsure how to perform a certain step, the answer should be given in my previous post, however please do ask if you still aren't sure.
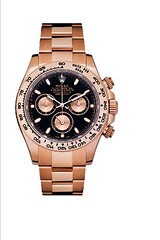
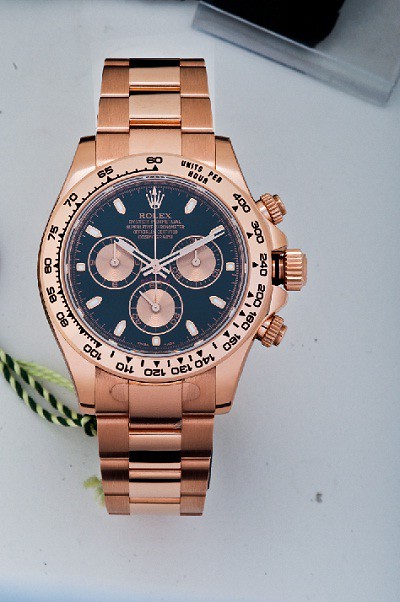
Anyway, today's subject is a Rolex Daytona in rose gold with a black dial. A black dial makes things more complex, because without the correct lighting, a black dial looks white and washed out with glare. The problem occurs when lighting to suit the dial; the lighting doesnt then suit the rest of the watch. The solution? Composite imagery. This will be the image we want to end up with:
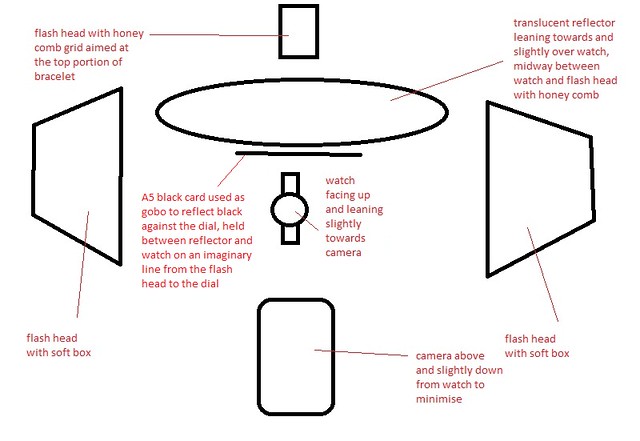
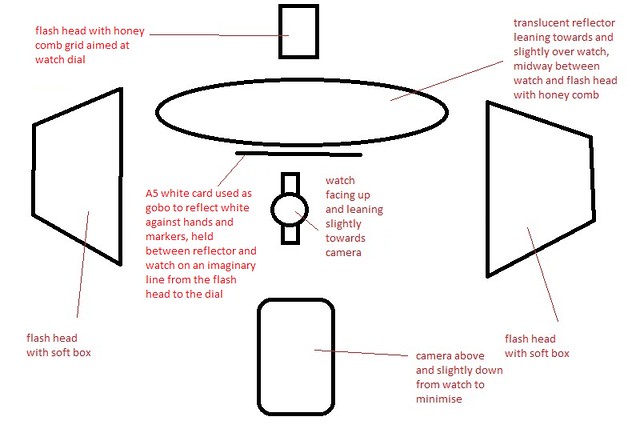
First of all, we need our images. The first shot I took was the for the case and bracelet, which is a mix of brushed and polished sections. With the watch on its back, angled slightly towards the camera which was held above and slightly below it to minimise reflecting itself, I used two softboxes on either side and one honey comb grid aimed from diagonally above and in front of the watch dial, pinpointed at the top portion of bracelet. This is so the direct light was not in the angle of incidence/reflection to glare directly onto the dial and cause horrible flares and artefacts in the image. Don't forget to pull the crown out too, otherwise compositing the images will impossible!
I then used a translucent reflector mid way between the honey comb grid and the watch, angled towards the watch to achieve the right 'softness' from the light. Moving it towards the light gives harder contrast and blown specular highlights, moving it away gives smoother gradients and transparent highlights. I wanted something inbetween the two.
I then used A4 pieces of white card above and below the watch (propped up on the table) to clean up the reflections on the watch, giving smooth gradients with no odd shapes. It takes a bit of fiddling to get the reflections right without blocking the light altogether, so don't forget that small imperfections can be edited out afterwards.
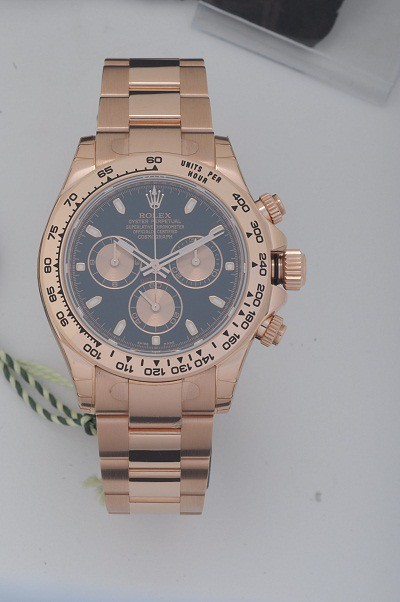
I also used two thin strips of black card, laid above and below the watch and slightly behind the return of the bracelet, to add a solid line of black on the polished bits and a dark gradient on the brushed bits, giving it shape and contrast. This is the setup and the resulting shot:
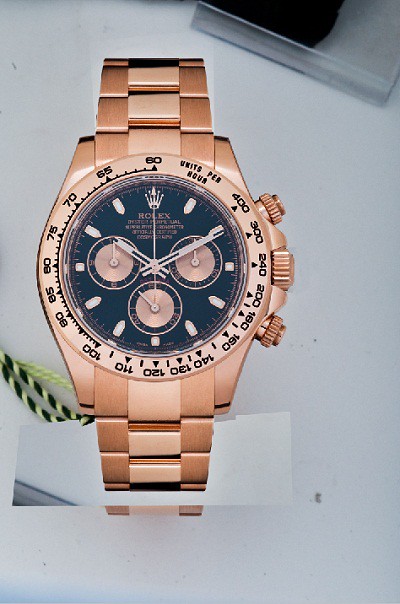
As you can see, the case looks ok, the bracelet looks ok, but the dial looks flat and washed out. This will form the basis of our next shot. The lighting setup is very similar, but this time we do away with all the card except for a single sheet of black. We use the black to catch a reflection in the dial, removing the glare and giving us a nice, deep colour (or absence of!). The area of reflection is found around the angle of incidence/reflection, a line mirrored from that between the camera and the reflective surface, which should be just slightly above the path of light coming from the honeycomb, which we aimed just a bit before the dial onto the bracelet. The setup and shot look like this:
So now the dial is black, but the reflective hands and markers are too - we could use the hands and markers from the first image, but they are too flat, with no contrast, so a third image will be required.
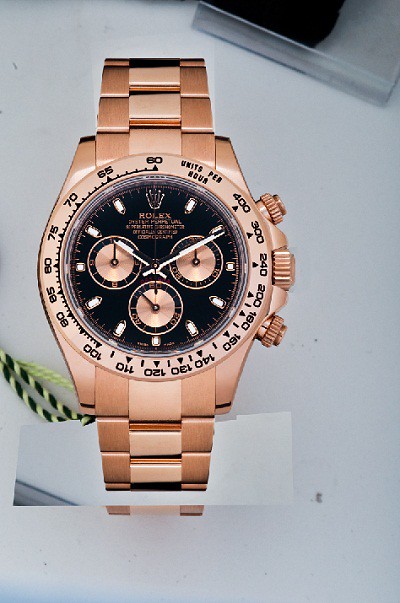
This time we aim the honey comb directly at the dial, and use a white card instead of a black card to reflect against the markers, holding it in the same place as we did with the previous black card. This serves two purposes - we get a nice rich gold colour on the hands and markers, and we also use it as a gobo to block some of the light, cast a shadow and create a contrasting gradient on the underside of the hands and markers, removing the flatness we saw originally and giving the markers some shape. The setup and image end up like so:
Next we open the images up in Camera Raw and adjust the sliders to bring out the colour/contrast etc, and open them in photoshop.
Starting with the case, use clone/heal to tidy up dust/smears, remove any unwanted reflections and then use dodge/burn to bring out the shape even further. We then have this:
Before we move on to the dial, several issues need to be addressed first. The crown needs to moved in with some cutting and cloning, but more complicated is the lower part of the bracelet.
For a consistent look on the bracelet, it is easiest to copy and mirror the top half. The reflections are even and tidy on the top half compared to the bottom half, which is a little untidy. With the top half copied and mirrored, its a case of using transform and cloning/healing to make the bracelet fit correctly. Here is the result:
Next up is the dial. A simple bit of dust removal and a layer mask from a circular selection (feather of 1) sees the dial dropped in place:
Then we add the hands and markers. Again, use a layer mask, using a brush to reveal the hands and markers on the dial, like so:
Last of all, we cut the watch out with the pen tool, creating a layer mask and adding a white layer below:
Done!
 Posting Permissions